Now that I have been working in the Azure cloud environment for a few months with my new job, I have come to the realization that there is one thing related to Azure SQL Server instances that annoys me more than anything else in the Azure environment. Obviously every cloud environment is going to have its pros and cons, so this is only one small problem from the whole ecosystem. Azure has a lot of nice things to work with, so this complaint is very superficial, but I know others at my company have been confused by this issue so thought I would share the annoying difference here for educational purposes.
On-Prem SQL Server Permissions
The one thing that has been driving me crazy about Azure SQL Server instances recently is that there is not an easy way to quickly get an overview of the permissions a user/account/group has on the server and database.
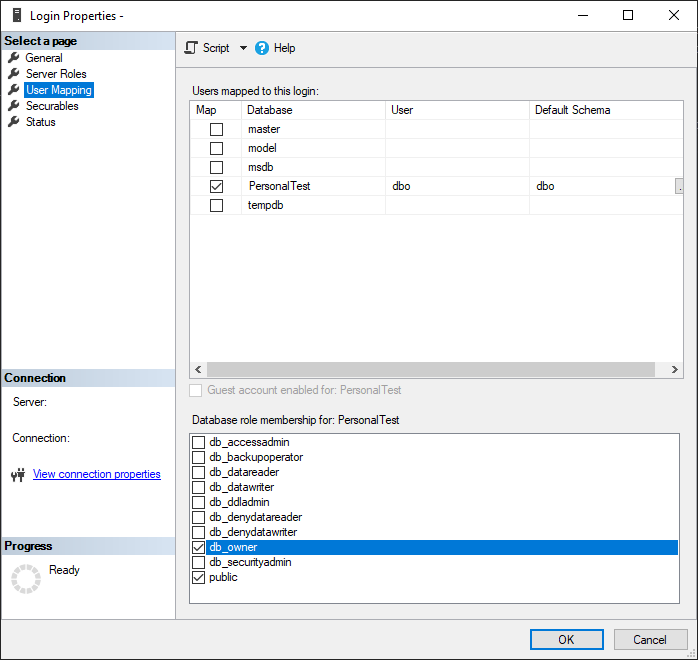
In on-prem/normal versions of SQL Server, you can open the “Security” section of the server or database then right-click on the user or group you want to review the permissions for, and then you’ll get a GUI that quickly shows all the server- or database-level permissions that user has. The following screenshot shows the Server Roles for a given login on my local test server, so you can quickly know what permissions the login has.
And then if you go to the “User Mapping” page of the Login properties, you can see any databases the login has access to as well as the permissions that user has on the database.
I love this interface that I’m pretty sure has been around for decades. It’s so much easier to view and quickly change the permissions for a login/database user that new new system in Azure-based servers.
Azure SQL Server Permissions
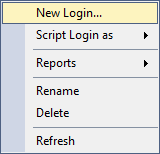
In comparison, you can’t easily view or determine the server- or database-level permissions any login or user has on an Azure-based SQL Server. You can’t even view any general properties of the user like you can for on-prem installations. For example, here is a screenshot of what you see on an Azure SQL Server when you right-click a Login from the Object Explorer:
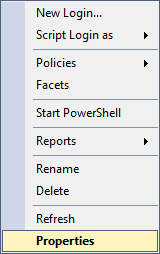
If you do the same thing on the on-prem SQL Server, you can see that there’s an option to view the properties of the user, which will get you to the menus where you can see server- and database-level permissions, along with other properties as well.
If you can’t get a nice GUI representation of those login permissions, how are you supposed to know what permissions anyone has on your server or database? A SQL query.
While that kind of makes sense for a platform where you do most of your work with SQL, it does mean you need to do more work to write or track down a copy of the appropriate SQL query to get the necessary data, instead of to right-clicking on an object and have its information displayed to you immediately. The SQL query you need to get permissions information is also tedious to me because you can only do it for a single database at a time instead of being able to quickly view the permissions for every database on the server in one place. For example, if you have 3 databases on your server, you need to run the query individually for each of those databases. You can’t even utilize the “USE [database]” statement to quickly switch between the databases and get all the results in a single result pane (if you want to read more about that, I have another upcoming post to discuss that topic).
This is the query I use to review database permissions:
SELECT DISTINCT pr.principal_id, pr.[name], pr.[type_desc],
    pr.[authentication_type_desc], pe.[state_desc], pe.[permission_name]
FROM sys.database_principals AS pr
JOIN sys.database_permissions AS pe
    ON pe.grantee_principal_id = pr.principal_id
ORDER BY pr.name;
If you want to view the permissions at the server level, run that query on the master database. Then to view the permissions specific to a single database, you will need to switch to that database (using the database dropdown from the toolbar above the query window, or updating your full server connection to specify the other database).
To view the role assignments for users in your database, you can use the following query, which utilizes the views sys.database_permissions, sys.database_principals, and sys.database_role_members to gather all the useful information related to role assignments.
SELECT u.[name] AS [UserName],
       r.[name] AS RoleName
FROM sys.database_principals u
     JOIN sys.database_role_members drm ON u.principal_id = drm.member_principal_id
     JOIN sys.database_principals r ON  drm.role_principal_id = r.principal_id
WHERE u.[name] = N'TestUser';
Summary
While it’s not hard to get all role assignments and assigned permissions for logins and database users in Azure SQL Server instances, it isn’t as easy as it used to be with on-prem servers. I don’t think the new method of getting the permissions gets the information you need in as useful a way as the old method of using the GUI. I personally don’t prefer having to scroll through a table of information about each user and deciphering the details of their permissions, but I will continue to deal with it since that’s the only option for Azure SQL Servers currently.
I recently went through a whole day long ordeal trying to figure out how to get the ISO/installer for SQL Server 2022 so I could install it on a few VMs I made for a software upgrade, which I wrote about in a post last week. After spending way too much time just getting the installer downloaded, I then ran into another issue where when I clicked on the link to do a new installation of SQL Server 2022, the link did absolutely nothing. The solution for this problem ended up being simple, but it had me scratching my head and bothering my teammates to try running the installer as well before I figured out what needed to be done.
When you run the setup.exe or installer for SQL Server 2022, and select the option for “New SQL Server standalone installation or add features to an existing installation”, the software may do nothing when you click that link. It may have a spinning cursor for a small moment, but then nothing happens at all, no matter how long you wait.
The Solution
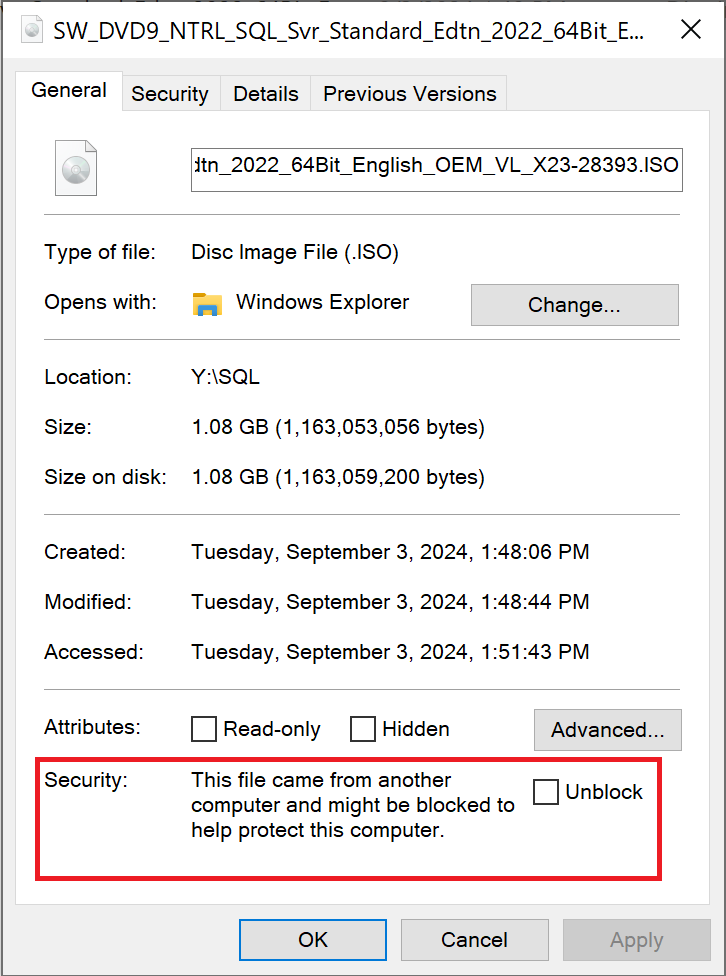
I found the answer to this issue on StackExchange. When I first downloaded and ran the installer, the standard Windows dialog came up asking if I wanted to trust the publisher of the program, since it was Unknown. I clicked yes. But despite that apparently, my computer had the file set to blocked, so when I clicked the link to start a new installation, the installer was blocked and nothing ran. To fix this problem, do the following.
Go to wherever you have the ISO file saved, for me this was the Downloads folder. Right-click on the file and select Properties. Then on that General/main page of that dialog, at the bottom there will be a checkbox that says “Unblock” with a message about security if you unblock the file. Check the box then click “OK”.
If you were experiencing the same issue that I was, you should now be able to reopen the installer file and click the link to start a new installation, and move on with your day.
Summary
There seems to be a bug with the installer for SQL Server 2022 where clicking the option to start a new installation seems to do nothing. This bug can be resolved by “Unblocking” the installer file through the Properties dialog of the file.
You would think that figuring out how to download the installer for SQL Server 2022 Standard or Enterprise editions would be a simple task, much like the process for how you download any other installer or ISO for any other version of SQL Server. But with 2022, Microsoft seems to have changed their method for getting the software to people, making it a lot more locked down than other versions are. I’m not sure why this change was made, and if you have some insight please feel free to share it in a comment, but it was made and I have finally figured out how to get that installer with this new system. It took my colleagues and I a whole work day to figure this out. We had to work with our Microsoft account managers to get to the bottom of it, and it seems a little crazy to me that it would be that unintuitive to find the ISO for this software.
In my company’s current architecture, we create SQL Server virtual machines (VMs) by creating standard Windows servers through the Azure portal, and then one of the database developers will logon to the VM and install SQL Server through the ISO/installer, instead of creating a SQL Server VM from a provided image in Azure. In the past, when we needed to install SQL Server onto a VM, we would google something like “SQL Server 2019 download” and click on the link that takes you to the Microsoft downloads page, and then get the ISO from there. When we tried to do the same for SQL Server 2022, we were taken to a downloads page that only allowed you to download Developer or Express editions, and if we wanted to do Standard or Enterprise, we could only get an evaluation version after providing our information to start a free trial.
We obviously did not want a short trial version of the software, we wanted the full Standard edition, but could not find a full installer/ISO for that version. For a few months, we gave up and installed 2019 instead of 2022 whenever we needed to create a new server, but we reached a point where we are required to use 2022 for some applications, so I set out to find out how to get the Standard edition of SQL Server.
The Proper Method
There are two different ways that we found we could get a Standard or Enterprise edition of SQL Server 2022, and I’ll start with the method that I think they’re intending people to use. If your organization uses SQL Server in Azure already, you will likely need to go through this same method to get the installer for 2022.
I unfortunately can’t get any screenshots of this method of the process because I’m not an elevated user in our organization, but there is a way for your Azure tenant owner (and a few other select individuals) to get the latest ISOs and installers for every piece of Microsoft software your company has licenses for. I believe it is at admin.microsoft.com, but you can talk to your account representative to find out for sure. You can then navigate to “Billing” and then “Your Products” and then “Volume Licensing” where you can view all your licenses and get the downloads for them.
This is how we resolved the installer issue in our organization; we had our tenant owner download the ISO from this location and save the file in a shared location. Going forward, whenever we need an installer for any Microsoft product that we use, we will be required to have that one person download the files and send it to us (not a super convenient method if you’re a developer that doesn’t have full access to your entire Azure tenant).
Once you have the ISO, you can run it as you usually would to install any version of SQL Server, and your license key will be prefilled into the installer so you don’t need to worry about specifying that at any time during the installation process.
The Workaround Method
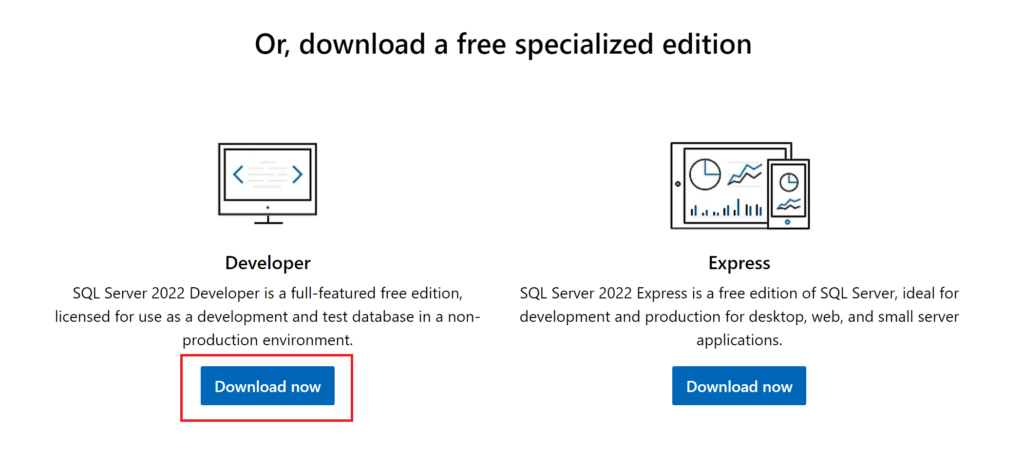
Before we had talked to our Microsoft account managers, this is the route we were going to use to be able to install SQL Server 2022 on our VMs. Go to the SQL Server 2022 page on the Microsoft website (https://www.microsoft.com/en-us/sql-server/sql-server-downloads) then download the “Developer Edition”.
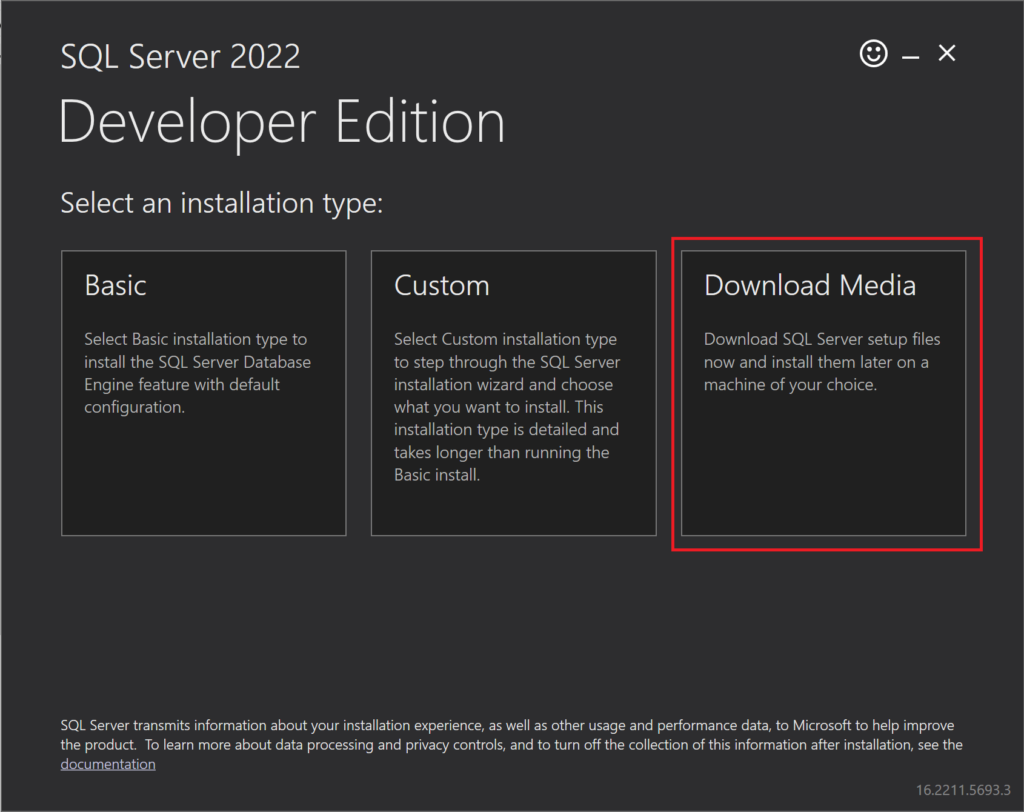
After you download that version, run the installer that you downloaded. When it first opens, click the option that says “Download Media”:
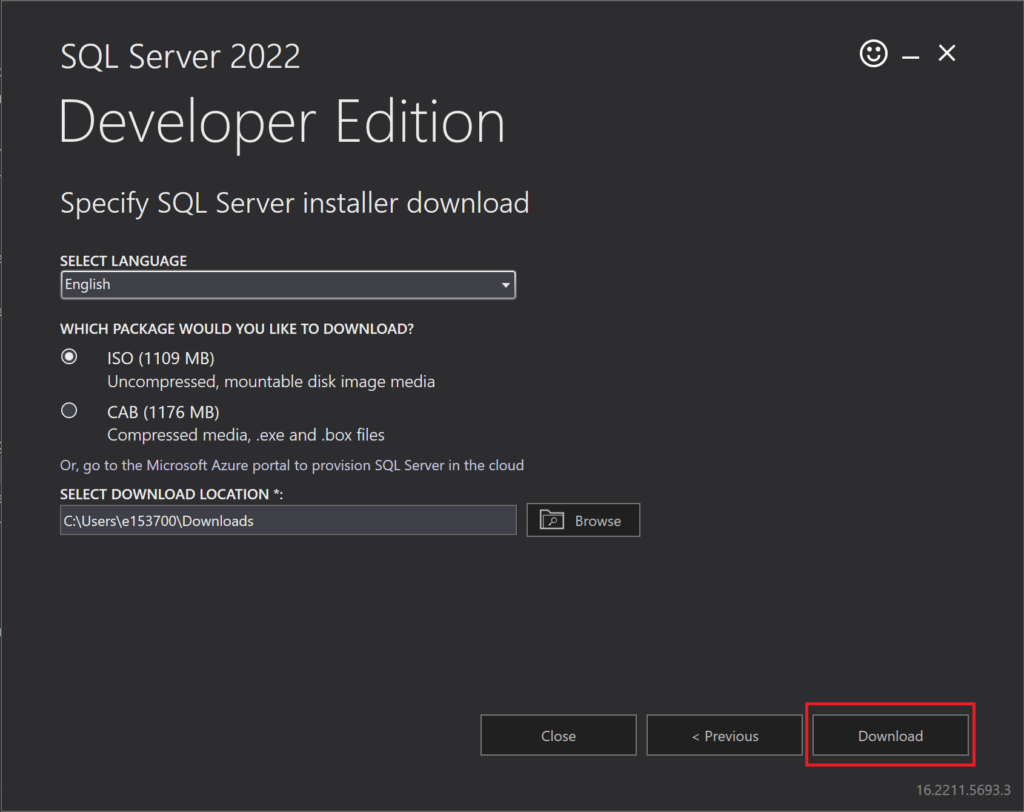
On the next page, click “Download”, which will download the ISO for SQL Server:
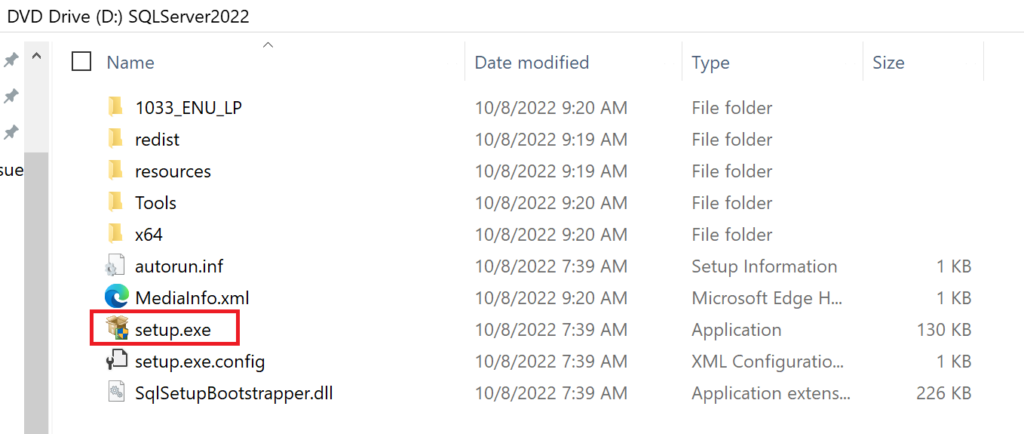
After the ISO file has downloaded, double-click on the file in File Explorer, which will mount a “DVD” to your system, which will open another directory. In that directory, double-click on “setup.exe” to run the installer for SQL Server.
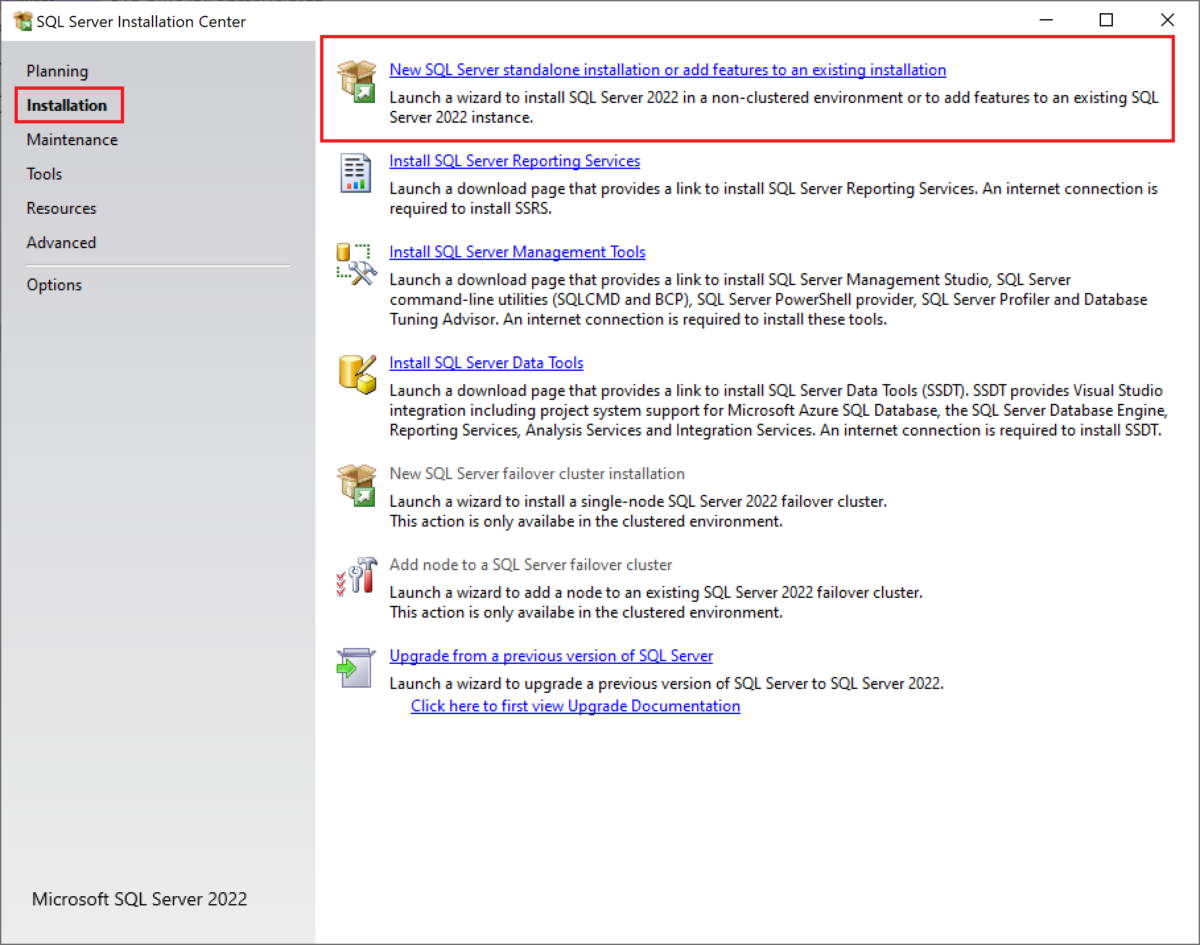
When the installer window opens, click on the “Installation” page from the left-hand pane, then click on the first link that says “New SQL Server standalone installation or add features to an existing installation”.
If you have an issue where clicking that link doesn’t open anything else, seems to do nothing, check out my other post about how to resolve that issue.
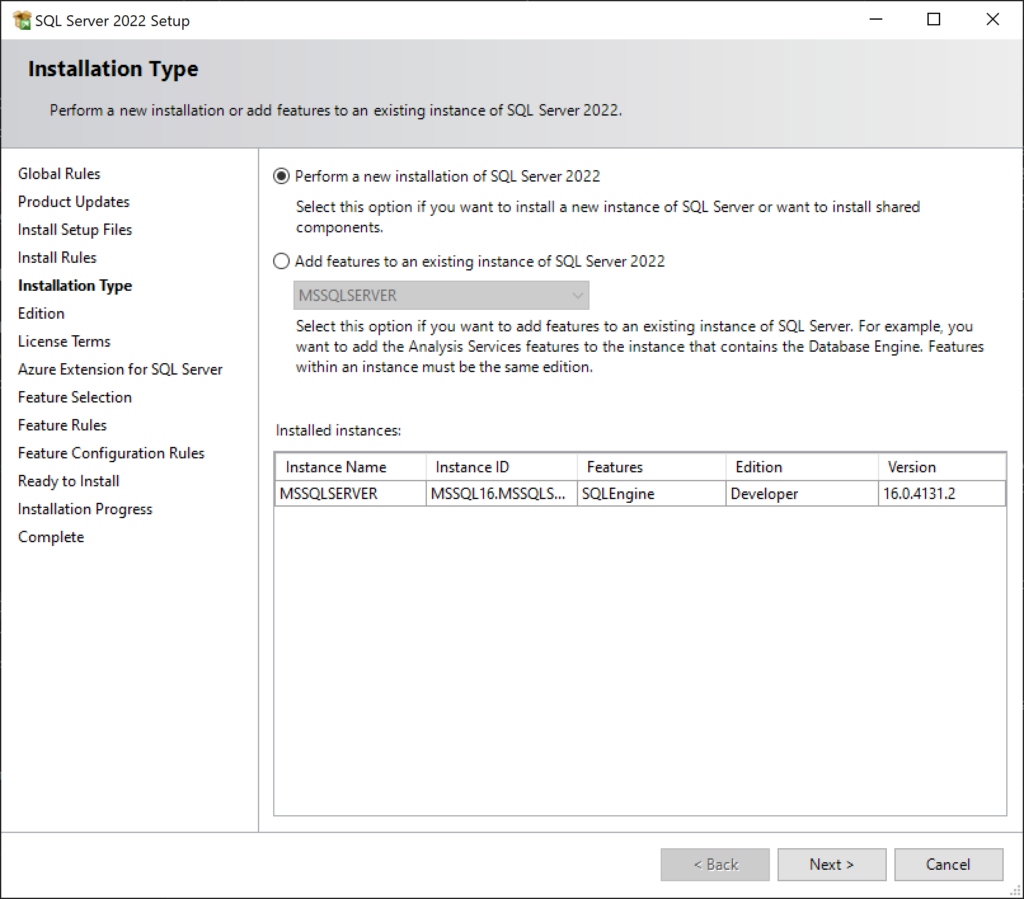
Click “Next” multiple times to move through the initial installation steps for SQL Server 2022. Review the information on each page before moving past it to ensure the settings are what you want them to be. When you come to the following page, keep the radio button for “Perform New Installation” selected then click “Next” again.
The “Edition” page is the one we’ve been needing to get to. On this page, you can change the selection from “Specify a free edition” to either one of the other two options to install Standard or Enterprise editions.
If you select the option for “Use Pay-As-You-Go billing through Microsoft Azure”, there is a dropdown menu that will let you specify Standard or Enterprise editions. Note that going with this option would then later require you to specify Azure Subscription information to bill the server usage to.
If you select the option for “Enter the product key”, you can then give a license key for SQL Server 2022 if you already have one. Review the two optional checkboxes under the license key box to select any options that apply to you. It looks like if you don’t specify a license key after choosing this option, you can still move forward with the installation, but there must be some point in the future of using the software where you’ll be required to provide a license key to keep using it.
Note: If you go through the “proper method” I listed above, the license key should be prefilled in the third option when you get to this page with the properly downloaded ISO file. For our situation, we also need to make sure the checkbox below the license key box “I have a SQL Server license with Software Assurance or SQL Software Subscription” is checked, since we use Software Assurance for our licensing.
After you’ve made your selections for the “Edition” page of the installer, you are ready to move through the rest of the installation process, specifying whatever options required for your own version of SQL Server.
Summary
There are two different methods I have found for getting the installer for SQL Server 2022 Standard edition, and neither of them are necessarily intuitive. Based on your needs, you can choose either the “proper” or the “workaround” methods. I hope this tutorial has helped you download the software without having to spend a day figuring it out like my coworkers and I had to.
I am going to try to keep this post shorter than yesterday’s because today was an ever longer conference day for me, and I followed it up by doing some sightseeing in Vegas for the entire evening afterwards. Overall, my sentiment of the day is that a good portion of the sessions are not what I was hoping for or needing in my Oracle journey right now.
Once again, I did learn a lot of new things, but so many of those things aren’t applicable to our Oracle systems at my current job. I think a big part of that is due to the fact that Oracle is basically a side database for us, not the main databases we are developing with the majority of the time. Many of the sessions I’ve attended in the conference so far have been targeted at developers who solely develop in the Oracle ecosystem, doing more advanced developing than anything I’ve needed to do with our Oracle databases. That’s not really a fault of the sessions, more of a mismatch of my needs and wants with the main target audience of the conference.
Keynote 1: Discover the Power of Oracle AI in Oracle Fusion Applications
This was another keynote where many incredible statements were made about the influence and reach of Oracle, specifically in relation to Large Language Models (LLMs) and other aspects of Artificial Intelligence (AI). One of my to-do items for after the conference is to complete my own research to fact-check these grandiose statements that have been made throughout the conference.
The main point of this keynote was to once again talk to large customers of Oracle that are utilizing AI in there internal corporate systems or “at the edge” with their own customers. I thought a lot of the use cases presented were interesting, like how Caesar’s uses AI to speed up check-in and check-out and other customer-facing features of their resorts and casinos. I also liked many of the presented AI agents and features that Oracle has been working on, like the ability to automate a lot of the more tedious aspects of database management or day-to-day tasks of accountants and other parts of businesses to free up human time for better things.
AI Vector Search: A RAGs to Riches Story
This session is the epitome of what I wish every session at the conference would be. Although if they were all like this, I think I would be extremely overwhelmed with information. This was by far my favorite session of the day. The topic of the session was vector search and how it relates to artificial intelligence, and the presenters did a fantastic job at explaining the general technology concepts while at the same time sprinkling in a few plugs for how Oracle is doing those things and doing them better than current standards with their new services. I cannot validate whether or not Oracle’s versions of vector search and vector databases are better than their competitors, but this session was extremely informative and cleared up a lot of topics I have been unclear on when it comes to AI.
Best Practices for Oracle Integration and OCI Process Automation
This was the second best session I attended today. What I liked most about this presentation is it was 100% what I expected based on the title and abstract. They had concise, to the point slides covering exactly what you need to know to make the best of your Oracle Integration and Oracle Cloud Infrastructure systems. Plus they also had the proper presentation layout recommended by communications classes, where they first gave us a quick overview of what they were going to cover, then they covered that information, then they gave a quick summary of what they had covered. The presentation was well-organized, the presenters were funny, and the information was useful.
Keynote 2: Solving Industries’ Biggest Challenges with Applied AI
This was yet another keynote where a top leader at Oracle interviewed various customers about how they are using Oracle’s AI tools to solve their biggest problems. While hearing testimonials like these are nice, I really don’t need to hear as many of them as I’ve heard from the keynotes in the past two days. Not the worst thing ever, but I feel like picking a different conflicting session might have provided more useful information for me.
A Simple Python, Flask Application with Oracle REST APIs
This hands-on lab definitely did not go the way the presenters wanted to, which seems to happen with a good portion of lives demos. It seems like the system our lab sandboxes were built on was not built strong enough to handle the load we were putting on it, since there were over 20 people in the session. I think the content of what we were supposed to be learning was really interesting, but only one person in the class could get the system to work, so he became the unintended example for the rest of us to watch. So shoutout to that Norwegian man who had the luck of the draw getting the web app to work.
What I realized as I was reviewing the lab code was that Flask and ORDS (Oracle REST Data Services) Python code is formatted very similarly to how Azure Functions are formatted. Which makes sense since both frameworks are allowing you to easily work with REST APIs without having to do a lot of the more tedious work yourself. Thankfully the leader of the workshop, who wrote all the code (it’s not his fault the sandboxes weren’t working because it seemed to be a network or VM issue), has the entire code example saved on his public GitHub so that I can download it and play with it on my own in the near future to play around with REST APIs in the Oracle workspace.
Continuous Integration and Delivery (CI/CD) for the Oracle Database Developer
This was one of my least favorite sessions of the day simply for the fact that I was expecting a session that covered Oracle-specific CI/CD practices, but instead, the content of the presentation was mostly generalized information about CI/CD, which I’m already familiar with. At some point in the future, I am now going to need to research the standard ways people normally do CI/CD in the Oracle environment to see if there’s anything we can or should use in our own Oracle systems.
One tidbit that was mentioned during the presentation that really brought be back in time about a year was hearing that the Oracle tool SQLcl is based on Liquibase, which is a open-source database change management tool I did a proof of concept project on at my last job. If you are interested in learning more about what I learned while doing a trial with Liquibase, you can read my post about it.
Summary
Today was really difficult for me to get through, because the day felt extremely long. I think about half the sessions I attended were useful to me while the others were not as useful. I have a whole list of random topics I’ve gathered from the presentations today that I want to research further, so that is the brightest side of today at the conference. Tomorrow is the last day of the conference, and only a half day, so I am going to try to make the most of it and learn as much from my last few sessions as possible.
Have you also been at Oracle Cloud World this year or have gone in previous years? If so, I would love to hear about your experiences in the comments below.
Today was my first day at Oracle Cloud World in Las Vegas, and also my first time ever at an Oracle conference, since I only recently started doing database administration with this RDBMS. As with any technology conference, the day was jam-packed with many different sessions. Although I obviously cannot convey all the information I learned at my sessions throughout the day, I will try to summarize the interesting and key points I took away from each.
Keynote Session 1: “Customers Winning with the Cloud and AI”
I’m not going to lie, I went into this conference and this sessions not having a great opinion of Oracle, due to the multiple negative experiences I had with their database platform in the past few months. However, this keynote was not a useless session, because I did learn that MGM Resorts owns a huge number of properties and hotels in Las Vegas, which is interesting from a big data perspective, and that the CIA is the first customer of Oracle. There are a lot of rumors online about how Oracle came to be and how it may or may not relate to a CIA project codename, but I couldn’t find any reputable sources, so we’ll just leave it at the CIA being the first and one of the largest customers of Oracle.
Besides those interesting tidbits, this keynote mainly contained somewhat dry interviews with different large customers of Oracle talking about how they’ve utilized Oracle products to revolutionize their businesses and how they’ve started to use AI in their technology journeys. This was the beginning of discussions surrounding “AI” that continued throughout most of the sessions today. (On that topic, I’m starting to feel like the term “AI” is being watered down or misused at this conference to represent things that really shouldn’t fall under that term…)
“Accelerate Your IAM Modernization to Multi-cloud Deployments”
This session was not what I expected it was going to be, and it wasn’t the only one where that happened today. However, even though the content of this session wasn’t what I thought it was going to be, I did learn a few interesting things. The presenters gave many startling facts about the costs associated with data breaches as well as the causes of those breaches. The statistic that I found most interesting is their claim that 60% of breaches resulted from poor patch management.
I was hoping that this presentation was going to cover more of the technical details of implementing and modernizing IAM within the Oracle ecosystem, but it proved to be a general overview of what everyone should be doing instead, which was what disappointed me about it. However, it at least gave me some topics that I can do further research on by myself to learn more about IAM in Oracle, such as the Oracle Access Manager. At least if I couldn’t get the technical details I wanted, I still got some direction about what to research next.
“Create a Data Pipeline with Data Transforms in Autonomous Database Data Studio”
This presentation was more the style of what I was expecting of most of the sessions I chose today, but it once again covered completely different information than what I thought it would. This session was different than what I expected because I was not aware that “Data Transforms” is an Oracle product; I thought that it was being used as a general term in the title. If I had known that the presentation would be covering a specific service, I would have had a better understanding of what I was about to learn. My confusion of expectations did not make the presentation unenjoyable or uninformative, though.
What I learned from this session is that Oracle has two different ETL platforms available to move data around, similar to how Microsoft has SSIS for SQL Server (and other databases). Data Transforms was the service covered by this session, but they did mention Oracle Data Integrator (ODI) which is another, older ETL service. Data Transforms can move data between tons of different types of databases, not just Oracle, and it seemed to have a lot of interesting and easy to use ETL capabilities. It seems like they are trying to make this tool be the data flow tool of the future, especially since they covered 3 different features that are about to be added, like vector search/query capabilities. Although I haven’t had the chance to use this tool myself, I want to temper the expectations for what it can accomplish due to my own personal experiences with other Oracle services. Maybe it’s as fantastic and as useful as they say it is, or maybe it’s just another sales pitch that is better than the real user experience. If you have personal experience, good or bad, with Data Transforms I would love to hear about it in the comments below.
Keynote Session 2: “Oracle Vision and Strategy”
Of all the sessions today, I think this one had the most interesting pieces of information, although none of it was directly applicable to me or my company. The biggest downside of this keynote was that it went way over time, so I had to head out before the end of it. The two major topics of the keynote, presented by Larry Ellison, the founder and CTO of Oracle, were the joining of Oracle Cloud with the other major cloud providers and then covering various different topics surrounding artificial intelligence and how they want to use it to fix all the problems of the application and database development world.
While I like the idea of them putting Oracle databases into the other cloud platforms–Google Cloud Platform, AWS, and Azure–because it gives me hope that maybe one day we could migrate our Oracle databases to a less fragile ecosystem, it did leave me wondering if one day in the future there will just be one single mega-cloud system and monopoly originating from the combination of the current big four (but maybe I’ve just been reading too many dystopian novels lately).
I thought the second part of the keynote, surrounding current and potential uses of AI integration with other software systems, was more interesting and also a bit scary. Interesting in that automating mundane and error-prone processes makes our lives as database developers and administrators easier. There are so many things Mr. Ellison mentioned automating with AI that sounded great and useful to me. But it also scared me a bit, as it felt like there was an undertone of invasiveness being discussed under the guise of security. Security, on the technological and physical level, is important for individuals, groups, and even our whole country, but I personally believe security should not come at the cost of personal freedom and privacy. Some of the proposed and planned uses of AI, specifically how it relates to biometric authentication for every aspect of our lives, left me feeling a little uneasy (but once again, maybe it’s due to the large number of dystopian books I’ve read lately).
“Access Governance: The Key to Ensuring the Survival of Our Digital Lives”
I think this session was the best presentation of the day, as far as straight communication abilities go. The team of presenters was very well put together and knew their topics well without having to read off their slides at all, and I really appreciated that.
The topic of this session was once again about managing who can access what, including the use of Identity and Access Management (IAM) as one of the core topics. The presentation was lead by a member of the Oracle leadership team, who was accompanied by three Oracle customers, including a senior security engineer from Uber. Hearing from the different customers about their experience using IAM in general, not just the Oracle services, offered a great perspective on managing access to applications and databases, and gave me some ideas to take back to my own work. The main Oracle services covered were Oracle Access Governance and the Intelligent Access Dashboard, which I’ll need to do further research on myself now.
“AI-Based Autoscaling with Avesha for Simplified OKE Management on OCI”
This was my last session of the day, and although I was tired and dreaming of my hotel room, I did find it to be another interesting presentation, although not super applicable to my work life. The title is quite a mouthful, but what it covered was how a small company called Avesha has created 4 different tools to help you autoscale and manage Kubernetes clusters in Oracle Cloud Infrastructure (OCI). Their 4 tools all seemed like they would be very useful for people who are working with Kubernetes in Oracle, since apparently the autoscaling in OCI doesn’t always work as well as people want it to (coming from comments from the audience during the Q&A at the end of the presentation).
While I don’t think my company will be using any of Avesha’s tools anytime soon, they did seem like they could be extremely useful to other organizations. And the presenters definitely understood their own products, down to the fine details of how they work, which is always a green flag I appreciate with software vendors.
Summary
Wooh, that was a lot of information to recap and cover for a blog post! After attending these six sessions on this first day of Oracle Cloud World, I’m a little bit overwhelmed an exhausted, and not quite ready for another day and a half of more info dumps. But that’s okay because it’s what’s to be expected from conferences like this. I am hoping that the sessions I picked for tomorrow are more applicable to my current role, but even if they aren’t, I’m sure I’ll learn more interesting things throughout the day.
In last week’s post, I wrote about how I use the Fernet functions of Python’s cryptography library to encrypt and decrypt my “.env” files for projects. After finishing the post, I realized I should research the security and methodology of the Fernet algorithms since I am using them. In my research, I found this StackOverflow question that had some good answers about the type of encryption Fernet is using. Check it out to learn a little more about what Fernet is using.
Have you ever created a Python script that needed to pass secrets to an API or something else in order to work, and wondered how you can keep those secrets… well, secret while still using them as needed? Every programmer should know that storing passwords and other secrets in plain text in a code file is bad practice, but sometimes it doesn’t feel like there is another option that is easy to use and doesn’t take a ton of extra time to implement. I am here today to tell you that there is another option that helps you to secure your secrets while still being able to use them whenever needed without much hassle. I was the first person to use this methodology for scripts in my current team, and it has now become a team standard to use this method for storing, retrieving, and securing secrets in code.
The “.env” file is a configuration file that you can use to store any configuration settings you need for your program, including which environment the script is operating in, as well as a place to store sensitive information such as API keys and IDs. In my own Python projects, I use the “.env” file to store ID values associated with the App Registrations I’m using, but I do not store actual secrets in the file. While it is theoretically safe to store secrets in the “.env” file as long as you encrypt that file, my team has decided we would prefer to pull secrets from an Azure Key Vault when needed instead of storing it in any text file, even if that file is encrypted.
An example of what a “.env” file might contain is:
The values following the key names can be surrounded by quotation marks or not, it does not matter for this. I prefer to not put quotes around anything because I think it looks cleaner. But doing so or not does not affect how you interact with the values from this file.
There is a lot more information surrounding environment variables and how you can use them with your Python scripts than I can cover here. But if you would like to learn more, I felt like this article covered it well. Using .env Files for Environment Variables in Python Applications by Jake Witcher.
Python Cryptography Module
There is a Python library called “cryptography” that you can install and import into your projects, and this library aims to make the “recipe” layer of encryption easy for normal developers to use. This library also has a layer that it calls the “hazmat” layer, since the functions in that layer require more in-depth knowledge of how cryptography works. If you would like to read more about this library, you can check out the documentation here.
Since I do not claim to be an expert on cryptography in any sense, I chose to stick with the “recipe” layer of the cryptography library, using the standard Fernet cryptography functions. Starting to work with this symmetric encryption is extremely easy, it only requires the following steps.
Create a new encryption key: key = Fernet.generate(key)
Create a Fernet object using the previously created key, to encrypt and decrypt files: f = Fernet(key)
After you have created that object, you can encrypt and decrypt whatever you would like at will. You can encrypt variables within your code, or you can encrypt whole files.
How to Encrypt and Decrypt Files with Fernet
For my own Python coding, I have made it a standard to always include a script called “EnvEncryption.py”, where I have two functions that I call as needed to encrypt and decrypt files. Since I created the file for my very first project, I’ve since just been able to copy and past the script into each new project I write so I don’t have to rewrite the same code over and over. Below are my two cryptography functions.
Encryption Function
from cryptography.fernet import Fernet, InvalidToken
import sys

def encrypt(filename, key):
	try:
		f = Fernet(key)
		with open(filename, "rb") as file:
			file_data = file.read()
		encrypted_data = f.encrypt(file_data)
		with open(filename, "wb") as file:
			file.write(encrypted_data)
	except InvalidToken:
		errorMessage = "Token error has occurred while trying to encrypt the file \"" + filename + "'""
		errorLine = sys.exc_info()[2].tb_lineno
		print("Exception: " + errorType)
		print("Error Message: " + errorMessage)
		print("Error line: " + str(errorLine))
What the above code is doing is first creating the Fernet encryption object with f = Fernet(key). After creating that object from the key that was passed to the function, it will read the data from the specified file, saving it into the variable file_data. After getting that data into the variable, that data is then passed through the Fernet encrypt function using the custom key/Fernet object, and is stored in the encrypted_data variable. Once the data has been encrypted in that variable, it is then written back to the same file, thus making the file encrypted.
Decryption Function
def decrypt(filename, key):
	try:
		f = Fernet(key)
		with open(filename, "rb") as file:
			encrypted_data = file.read()
		decrypted_data = f.decrypt(encrypted_data)
		with open(filename, "wb") as file:
			file.write(decrypted_data)
	except InvalidToken:
		print("File not encrypted, cannot decrypt")
My decryption function is almost the same as the encryption function, just in reverse. The function takes a file and encryption key as input, then generates the Fernet encryption object from the key. The next step is to read the encrypted data from the file into a variable, then pass that data into the Fernet decrypt function and save the results to the variable decrypted_data. The function then opens the file again and writes the newly decrypted data into the file.
Creating the Key for the First Time
As you probably noticed from my code above, both the encrypt and decrypt functions take a “key” variable as required input for encrypting and decrypting the file, yet I didn’t say where that was coming from.
Each time I start a new project that will use this encryption and decryption method, I write a temporary script to generate a key for my functions to use, and then I save that key to an Azure Key Vault so I can access it later and pass the value into the script from a command line when the script is called. So if you were to run the above code as-is without generating your own key first, neither of the functions would work.
Before you begin using the above scripts, you need to run the following code to generate a key for yourself to use for encryption and decryption with your project.
Note: After you encrypt your file/data for the first time with the key you are about to generate, you MUST have the same key available to decrypt the data. If you lose the key, you will not be able to easily decrypt your file (unless you’re great at hacking :D). Make sure you save your key in a safe location for future reference after you encrypt your data.
Note: Direct quote from the documentation: “Generates a fresh fernet key. Keep this some place safe! If you lose it you’ll no longer be able to decrypt messages; if anyone else gains access to it, they’ll be able to decrypt all of your messages, and they’ll also be able forge arbitrary messages that will be authenticated and decrypted.”
key = Fernet.generate_key()
print(key)
That code snippet above will print something that looks like b'tWEVGCX-dvt9v-3MZTSehHMD2-2IpJChgit04QZaAy8='. The keys that are generated are of type byte, so when you print out to the console it lets you know the string is bytes by surrounding it with b''. To save that key somewhere safe, you don’t need the b'' part, just the characters within the quotes.
Now that you have this key, you can use it with the encryption and decryption functions as needed.
How to Access Secrets from Encrypted “.env” File
Once you’ve successfully encrypted your .env file, how are you supposed to use the data you stored within it when you need it? The answer is that you will need to decrypt your file whenever you need to pull data from it, then immediately encrypt the file again after you’ve pulled what you need from it. You want to keep the file decrypted for as little time as possible to prevent any possible sniffing of the data that’s in it. I know a good hacker will be able to get the data if they’re determined, but this model is assuming that you’re not in a high-risk or high-security system. If you are in such a scenario, I strongly suggest that you use stronger safety systems than what I have presented here.
An example of what this decryption/encryption format looks like is the following:
ee.decrypt(envFile, encryptionKey)
# Get the data from the file
ee.encrypt(envFile, encryptionKey)
For more information on how to extract key-value pairs from an .env file, please see next week’s post where I cover how I write my code to do that.
Summary
In this post, I covered all the details you need to know in order to start using an encrypted “.env” to store your environment/processing values that you want to keep more secure. The key to doing it well is to use the standard Python cryptography library and the Fernet functions. Make sure to always encrypt your file again as soon as possible after decrypting it and pulling the data you need from the file. Happy coding!
If you are in a role similar to one I am in now, where there is heavy oversight into certain data the company owns due to federal regulations, you may get assigned a similar project where you need to automatically retrieve various ownership and access information about one or more databases in your Azure cloud environment. What I’ve found through my own process of completing such a project is that the documentation Microsoft offers for its Python SDKs is abysmally low, and there is often nothing helpful being offered about the class you are trying to work with. But I have finally figured it out with my own determination, trial, and effort so I decided I would share it with everyone so that hopefully others don’t have to go through the same amount of effort to figure out something that should be fairly easy to accomplish.
Get a list of the “role assignments” for a SQL Server resource in the Azure Portal, specifically the Owner assignments. According to this Microsoft article, the “Owner” role “grants full access to manage all resources, including the ability to assign roles in Azure RBAC.” Since that is a lot of freedom, our auditors want to make sure they know who has such access so they can determine if those people should have access.
Necessary Python Modules
There are two modules that you will need to download and install in order to programmatically generate the list of “Owner” assignments on a resource in Azure. The first is from azure.identity import ClientSecretCredential, which is how we are going to create credentials to use with the Authorization Management client. The second is from azure.mgmt.authorization import AuthorizationManagementClient, which is the module that will allow us to query the Authorization API that Microsoft provides, so that we can get that list of role assignments for a particular resource in the cloud environment.
Required Permissions
In order for you to be able to query this data we are looking for, you will need to create an app registration that has been given the appropriate permissions on either the subscription or resource group level, depending on the security requirements of your organization. Lowest access is always preferable, but giving the permission at the subscription level would then allow your app registration to perform this same action on any and all resources you want with just one permission assignment. The permission you need to assign to your app registration at either the Resource Group or Subscription level is “API Management Service Reader Role”, which can be assigned under “Access Control (IAM)” for the Subscription or Resource Group.
Data Pieces You Will Need
There are several pieces of information you will need to know and feed in to your Python script to get it to retrieve the role assignments for a given resource.
Tenant ID, Client ID, and Client Secret of the app registration you are using with your script
These three items are used to generate the credential needed for the Authorization API using the Azure Identity ClientSecretCredential
To keep these vital pieces of information secure, you can review my upcoming blog post about encrypting your IDs and keeping your secrets safe while still using them
Subscription ID for the subscription your resource is in, even if you are getting the role assignments at the resource group or resource level (not Subscription level)
Resource Group name for the group your resource is in
Resource Namespace. This item is a bit more confusing to achieve since there really isn’t any clear information about what it means, at least in my own research. (If you can find a Microsoft document talking about this, please let me know!) What I found through my own trial and error is that this value, at least if the resource you’re getting the owners for is a SQL Server resource, will be "Microsoft.Sql". I ultimately figured this out by looking at the full Resource ID for one of my SQL Server instances and seeing that value there. You can also use the Resource Explorer in the Azure portal and look in the “Providers” list to see that there are hundreds of different namespaces that can be used for getting the role assignments for any resource.
In this screenshot below, taken from the Properties page of my SQL Server resource, you can see the full ID for the resource, which includes "Microsoft.Sql/servers" which is the namespace/resource type for this resource
Screenshot showing the full Resource ID for a SQL Server resource, which includes the Resource Namespace and the Resource Type
Resource Type. Similarly to getting the resource namespace, it’s hard to find the official value that should be used for Resource Type when querying the Authorization Management API. But I figured it out from the Resource ID like I did the namespace. The Resource Type can also be found under the Resource Explorer “Providers” list, but just looking at that did not clarify for me what value I should be passing in. I once again found out through trial and error what value would work for this parameter.
Resource Name. The name of the resource you want to get role assignments for. If you have a SQL Server called “prod_dta”, then you would pass that value in for this parameter.
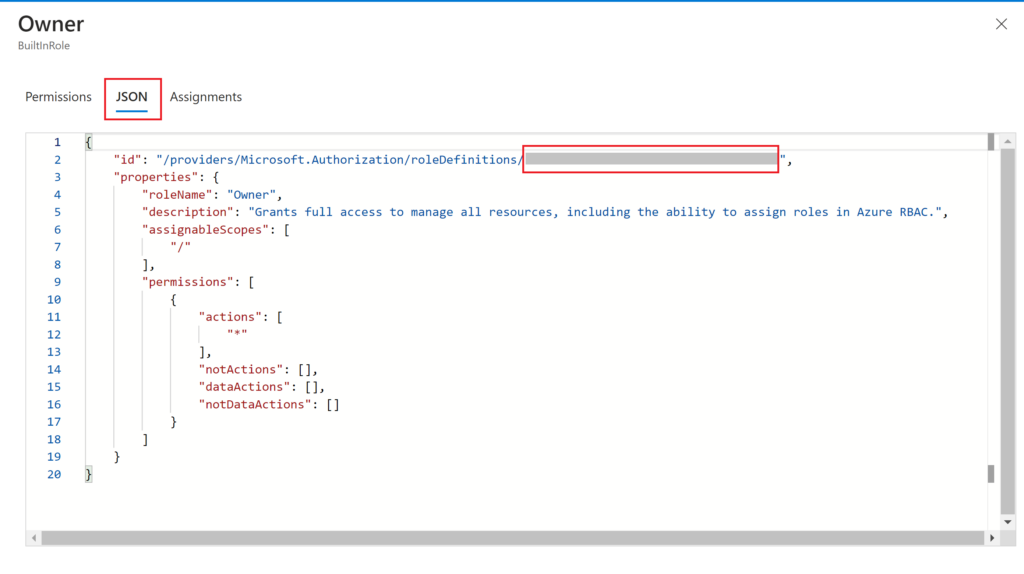
Optional: The ID value for the role type you are looking for, which in my case, was the Owner role. This is a standard ID that is assigned to the Owner role across your organization (or maybe it’s the same for all of Microsoft…). See subsection below for how to find this ID value.
Getting a Role ID Value
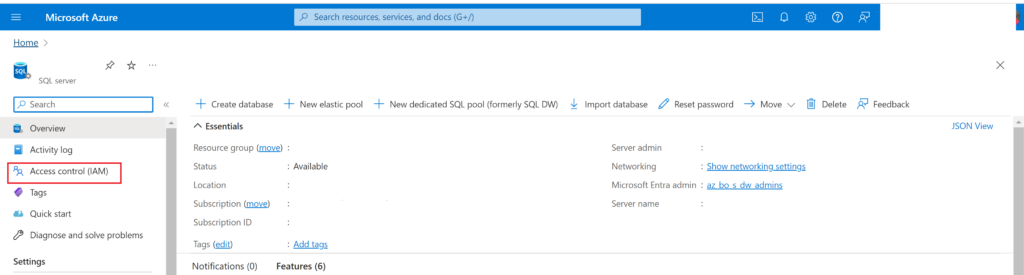
In the Azure portal, navigate to any resource and then go to the “Access Control (IAM)” page:
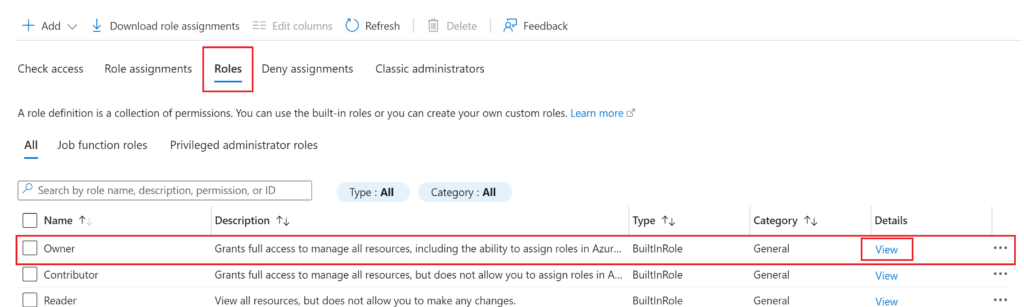
In the IAM page, click on the “Roles” tab then click on “View” for the Owner role (or whichever role you would like to get the ID for)
In the pane that opens with the details of the role, you want to click on the “JSON” tab, which is where you will find the ID you need. The full ID of the role is longer than just the GUID we are looking for, so make sure to only copy out the GUID from the end of the string (which is what’s covered in gray on the screenshot below). Save this ID for later.
The Code
Once you have figured out and gathered all the required pieces of data needed to get role assignments for a resource in Azure, the code for getting that data is fairly simple. Below is all of my code which I used to get just the people with Owner role assignments from a resource.
from azure.identity import ClientSecretCredential
from azure.mgmt.authorization import AuthorizationManagementClient
import json


def create_auth_management_client(tenantID, clientID, clientSecret, subscriptionID):
    credentials = ClientSecretCredential(tenant_id=tenantID, client_id=clientID, client_secret=clientSecret)
    authMgmtClient = AuthorizationManagementClient(credential=credentials, subscription_id=subscriptionID)


def list_resource_owners(authMgmtClient, serverName):
    resourceGroupName = "MyResourceGroup"
    resourceNamespace = "Microsoft.Sql"
    resourceType = "servers"
    resourceName = serverName
    ownerRoleDefID = "f865f414-b2bf-4993-8f94-51b055da4356"
    # This is a random GUID value that I replaced with the actual GUID for the Owner role in our system. Since I'm not sure if those are unique to organizations or not, I have taken out the actual value for this example.

    permissions = authMgmtClient.role_assignments.list_for_resource(resource_group_name=resourceGroupName, resource_provider_namespace=resourceNamespace, resource_type=resourceType, resource_name=resourceName)
    principalList = []

    for item in permissions:
        stringItem = str(item)
        if ownerRoleDefID in stringItem: #If the current item is for an Owner role
            # Replace single quotes with double quotes in string
            replacedStringItem = stringItem.replace("'","\"")

            # Replace None with "None"
            replacedStringItem = replacedStringItem.replace("None","\"None\"")

            # Get index at which to cut off the string
            stopIndex = replacedStringItem.find(", \"principal_type\"")

            # Substring the string item to stop after getting the princiapl id
            substring = replacedStringItem[0:stopIndex]

            # Add closing bracket to end of the substring
            substring = substring + '}'

            # Load the item into a JSON-format object
            jsonItem = json.loads(substring)

            # Get just the principal ID value from the JSON object
            principalID = jsonItem['principal_id']

            # Add the principal ID to the principalList object
            principalList.append(principalID)
    return principalList
Let’s break that down further
from azure.identity import ClientSecretCredential
from azure.mgmt.authorization import AuthorizationManagementClient
import json
The above code snippet shows the 3 libraries you need to import for this code to work.
ClientSecretCredential from Azure.Identity: This module/library allows you to create a login credential for your Azure environment.
AuthorizationManagementClient from azure.mgmt.authorization: This library is what gives you the modules, functions, and classes needed to interact with role assignments in Azure, which includes functions to create, update, and delete role assignments with your Python code. I only used the “get” functionality because I only wanted to retrieve assignments, not make new ones.
JSON: I use this library to manipulate the data returned from the Auth Management API calls in a JSON format, which is easier to work with to retrieve the value associated with a particular key.
This function, create_auth_management_client takes input of the Tenant ID, Client ID, and Client Secret of the app registration making the calls to Authorization Management, as well as the Subscription ID that the resource we want to get role assignments for is in, and uses the ClientSecretCredential function from the Microsoft library to generate such a credential. It then makes a client to interact with the Authorization Management API with Azure using that credential. The authMgmtClient object will be the object we call methods on to get the data we need.
We then come to the definition of the function list_resource_owners, which is where I pull the role assignment data from Azure, then parse the data returned into a usable format and pull out just the role assignments that contain the Owner role ID value. The beginning of the function first sets important data values for the Authorization Management Client to use; you could pass these in to your own function if you want instead of hard-coding the values within the function.
    resourceGroupName = "MyResourceGroup"
    resourceNamespace = "Microsoft.Sql"
    resourceType = "servers"
    resourceName = serverName  # Passed in as parameter to function
    ownerRoleDefID = "f865f414-b2bf-4993-8f94-51b055da4356" # Replace with correct value from your environment
After defining those important values, the code then finally makes a call to Authorization Management:
If you were to then print(permissions), you would get a very long string of role assignments for the given resource (but permissions is an Authorization Management object, not a true string). The results look something like this (except it would contain the GUIDs of all the objects, not the all-zero GUIDs I redacted with):
You would have one of these sections of data for every single role assignment on the specified resource.
An important note is that there are several different classes you can call a list_for_resource function on from the authMgmtClient, but the only one that gets this data for the entire resource, and not just for the role assignments that apply to the caller, you need to use the role_assignments class. Here is a link to the Microsoft documentation, it honestly wasn’t that useful to me, but may be useful to you.
The final step of the processing of role assignments is to format it into something that is more useful, a JSON object, which is what the following section of code aims to do.
    principalList = []

    for item in permissions:
        stringItem = str(item)
        if ownerRoleDefID in stringItem: #If the current item is for an Owner role
            # Replace single quotes with double quotes in string
            replacedStringItem = stringItem.replace("'","\"")

            # Replace None with "None"
            replacedStringItem = replacedStringItem.replace("None","\"None\"")

            # Get index at which to cut off the string
            stopIndex = replacedStringItem.find(", \"principal_type\"")

            # Substring the string item to stop after getting the princiapl id
            substring = replacedStringItem[0:stopIndex]

            # Add closing bracket to end of the substring
            substring = substring + '}'

            # Load the item into a JSON-format object
            jsonItem = json.loads(substring)

            # Get just the principal ID value from the JSON object
            principalID = jsonItem['principal_id']

            # Add the principal ID to the principalList object
            principalList.append(principalID)
    return principalList
What that above code is doing is that for every item in the returned permissions object (each line like the example I showed above), formatting is going to be applied.
The current item will be converted to a true string object using str()
If the current item contains the ID of the owner role (which we retrieved earlier), then we will keep processing it. If it doesn’t contain that ID, then the item will be ignored and processing started on the next item in the object.
The first formatting change is to replace any single-quote characters with double-quote characters, which is what JSON expects. Example: 'name': '00000000-0000-0000-0000-000000000000' will change to "name": "00000000-0000-0000-0000-000000000000"
The next formatting change is to replace any instances of None with "None", which also better fits JSON formatting.
Because of weird formatting that happens later in each line of the permissions object, I opted to cut off the string after the final piece of data that I needed, which was the “principal_id” value. So the line stopIndex = replacedStringItem.find(", \"principal_type\"") is retrieving the character index at which the string “, principal_type” is found, so that I can cut off the string right before that value.
The next step of formatting is to perform a string slice on the current item to cut it off at the designated point. That means the above example data will now look like {'additional_properties': {}, 'id': '/providers/Microsoft.Management/managementGroups/00000000-0000-0000-0000-000000000000/providers/Microsoft.Authorization/roleAssignments/00000000-0000-0000-0000-000000000000', 'name': '00000000-0000-0000-0000-000000000000', 'type': 'Microsoft.Authorization/roleAssignments', 'scope': '/providers/Microsoft.Management/managementGroups/00000000-0000-0000-0000-000000000000', 'role_definition_id': '/subscriptions/00000000-0000-0000-0000-000000000000/providers/Microsoft.Authorization/roleDefinitions/00000000-0000-0000-0000-000000000000', 'principal_id': '00000000-0000-0000-0000-000000000000'
Then to return that string to standard JSON formatting, we are going to append a closing curly bracket to the string
After getting the string formatted nicely so that it can be a JSON object, I use json.loads(substring) to create a true JSON object from that string
Once the string has been turned into a JSON object, I use standard JSON string extraction formatting (principalID = jsonItem['principal_id']) to pull just the principal_id value out of the JSON object. If I had not gone this route, it would have been much more difficult to do string parsing to correctly get the value of the principal_id key.
The final step of this function is to add that retrieved principal_id value to the principalList List and then return that List to the caller once all lines of the permissions object have been extracted, formatted, and the principal_id values retrieved.
Summary
There isn’t much documentation and there aren’t many references online about how to retrieve role assignment data for a resource from Azure, so I hope this tutorial has been helpful to you. My goal for this post was to make it so that others did not have to go through all the trial and error I had to go through to figure this out. I think that once you get an example of the data that the API is expecting you to pass in, it becomes much easier to query not only SQL Server resources but also any other type of resources in Azure. Let me know in the comments below if you found this tutorial helpful or if you have any remaining questions or misunderstandings on the topic that you would like help with.
As many of you probably already know, my cloud development career started in AWS, which I worked with for just about 3 years while I worked at Scentsy. Since my recent transition to a new job at a different company, I have started to develop in Azure instead, and it’s been a learning journey. Although both platforms allow for cloud development and processing, they have quite a few notable differences in what is offered and how they offer it, which is what I’m going to cover in this post today. My goal for this list isn’t to have a technical or all-inclusive list of the differences, but more of a difference a developer might feel in their own work if they make the same switch that I have.
Azure is simpler yet still robust. Sometimes I feel like AWS tries to overcomplicate their services in order to make them seem fancier or more cutting-edge. And it also seems like they split what could be one service into multiple just to increase their total service count. Azure combines multiple functions I was used to in AWS into a single service. An example of that is Azure DevOps, which combines your ticketing/user story system with your DevOps pipelines and your Git (or other) repos. In my past job, we used TeamCity and Octopus Deploy for the pipelines, Jira for the ticketing, and Bitbucket to store our code, so I was a little confused my first couple of weeks in my new role since everything seemed to only be in one location. But I now find it nice and easier to work with.
Azure has better cloud ETL development
In the Azure cloud platform, there is a service called Synapse Workspace or Synapse Studio, and a second service called Azure Data Factory, which both allow you to create ETL pipelines right in the cloud. AWS has Glue, but that really doesn’t seem to have the same feel or capabilities that either Synapse or Azure Data Factory (ADF) has in the Azure realm. I have already updated and created several pipelines in each of those services in Azure and I really enjoyed working with them because they were very intuitive to get working with as a newbie and I could do everything I needed for the ETL right in the cloud development workspace.
When I worked with Glue in the past, it definitely did have some limited capabilities for making drag-and-drop ETLs in the cloud, but the service seemed to have a lot of limits which would force you to start writing custom PySpark code to make the data move. While writing custom code is also possible with Synapse and ADF, they both are built with more robust built-in components that allow you to make your ETLs quickly without writing any more custom code than a few SQL queries. I have really been enjoying working in these new services instead of AWS’ Glue.
More on Azure Data Factory
Another reason why I have been enjoying working with Azure Data Factory (ADF) is because it seems to be a modern version of the SSIS I am already familiar with, and located in the cloud instead of on an ETL server and local developer box. Although the look of ADF isn’t exactly the same as SSIS, it still is the drag-and-drop ETL development tool I love working with. And since it’s developed by Microsoft, you get all the best features available in SSIS ETL development without having to work with the old buggy software. I’m sure as I keep working with ADF that I’ll find new frustrating bugs that I’ll need to work around, but my experience with it so far has been only positive.
Power Automate & Logic Apps
Two other tools that aren’t available in the AWS ecosystem and that don’t seem to have an analog in AWS are Power Automate and Logic Apps. While these tools are more aimed at people who are not developers, to allow them to automate some of their daily work, they are interesting and useful features for certain scenarios and I am enjoying learning about them and playing with them. One of the best parts about working with Azure services is that it’s fully integrated into the entire Microsoft ecosystem, so you can pull in other non-Azure Microsoft services to work with Azure and expand your horizons for development. I’m not sure yet that I would 100% recommend working with Power Automate or Logic Apps for task automation (I’m still not done learning it and working with it), but it at least is another option to fall back on in the Microsoft realm that isn’t available in AWS.
Copilot isn’t what they want it to be
While most of my experience with Azure so far is positive, there are a couple annoying things I’ve noticed that I think are worth sharing, although neither of them are so egregious that it would prevent me from recommending working with this platform.
The biggest negative about Azure for me so far is that Microsoft keeps trying to shove Copilot (their AI assistance tool which seems only slightly more advanced than Clippy) into every single product they offer even when it provides no benefit or actually detracts from your total productivity. The perfect example of this is the “New Designer” for Power Automate. For some unknown reason, Microsoft has decided that instead of allowing you to do a drag-and-drop interface for task components to build your automation flow, everyone should instead be required to interact with Copilot and have it build your components instead. That might be useful if you had already been working with Power Automate in the past so knew what capabilities and components it offered. But as someone totally new to this space who is trying to learn how to use the tool and has no idea what is currently possible to develop, it feels basically impossible to communicate with the AI in any meaningful way in order to build what I want. I don’t know what to ask it to create when I’ve never seen a list of tasks that are available. Luckily, for now it is possible to toggle off the “New Designer” and switch back to the old that allows you to add each individual component as you go and select those components from a list which gives you a short description of what each does. Maybe in the future I’ll be more open to using Copilot with everything I develop, but right now, as a new developer in Azure, it doesn’t work for me.
Unintuitive service naming
The only other nitpick I have about the Azure and Microsoft cloud ecosystem is that sometimes, the names they pick for their services don’t make sense, are confusing, or are the same thing as a totally different service. Microsoft doesn’t seem to be that great at naming things to make them understandable at a quick glance, but I suppose that can also be attributed to the desire of all cloud computing companies to make themselves look modern and cutting-edge.
The best example I can give of this phenomenon right now is that a data lake in Azure is built on what are called Storage Accounts, which is the blob storage service within Azure. It’s not as confusing to me now that I’ve been dealing with it for a month and a half, but that name doesn’t seem at all intuitive to me. Each time my colleagues directed me to go to the “data lake” I would get confused as to where I was supposed to navigate since the service I would click into was called Storage Accounts instead.
Summary
Although it felt like such a big switch in the beginning to move from an AWS shop to an Azure shop, I have already started to enjoy developing in Azure. It has so much to offer in terms of cloud ETL development and I can’t wait to keep learning and growing with these tools. I’ve already compiled so many things that I can’t wait to share, so I am hoping I will get those posts ready and posted soon so others can learn from my new Azure developer struggles.
Now that I am almost two months into my new job, I am finally feeling ready to get back into posting regularly about the technical work I’m doing during my day job. In the next few weeks, you can expect a general post about Azure versus AWS development since I’ve worked with both now, as well as more technical posts about how to do things in Python, Azure, Power Automate, and other tools that I had to struggle through personally due to limited content about them online. My goal is to always try to make development easier for others, and I hope these upcoming posts will bring value to others who may also be struggling to accomplish the same things with their own work.