Now that I have been working in the Azure cloud environment for a few months with my new job, I have come to the realization that there is one thing related to Azure SQL Server instances that annoys me more than anything else in the Azure environment. Obviously every cloud environment is going to have its pros and cons, so this is only one small problem from the whole ecosystem. Azure has a lot of nice things to work with, so this complaint is very superficial, but I know others at my company have been confused by this issue so thought I would share the annoying difference here for educational purposes.
On-Prem SQL Server Permissions
The one thing that has been driving me crazy about Azure SQL Server instances recently is that there is not an easy way to quickly get an overview of the permissions a user/account/group has on the server and database.
In on-prem/normal versions of SQL Server, you can open the “Security” section of the server or database then right-click on the user or group you want to review the permissions for, and then you’ll get a GUI that quickly shows all the server- or database-level permissions that user has. The following screenshot shows the Server Roles for a given login on my local test server, so you can quickly know what permissions the login has.

And then if you go to the “User Mapping” page of the Login properties, you can see any databases the login has access to as well as the permissions that user has on the database.
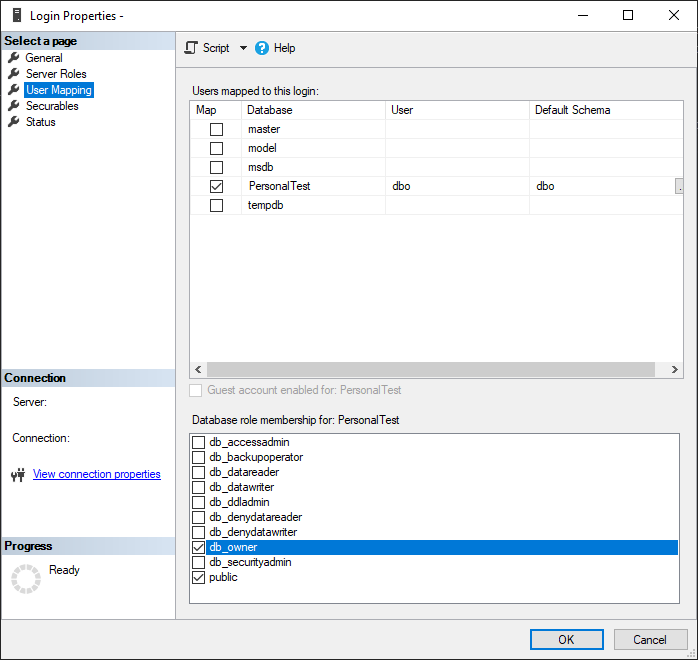
I love this interface that I’m pretty sure has been around for decades. It’s so much easier to view and quickly change the permissions for a login/database user that new new system in Azure-based servers.
Azure SQL Server Permissions
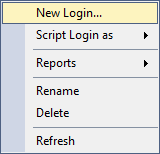
In comparison, you can’t easily view or determine the server- or database-level permissions any login or user has on an Azure-based SQL Server. You can’t even view any general properties of the user like you can for on-prem installations. For example, here is a screenshot of what you see on an Azure SQL Server when you right-click a Login from the Object Explorer:
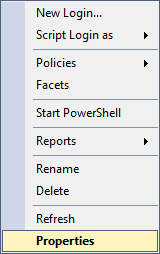
If you do the same thing on the on-prem SQL Server, you can see that there’s an option to view the properties of the user, which will get you to the menus where you can see server- and database-level permissions, along with other properties as well.
If you can’t get a nice GUI representation of those login permissions, how are you supposed to know what permissions anyone has on your server or database? A SQL query.
While that kind of makes sense for a platform where you do most of your work with SQL, it does mean you need to do more work to write or track down a copy of the appropriate SQL query to get the necessary data, instead of to right-clicking on an object and have its information displayed to you immediately. The SQL query you need to get permissions information is also tedious to me because you can only do it for a single database at a time instead of being able to quickly view the permissions for every database on the server in one place. For example, if you have 3 databases on your server, you need to run the query individually for each of those databases. You can’t even utilize the “USE [database]” statement to quickly switch between the databases and get all the results in a single result pane (if you want to read more about that, I have another upcoming post to discuss that topic).
This is the query I use to review database permissions:
SELECT DISTINCT pr.principal_id, pr.[name], pr.[type_desc],
    pr.[authentication_type_desc], pe.[state_desc], pe.[permission_name]
FROM sys.database_principals AS pr
JOIN sys.database_permissions AS pe
    ON pe.grantee_principal_id = pr.principal_id
ORDER BY pr.name;
If you want to view the permissions at the server level, run that query on the master database. Then to view the permissions specific to a single database, you will need to switch to that database (using the database dropdown from the toolbar above the query window, or updating your full server connection to specify the other database).
To view the role assignments for users in your database, you can use the following query, which utilizes the views sys.database_permissions, sys.database_principals, and sys.database_role_members to gather all the useful information related to role assignments.
SELECT u.[name] AS [UserName],
       r.[name] AS RoleName
FROM sys.database_principals u
     JOIN sys.database_role_members drm ON u.principal_id = drm.member_principal_id
     JOIN sys.database_principals r ON  drm.role_principal_id = r.principal_id
WHERE u.[name] = N'TestUser';
Summary
While it’s not hard to get all role assignments and assigned permissions for logins and database users in Azure SQL Server instances, it isn’t as easy as it used to be with on-prem servers. I don’t think the new method of getting the permissions gets the information you need in as useful a way as the old method of using the GUI. I personally don’t prefer having to scroll through a table of information about each user and deciphering the details of their permissions, but I will continue to deal with it since that’s the only option for Azure SQL Servers currently.