Welcome to another coffee break post where I quickly write up something on my mind that can be written and read in less time than a coffee break takes.
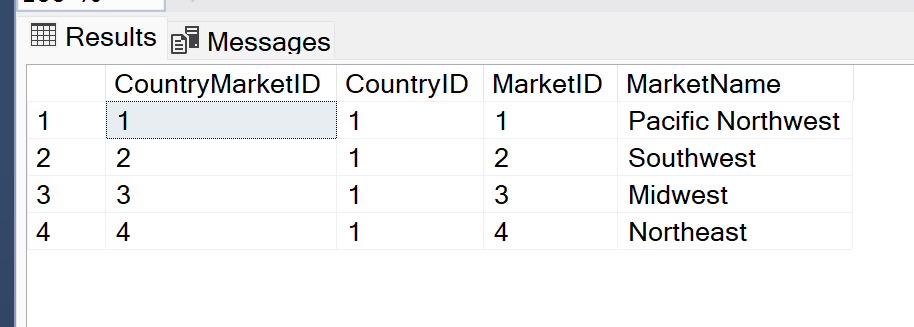
Several months ago I ran into a situation where I needed to update the records in one table based on values in a related reference table. To do this update, I was going to need to run an existing stored procedure once for every record in the reference table, which I believe contained information about countries and markets within those countries. The reference table looked something like this:
The stored procedure I needed to run had input parameters for CountryID and MarketID as well as several other things that aren’t important for this post. When I was originally looking at this task I needed to complete, I was not looking forward to running the stored procedure manually dozens of times, one for each combination of Country and Market. But I knew there must be a better way. I’m a programmer, I can find a way to automate this tediousness.
A practical use for a cursor
If you’ve developed SQL code for any length of time, you’ve probably heard an older DBA or database developer tell you to never use cursors! I know that I personally have been reminded of that many times, so I had never even considered using one or tried to use one. But when I was staring down the barrel of updating two values in a procedure execution call, running it, waiting for several minutes for the procedure to complete, then doing it all over again, for dozens of times, I knew I had to give a cursor a try.
I of course had to Google how to write a cursor, since I had never done that before, but was quickly able to write a script I would need. The cursor was created to loop over every record retrieved from the reference table using a query I wrote, and injected each of the CountryID and MarketID values into the input parameters of the stored procedure. This easily automated the tedious manual work that I would have needed to do myself, and it did it in a lot less time since it wasn’t a user having to slowly update each relevant value each time they needed to change.
Summary
Maybe cursors aren’t quite the devil I always believed them to be. I know they can certainly cause performance issues on databases when they’re written into stored procedures and ran regularly, turning what should be set-based work into row-based work, but I have learned that there is at least one fantastic use. And this use will make my life easier going forward any time I need to run one stored procedure a lot of times with different input values.
Sources
Here is the main StackOverflow answer I used to help me write my own query: https://stackoverflow.com/a/2077967. And you can see, the first comment of this answer is literally calling cursors evil, which I find amusing.
If you know me personally or follow me on LinkedIn, then you know that several weeks ago I made the decision to leave my friends and colleagues at Scentsy to take a new role at Boise Cascade. I made this decision for a lot of different reasons, but the main one being that I felt like I needed more of a challenge and wanted to get back into development work rather than focusing on project organization and management.
I am just about through my third week in my new role and it has been a scary, tiring, interesting, and even a bit fun, experience. Starting any new job comes with some new stress as I adjust to the environment and coworkers, and while I’m not completely out of the adjustment phase yet, I am already becoming more comfortable in this role so thought I should come here and give an update.
Previously, this blog has been heavily focused on cloud development with AWS since that is what I was developing in daily at Scentsy. But with my new role, I am drinking from a firehose to start learning cloud development in Azure, so my posts will be switching to focus on that platform instead. As of right now, I have no plans to do any personal development projects in AWS to be able to continue content in that space. I am really excited to be learning about Azure though, and am equally excited to start sharing what I learn about it here on my blog, since it seems like the Azure documentation is just as hard to understand, interpret and use as the AWS documentation is. So I will have plenty of my own learnings to share.
In my new role, I am also jumping into the deep end with scripting in Python which I am loving (but of course having issues with just like any other platform), so I will be starting to share some of my learnings about that space as well. Plus, there’s always a possibility I’ll be learning some other new technology because of how diverse my new role is, so my content going forward might be a lot more diverse than it was in the past.
It may take a few more weeks for me to get into the swing of things enough at my new job to feel like I have something worth posting about here, so I hope you’ll stick around and give the new content a read once it comes out. And as always, if there is anything in particular you would like me to write about, let me know in the comments and I will try to get to it!
So far in my career, I have achieved three different certifications from AWS for different aspects of their cloud development platform. I passed all three of the exams, one beginner, one intermediate, and one advanced, all on the first try. While I’m usually pretty good at learning new things and taking tests, two of the tests left me questioning whether or not I had actually passed or not when I left the testing center, but I did end up passing each of them. Many of my colleagues have asked me how I prepared for the exams, as they are also beginning to work on similar certifications, so I thought I would also share my process here to help others outside of my organization.
This is the easiest of the certifications I have achieved
The content of this exam is general knowledge of most of the services available in the AWS cloud
You will not need to have any great depth of knowledge of any particular service to pass this exam
Certified Solutions Architect – Associate
This was the middle ground in terms of difficulty of the exams I’ve taken
Very focused on the cost and design of systems across a broad range of services in AWS
Focus on the “Well Architected Framework”
More of an architecture-level exam (not development level)
Certified Database Specialty
This was the most difficult of the exams I’ve taken, simply due to the deep level of knowledge I needed to have for each of the database services available in AWS
Focused somewhat on the design of databases in different services of AWS, but mostly focused on the best way to implement different use cases for the various database services
More of a development-level exam rather than architecture-level
My level of knowledge before starting courses for each exam
Certified Cloud Practitioner: absolutely no knowledge of anything with AWS before starting a course to learn and prepare for this exam.
Certified Solutions Architect: I had more general AWS knowledge before starting to learn and study for this exam due to what I had already learned for the previous exam, but I still hadn’t done any actual development work myself in the AWS platform.
Certified Database Specialty: In addition to the knowledge I had gained from studying for the two previous exams, I had finally started to play around in the AWS console personally, so I had a tiny bit of AWS database development before starting a course for the exam.
While it’s best to actually develop in the AWS cloud before trying to take an exam, it isn’t required in any sense. Preparing for the exams is actually a great way to learn more in depth about all the AWS services so you can start working with them yourself.
How long I learned and studied before taking the certification exams
Certified Cloud Practitioner: 2-3 months
Certified Solutions Architect: 4 months
At the time I was learning and preparing for this exam, I had quite a bit of free time during my average work day so I spent many hours each week preparing for this exam
If you only have a couple hours available each week to prepare for this exam, you will likely need more than 4 months to learn and prepare for the exam
Certified Database Specialty: 4-6 months
I did not have as much dedicated time during my work weeks to focus on this exam, so it took me longer to prepare (although I can’t remember now exactly how many months I prepared for it)
If you only have a couple hours available each week to prepare for this exam, you will likely need closer to 6 months or more to learn and prepare for the exam
How I use the ACloudGuru learning platform
ACloudGuru is a learning platform specifically aimed at helping developers learn how to use various cloud technologies, including AWS. They seem to have a course designed for every possible AWS certification you would want to achieve.
In all honesty, I’m not sure I would personally seek out using this platform again for any future certifications if I had to pay for it myself. My work pays for every developer to have a license to the platform, and it’s a great jumping off point for learning enough about AWS to pass the certification exams, but it certainly has flaws. But if you have the opportunity to work with these courses, they do a good enough job to get you 90% of the way to what you need to prepare for the AWS certification exams, so they’re certainly not a bad option.
Pros of ACloudGuru
It offers a unified, full course experience to cover most topics you will need to know to pass an AWS certification exam
You can watch the videos at your own pace and come back to any video whenever you need to
Each video and section of a course will offer some links to read for further information, which can be helpful to find the AWS documentation you need to read
Each section of the course has a review quiz to test your knowledge as you go, which can help you remember things better
There is at least one practice exam provided to cover all of the course’s content at the end of the course. You can take this exam as many times as you would like, and the questions are not always the same or in the same order (so you can’t just pass by memorizing which answer to select–A, B, C, or D).
Cons of ACloudGuru
I found that the videos often focused on things that weren’t that important for the exam and would somehow cram the most important details into one or two sentences that I would then have to fully unpack myself.
Need to supplement the course teachings with additional reading of relevant AWS white papers or other documentation online
The course content isn’t updated as frequently as the exams seem to be updated, so I ended up covering a lot of content in the course that was never covered in my exam, and also didn’t cover some exam topics nearly enough with the courses.
The editing of the videos wasn’t the best in the Database Specialty course, which I find disappointing for a platform that I’m sure costs a lot of money. There were many videos where it seemed like things were kept in that should have been edited out (like actual bloopers, not just irrelevant content).
Practice exam questions aren’t written in the same manner as the actual exams which might lead people to believe that the actual exams will be easier than they are.
The course definitely doesn’t spoon feed you everything for the exam, you have to be willing to do your own additional research and experimentation to be fully prepared
How I used the AWS white papers to learn more
As I mentioned in the section above, in addition to going through the ACloudGuru courses online, I also read a lot of documentation and white papers from AWS to feel like I truly had a sense of how each service operates.
My approach for learning was to watch each video in the courses from ACloudGuru, making sure to take thorough notes of what was covered in each video. Then after I had completed each video, I would review any documentation linked for that topic (there was usually at least one document per video, but not all videos have links to AWS documentation for further reading). If there were topics covered in the video that I felt weren’t covered well enough or that I was still confused about, and those topics didn’t have documentation linked to them in the course, I would seek out AWS and other documentation to learn more about the topic. And would also then take notes on those documents.
Although reading documentation is never the most interesting thing you could be doing with your day, doing it really does pay off when it comes to taking the exam, so you should try to read the AWS white papers and documentation for each service when possible during your studying journey. And make sure to take good notes. For the two tougher exams, I filled 1/2 – 3/4 of a composition notebook with notes for each. There was a lot of content to cover for each exam and I made sure to take thorough notes.
Additional tools I used to help myself study
After I made my way through the entire ACloudGuru course for each certification exam and had read enough AWS documentation to fill my head for a long time, I would then try my best to synthesize and recapture my notes in a useful way in order to do my final studying. For all three of the exams I have taken, I used note review and study skills that I used in college.
Custom practice tests to help review notes
I feel like this is one of the nerdiest things I can admit to, but I swear it works so I’ve done it for all 3 of the exams I’ve taken. After my notes were completed, I went through them again, by chapter of the ACloudGuru course, and wrote my own practice exams to test myself with as a first pass. Doing this does take a lot of time and paper, but I personally think it’s worth it.
To make these personal tests based on my notes, I would essentially turn the most important bullet points into questions that I could then answer. So, for example, say that I have a note that says “Redshift is used for data warehousing and data analytics, not OLTP”, I would then turn that into the question “Which AWS service can be used for data warehousing and analytics but isn’t suited for OLTP data?”. I would develop these custom tests using a Word document and would then print it out and go through all the questions I made for myself, trying to use my memory and not my notes whenever possible for the best recall and memorization.
Flash cards for quick and repetitive review of high-level ideas
A high school and college classic study tip, creating and using my own flash cards really helped me burn the necessary knowledge into my brain before each exam. And I created literally hundreds of flash cards for each exam. Sorry, trees, but the numerous flash cards really helped me so it was worth the use of so much paper.
While the thought of creating and reviewing hundreds of flash cards may seem daunting, I hardly ever tried to work through all of them at once. Instead, I made, grouped, and reviewed flash cards by topic or section of the ACloudGuru course and only ever really reviewed on section of cards at a time.
My best tip for getting the most out of flash cards is to remove from your review stack anything that you can answer immediately upon seeing the card, and keeping the cards that took you a while to remember the answer to or that you couldn’t answer at all to review again later. Keep reviewing the problematic topics over and over until they are no longer problems.
What practice exams I used to prepare
While each ACloudGuru course does include a practice exam to help you test yourself on the course’s contents, I personally do not think that those practice exams are useful in preparing for the exam, outside of general recall of the topics that could be on the exam.
What was the most useful part of my study routine for each of the AWS certification exams was to take practice exams through Udemy/Tutorials Dojo. I don’t know how those folks have done it, but their practice exams are extremely similar to the actual AWS exams. The wording of their questions and answers are basically the same as the real exam, which I found to be the most helpful thing to use for studying, since it prepares you for the verbose formatting of the AWS exam questions. In comparison, the practice exams from ACloudGuru have very different formatting and wording, which, in my opinion, isn’t useful for preparing for the real exams.
You can get the Tutorials Dojo exams through their website directly or through Udemy, but you will have to pay. However, the price is reasonable and well worth it (make sure you wait for a sale on Udemy to get the “course” for ~$16 instead of the list price of $80+). The price is especially reasonable if you’re in a situation like I am where I would have to repay my company the multi-hundred-dollar cost of the exam if I failed. Pay the little bit of money and retake the practice exams until you get 70% or higher on them repeatedly. Also make sure to review the correct answers and explanations for those answers on questions you get wrong, because those explanations to be super helpful.
Conclusion
Overall, it does take quite a bit of time and effort to fully prepare yourself to take one of the AWS certification exams, but it is all totally doable and the exams are not impossible to pass. Just make sure you do your due diligence in studying before signing up to take the exams. If I can pass them, you can pass them.
This post is going to really deviate from my normal content, except for the fact that I am still writing about technology. My husband and I recently purchased our first house, which was a new build. Because of that, Google and every other map service of course did not know that our house exists, and that was becoming annoying while trying to help other people navigate to our new address.
I did a lot of googling and reading of support forum answers trying to find out how to add my new address to Google Maps, but nothing that I found online was possible when I went into the app. A lot of the suggestions seemed to be really outdated for the Google Maps UI. I eventually figured out how to add it myself through poking around the app, so I thought I would share how I did it in hopes of helping someone else who was struggling to find help with other online resources.
These instructions cover how to add an address to Google Maps using the iPhone app, I’m hoping it would work for the Android version as well, or even on a browser, but I’m not sure since I haven’t been able to try with either of those options.
Quick Overview
Open the Google Maps app
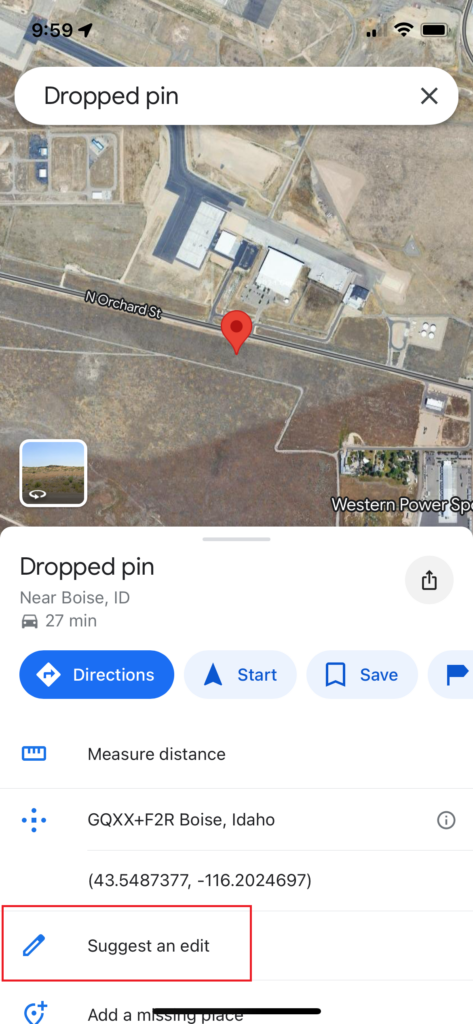
Press and hold on the location of the address you want to add to drop a pin
In the menu that opens when you drop a pin, select “Suggest an Edit”
In the next menu, select “Fix an Address”
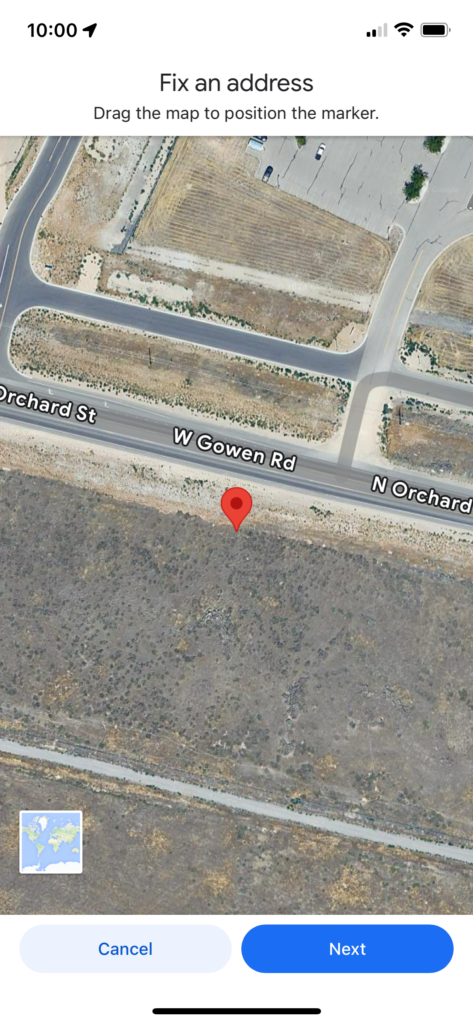
Confirm the location you are adding using the map on the next screen. Move the map if needed. Then click “Next”.
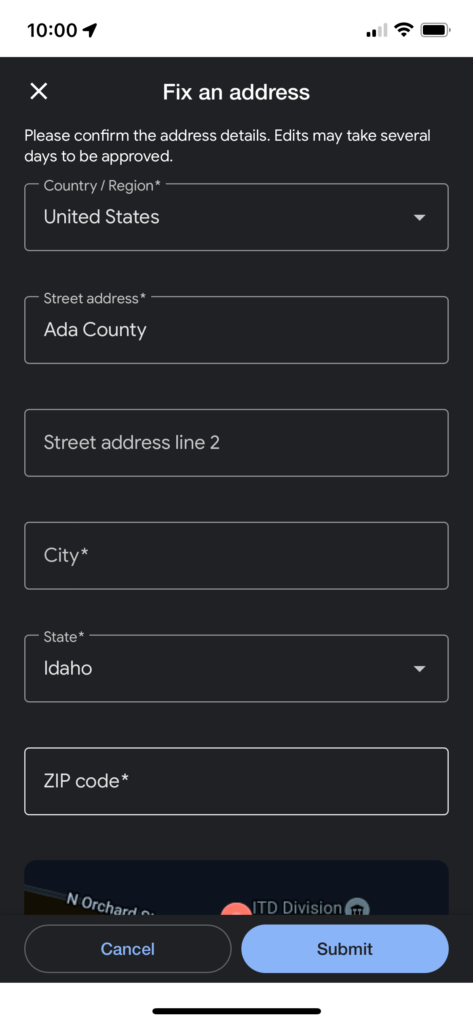
Enter your new address information in the fields provided and then hit “Submit” when ready to add it.
Open Google Maps and add pin where your address is
In the iPhone app, you can press and hold on the map in Google Maps to drop a pin, and that is what you want to start with. That will bring up a menu on the bottom half of the screen, choose “Suggest an Edit”.
Select the option to “Fix an Address”
In the menu that is brought up after you select “Suggest an Edit”, choose the option to “Fix an Address” (although technically the address doesn’t exist yet).
Confirm the location of the pin is where your location is supposed to be
After selecting to “Fix an Address”, the app will bring up a map again for you to confirm the location of the address you are fixing/adding. You will need to drag the map around until the pin in the center of the screen is where you would like the address to be. When I was adding my address, I put the pin on top of my current location while at home to make sure I put it in the right spot.
Enter your new address information
The very last thing you will need to do is to enter your address correctly into the fields you see in the final screen. Double-check to make sure you don’t have any typos or any other mistakes, then click “Submit”. After you submit the address information, the suggested edit apparently goes through some sort of review process at Google, but you should get your address added to the map within a few days of submitting.
Welcome to another coffee break post where I quickly write up something on my mind that can be written and read in less time than a coffee break takes.
This morning I was doing my normal work when I had a realization that I should share something I find super useful and use frequently use in SSMS that a lot of developers seem to not know about. They are small actions but they make your life easier when doing a lot of query editing in SSMS.
How to Minimize the Results Window
I have told many developers about this keyboard shortcut and they all appreciated it. I’m sure most people that frequently work in SSMS would like to be able to minimize and maximize the results window as needed in order to give themselves more screen real estate to work with while coding but still be able to see their query results as needed. But there is no minimize button for the results window of SSMS.
The only way that I know of to minimize and then maximize the results window in SSMS is to do CTRL + R. I use this keyboard shortcut every day at work while writing queries or updating existing queries.
How to Refresh the Intellisense
I have also had to tell many developers about updating the intellisense suggestions of SSMS since it will often trip them up if they don’t know how it works. First, you should understand that the intellisense offered by SSMS is only accurate as of the time you opened your query window or changed the connection for the query window (usually). If you’ve been working in the same query window for a while and have made DDL changes to any tables, functions, stored procedures, etc., intellisense is likely out of date and could tell you that a table or column you’re trying to reference doesn’t exist when you know it does.
If you ever run into this situation where it’s telling you something doesn’t exist but you know it does, use CTRL + SHIFT + R and the intellisense suggestions/corrections will be updated.
Bonus shortcut for Red-Gate SQL Prompt
Similar to the intellisense built in to SSMS, if you are using the SQL Prompt tool from Red-Gate, you can run into the same issue with the tool not recognizing that objects or columns exist when you know that they do. If you run into that issue and would like to update the suggestions list for SQL Prompt, use CTRL + SHIFT + D.
Welcome to another coffee break post where I quickly write up something on my mind that can be written and read in less time than a coffee break takes.
When you start working with Git Bash for the first time (or you have your computer completely reimaged and have to reinstall everything again like I did recently), you will likely encounter a command line text editor called Vim to edit your commits or to do any other text editing needed for Git. And if you’re like me, you probably won’t like trying to use a keyboard-only interface for updating your commit messages. If that’s the case, then I have a quick tutorial for how to make Git use a normal text editor to more easily update your commit messages.
What is Vim?
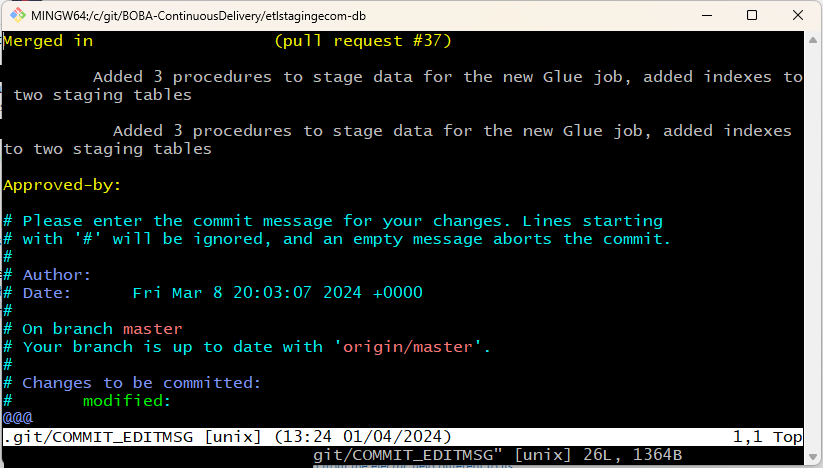
Vim is an open-source text editor that can be used in a GUI interface or a command line interface. My only familiarity with it is with the command line interface, as the default text editor that Git comes installed with. If you don’t update your Git configuration to specify a different text editor, you will see a screen like the following whenever you need to create or update a commit message in a text editor (like when you complete a revert and Git generates a generic commit message for you then gives you the opportunity to update it, or when you want to amend an existing commit). This is what the command line editor version of Vim looks like (at least on my computer).
I personally don’t like this text editor because to use it, you need to know specific keyboard commands to navigate all operations and I don’t want to learn and remember those when I can use a GUI-based text editor instead to make changes more quickly and intuitively.
After you execute that command in Git Bash, you can run this command to test it, which should open up Notepad++ to try to update the last commit you made: git commit --amend.
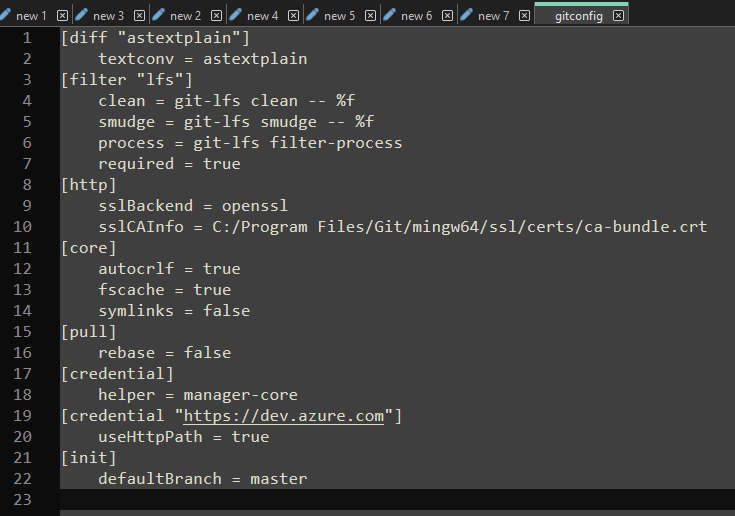
That blog post then says that you should be able to double-check your Git configuration file to see that the editor has been changed, but my file doesn’t reflect what the other post says despite Notepad++ be opened for commit messages after I ran the change statement. This is what my gitconfig file currently looks like after setting the editor to Notepad++:
So your mileage may vary on that aspect. As long as the change works for me, I’m not too concerned about what the config file looks like.
How to Revert Text Editor to Vim
If you ever want to change back to the default text editor, you can run the following command to switch back to Vim, and once again confirm it worked using the git commit --amend statement:
git config --global core.editor "vim"
Conclusion
Changing your default text editor for Git Bash is extremely simple as long as you know where the exe file of your preferred editor is stored on your computer. It’s also simple to change back to the default Vim editor in the future if you want or need to.
Note: I am NOT sponsored in any way for this post. Everything contained in this post is my honest opinion and review of the software.
For about a month now, I have been working with a new software for taking notes for my blog as well as personal learning projects, and I have really been loving the tool so thought I would share it and how I get the best use out of it. The tool I am now using is called Obsidian, and it has turned out to be a very simple but useful software for taking notes of any kind for any subject.
Before I made the switch to Obsidian, I was using good old OneNote, the built-in Microsoft note taking software. That worked well enough for me for several months, but I eventually decided to make the switch from it because I was really disliking the organization and look of OneNote and was finding it hard to customize the formatting of my text in the way that I wanted. OneNote has predefined styles for headings, plain text, and code snippets, and I wasn’t liking those options anymore. In previous versions of OneNote, I swear I was able to customize the styles to my liking, but the version I had been working with before switching to Obsidian did not allow that. Plus, I was really just finding the whole app a bit ugly and outdated looking, so I started the search for a new tool.
In my search of note taking options, there were a lot of different apps that gave the customization I wanted, but they usually required a subscription to use them for more than a few simple notes, and I am adamant right now that I don’t want to add another paid subscription to my life. The one really great looking option was Obsidian.
I sat on my research for about a month until I got really tired of the flaws of OneNote, especially the code formatting options since most of the notes I have been taking recently have been with Python. Then I finally downloaded Obsidian and have been using and loving it since.
What is Obsidian?
Obsidian is a markdown-based, text-editor-like note taking tool that is more bare-bones than OneNote but allows you to do a lot more formatting and linking of notes than OneNote is ever going to be capable of. Obsidian even includes a graph features that allows you to look at how all your notes are linked together, which it says can help you visually see how your thoughts are connected.
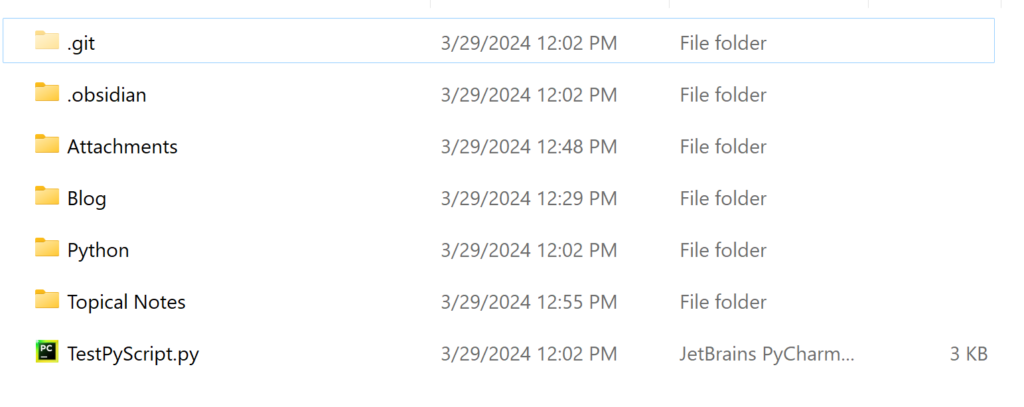
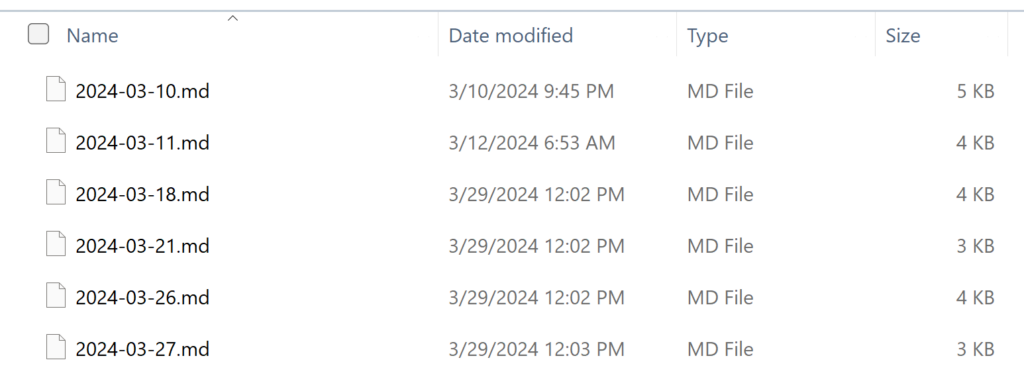
On the back end, your Obsidian Vault (how they refer to what I would call a notebook) is simply a folder structure full of individual markdown (.md) files that each contain one of your pages of notes. Since it is so simple on the back end, it is easy to keep organized and backed up with any software you normally use to backup your local files.
Below are screenshots showing what my Obsidian notebook looks like on my computer in File Explorer, and one screenshot showing what those same notes look like within the Obsidian app.
Screenshot showing the folder structure within my Obsidian Vault using File ExplorerScreenshot showing the individual note markdown files within the Python folder of my Obsidian vaultScreenshot of the Vault explorer pane in Obsidian
As you can see from the screenshots, it really is just simple files stored on my computer, but those files look much sleeker and more organized within the actual Obsidian app.
It took me a few days to get used to using Obsidian, but I got the hang of it quickly and decided it was going to be my one source of truth for notes going forward. It’s bee nice enough to use that I have even stopped using my physical notebooks for now, which I didn’t think would ever happen (where will I put all of my fun stickers now if not a physical notebook??).
How I organize my notes
As you can see from the screenshots above, I currently have my notebook organized into multiple folders. The most notable are Attachments, Blog, and Topical Notes. The best part of Obsidian is that you are able to customize it to meet your exact needs, so I am only showing how I have mine organized to maybe give others ideas for how they might organize their notes. This organization is very specific to my current needs.
Attachments
I created this folder based on advice I read from others online who use Obsidian as well, and it’s a great way to keep any images you have pasted into your notes organized, due to how Obsidian handles attachments in notes. When you insert an image or screenshot into a note, not only does the image get pasted where you want it to in your note, but that image also gets saved as a separate file into your Vault, at the very top level of the file structure. While that may be fine for others, I was really disliking it due to the number of screenshots I was copying into notes, so the main view of what’s in my notebook was getting very cluttered with all the image files visible at the top level.
(Technically, the image that you see pasted into your notes is just a link to the physical image file, but done in such a way that it appears as if the image is just stored within the text. But since every note page in Obsidian is a markdown file, it cannot store in itself an actual image, so that’s why the links are used.)
So to clean up my vault/notebook a bit, I created the Attachments folder and I copy all image files and other attachments into the folder after pasting them into my notes. It can be a bit annoying at times because I have to move every single image that I paste into the specified folder, but it’s really not that bad and makes the notebook look nicer so I’m happy to do it.
Blog
As you might guess, the Blog folder contains all my notes related to my blog, including drafts of posts that I am working on as well as other pages including lists of tasks I want to accomplish and future goals for the blog. Nothing too crazy in this folder.
Topical Notes
This section is where I put various notes about technology or anything else I am working on learning, when the topic isn’t big enough for its own folder/section but needs to be organized somewhere. Currently, this folder only contains some notes for OLAP data storage & processing as well as Snowflake.
How I save my notes
Unless you want to pay for a subscription, you will not have a built-in function for saving your Obsidian Vault to the cloud or have any easy way to sync your files across multiple devices. But thankfully, since everything with the tool is file-based, it is very easy to use an existing cloud storage service you may already have to save and sync your files across devices. One option would be to use OneDrive, another is to use Git and that is the option I am currently using.
To make my notes available to me easily no matter where I may be working, I decided that the best solution for saving my notes off my computer would be to use GitHub, since I already have an account with them. I created a private repository on GitHub and pulled that down to my local and set up Obsidian in that repo. Since creating that, it has been super easy and intuitive for me to save my notes every day by pushing to the remote GitHub repo.
Other Features
One main feature that Obsidian uses as a selling point that I haven’t found useful for my own purposes yet is the Graph View of my notes. The graph view shows you a physical graph (like the data structure) of how your notes are linked to each other. I haven’t found this useful because, while I do link some of my notes occasionally, I am not doing a lot of linking and don’t feel the need to view my notes in essentially a “mind map” format. But others who are more visual thinkers could find it useful. That feature is certainly unique to this software.
Screenshot showing the Graph View of my Obsidian notebook, very few links between files at this point
As you can see from that screenshot above, I have hardly done any linking with my notes yet, so the graph view doesn’t show anything useful for me. (FYI the blanked out boxes are for upcoming posts that I didn’t want to leak.)
Obsidian also has a feature called Canvas, which I haven’t played around with much, but it seems like a tool that might be nice to help you plan out large projects or any type of work with notes or ideas that connect to each other. The Canvas reminded me a bit of LucidChart, but it seems more focused on helping you organize your thoughts rather than to make flow charts.
Screenshot showing a sample Canvas I created using one of my Obsidian note pages and a “card”
Pros of Obsidian
Works well with code snippets, since it has simple markdown functionality for that style
If you are a programmer or are just learning code, being able to format the code nicely in your notes is wonderful
You don’t need to use the mouse to change to code formatting while typing, just use the markdown symbols
Notes are stored on your own system which makes them as secure as your computer– no need to worry that the company is going to get hacked and compromise your data
Simple yet robust note-taking features, with just enough styling options to make it personal yet not hard to read
Modern design and function
Can use most keyboard styling shortcuts available in other text editing tools (e.g. CTRL+I to make text italic, CTRL + B to make text bold, etc.)
Cons of Obsidian
Uses markdown styling for all text formatting options, so you need to learn that to be able to style text how you want
I have been going back to this cheat sheet multiple times to remind me how to do markdown formatting
Once you get the hang of it, it’s really easy to do all sorts of custom formatting
Must buy a license if you want to use it for work, even if you’re not the owner of the company
I would love to be able to use this tool for all my work notes since it’s so customizable yet simple
The current subscription price for one person is $50 USD per year, which is reasonable, I just don’t want to pay for yet another subscription service right now
Must manage your own cloud saving and syncing across devices if you don’t want to pay for Obsidian Sync
Difficult to add color or other text customizations beyond bold & italic to your notes, must use inline HTML to add colors
Can’t specify your own ordering of notes, will always be placed in alphabetic order
I think this is the biggest annoyance to me for the most part, sometimes it would be nice to keep your notes in a specific, non-alphabetic ordering
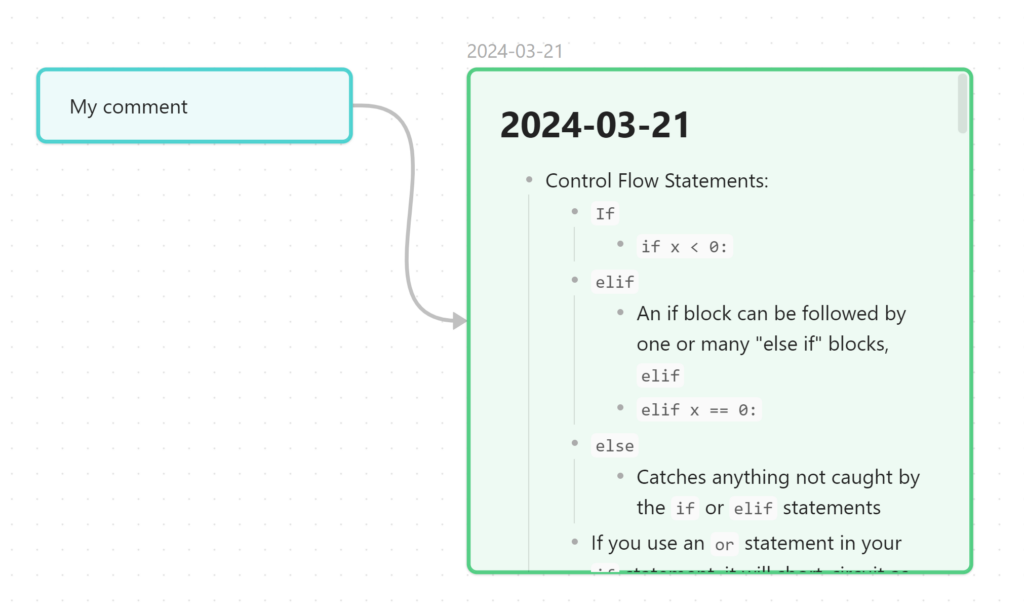
The easiest way to keep things in the order you want is to use numbers or symbols at the beginning of note names (I put the date at the beginning of each note to keep it organized better, and then put symbols like ! at the beginning of the title for notes I always want at the top of the list)
Conclusion
Obsidian is a great free tool to use for taking organized and useful notes right on your own computer. While there are a few features of the tool that are annoying to use at times, it has more positives than negatives. I would recommend that anyone in a technical field take a chance with Obsidian for their notes solution if they’re looking to try something new and modern.
Welcome to a coffee break post where I quickly write up something on my mind that can be written and read in less time than a coffee break takes.
Recently, while exploring possible options for converting our existing ETLs to working with Postgres, I found myself asking the question “can you update a table using a view that has been created on that table?” and the answer is Yes for both Postgres and SQL Server, which I learned after doing some research.
In Postgres, there is a concept of an updatable view, which is essentially a very simple view, that usually doesn’t include a join to a second (or third or more) table. There are other qualifications for what makes a view updatable, but it is generally the fact that the query creating the view is very simple. If a view meets these criteria, you can in fact update the base table using a query to the view.
For example, if you have a table called employee, then you create a view on top of that table which selects most but not all the columns from the base table, with the view being called v_employee, you can then run this query and it will update the data in employee.
UPDATE v_employee
SET full_name = 'George Smith'
WHERE emp_id = 15;
This concept is intriguing to me, and could also be really useful in updating our ETLs more quickly after we convert to Postgres, so I thought I would share this fun little fact with everyone.
If you haven’t seen it already, I had two previous posts listing differences I have found between Postgres and SQL Server while learning to develop in the Postgres environment. As I am continuing to learn, I am finding even more differences that I think are interesting, and they are going to be shared below.
The difference between SQL Server and Postgres for creating a temp table is small, but significant. Mostly because my company uses temp tables frequently in our stored procedure and ETL code, so as we migrate off of SQL Server, we’re going to have to do a lot of updating to move temp table statements to Postgres. The syntax for SQL Server is to use a hashtag/pound/number symbol in front of the table name, or to use a double-pound symbol to create a global temporary table, like “CREATE TABLE #MyTable” or “CREATE TABLE ##MyGlobalTempTable“. In Postgres, the syntax requires that you use the TEMP or TEMPORARY keyword to make the temp table, like “CREATE TEMP[ORARY] TABLE my_table“.
You also have to use the TEMP or TEMPORARY keyword when creating a temp table in Postgres by doing a SELECT INTO statement, such as SELECT column1, column2 INTO TEMP TABLE my_table. In SQL Server, that same command would look like SELECT column1, column2 INTO #MyTable.
General differences between temp tables in each engine
Not only is the way you create temporary tables different between Postgres and SQL Server, but how the tables are actually stored on the database is completely different between the two as well.
In SQL Server, any temporary objects are stored in a separate database called tempdb. When creating a temporary table, you can specify whether it’s localized to your current session only or whether it is a global temporary table that can be accessed from different sessions or query windows, as I mentioned above. To do the first, you specify the table name as #MyTable, then the do the latter, you specify the table name as ##MyTable.
In Postgres, temporary tables are not stored in a separate database. Instead, they are put into their own system schemas whose names are based on numerical values (ex. pg_temp_1, pg_temp_2, etc.), so it’s harder to see the specific location where your temp table is being stored. You also are generally unable to access a temp table in one session from a different session, so there is no concept of a global temp table in Postgres.
One similarity of temp tables between the two engines, though, is that they are dropped/deleted in both as soon as the session in which they were created ends.
Getting the current UTC time
In SQL Server, there are two built-in functions that allow you to get the current UTC time, GETUTCDATE() and SYSUTCDATETIME(). The former returns the time in type DATETIME, and the latter returns the time in type DATETIME2 (more precise).
Postgres also has multiple functions and methods of getting the current UTC time, but they look much different from each other than the SQL Server options look. While there are more than just these two options, the most common ways to get the UTC time are the following:
SELECT NOW() AT TIME ZONE 'utc';
SELECT CURRENT_TIMESTAMP AT TIME ZONE 'utc'
Although the two options look different, they will return the same value. I’ve had some issues trying to use one versus the other in different scenarios in the SQL code I’ve written for Postgres, so it seems like there may be times where it’s better to use one over the other, but I’m just not able to differentiate those scenarios right now. There are also other options for getting the current UTC time, but I won’t cover those here.
Updating a table with a JOIN
One of the biggest syntax differences between T-SQL and pgSQL that has really gotten me confused so far is the formatting of an UPDATE statement that includes a JOIN to a different table. To me, the syntax of T-SQL makes a lot more logical sense and the pgSQL syntax doesn’t seem as intuitive. The T-SQL syntax is as follows:
UPDATE p
SET p.MyColumn = s.MyColumn
FROM person AS p
INNER JOIN staging AS s
	ON s.MyColumn2 = p.MyColumn2
Then the syntax for pgSQL is:
UPDATE person
SET p.my_column = s.my_column
FROM staging
WHERE staging.my_column2 = person.my_column2
To me, the pgSQL syntax doesn’t scream “joining to a different table”; it really looks to me like a simple update statement without a join. Yet the join is there. Also, it doesn’t seem to let you use aliases for the query, which I also dislike since I use aliases for every query I write. I wish I could change the standard for the pgSQL syntax, but obviously that isn’t within my power so I’m going to have to learn to live with it.
Making a column nullable
Unlike the pgSQL syntax for updating a table using a join to a different table, I actually like the syntax of making a column nullable in pgSQL more than I like the T-SQL syntax. The pgSQL syntax seems much more clear and straightforward for this action. The syntax in Postgres for making a NOT NULL column nullable is as follows: ALTER TABLE my_table ALTER COLUMN my_column DROP NOT NULL;
The T-SQL syntax for the same action is less clear, since you are basically redefining the column like you would if you were adding it, instead of specifying what you are changing. If you had a column that was set to NOT NULL in a table, you would write out the whole definition of the column again but write NULL instead of NOT NULL. For example: ALTER TABLE Mytable ALTER COLUMN MyColumn INT NULL;
I’m not fond of that T-SQL syntax because you can’t tell at a glance what is changing with the column definition unless you already knew what it was before running the statement. Since that same statement would also be the same syntax for changing the data type for the column if the column was already set to be nullable.
Data type for automatically updated binary numbers
In SQL Server, there is a data type called TIMESTAMP or ROWVERSION that is an automatically updating binary value that is added to a record when that record is updated or inserted. (The TIMESTAMP synonym for the ROWVERSION data type has been deprecated.) My company currently uses this data type heavily to help identify changed data quickly for our ETLs. As we are looking at moving everything into the Postgres world, we have found that Postgres does not have any built-in functionality similar to the ROWVERSION column, at least not at the precision we would need it to be (you can read about system columns here). You of course can store binary data within a table, but there is no data type for columns that will automatically increment a binary value when data is changed with the same precision as SQL Server’s ROWVERSION.
There do seem to be some ways people have replicated that functionality using custom triggers/functions that we are considering, but I haven’t looked into it that much personally so I cannot yet speak to how well that would work to replicate SQL Server’s ROWVERSION functionality. So we are either going to have to add these custom triggers/functions or find another reliable and fast way to identify changed data between source and target for our ETLs. Soon, I am hoping to do a blog post about the possible Change Data Capture (CDC) options for Postgres that we are considering.
Conclusion
There are so many weird quirks and differences between SQL Server and Postgres that I am having to learn as I grow in the Postgres development space. While I have already listed so many of them across several posts now, I am sure there will be many more to come as I keep learning. And I will continue to compile a list of the differences and share them here on my blog as I find them.
Despite already writing a similar post about this topic myself, I have still been struggling recently to keep my work at work, struggling with not thinking about it in my free time in the evenings and on weekends. Looking for some professional guidance from an outside perspective online, I found this great article from Harvard Business Review that I want to share with others.
Using Technology to Log Out for the Day
Steps 1 and 3 from the article come easily to me. While I don’t have specific hours I am required to be at work, I am great at keeping a regular work schedule for myself that I don’t normally deviate from. Once I log out at 5 PM each day, I don’t check Teams messages, and I don’t even have my work email on my phone so I can’t check that even if I wanted to. I manage this system using the Focus Time feature on my iPhone.
I have two different scheduled Focus Time settings for my phone: 1) Work and 2) Personal Time. I’ve set up the Work Focus Time to be active during my normal work hours and it only allows notifications from Teams, my two-factor authentication apps, and a couple of important family members. Then I’ve set up the Personal Time custom Focus Time to be the opposite: it runs from the time I get off work to the time I start work in the morning and blocks any notifications from Teams or other work-related applications.
This system has been working really well for me and I would recommend others try it out if they haven’t already, because then you never need to think about which notifications to turn off after work each day, or worse, just keep getting those notifications all evening and weekend long that take your mind back to work when it shouldn’t be there.
Struggling with “Mental Clarity” Around Work
Steps 2 and 4 from the HBR article are more challenging for me lately than I would like them to be. Step 2 is to get “mental clarity”, which essentially means that you should know each day what tasks you need to accomplish at work, by keeping a running to-do list or somewhere else to manage all your thoughts about work. I used to be great at this before the last couple months, when my job became less clear and began changing. I stopped keeping a physical notebook because I needed a new system to keep related notes related and physically close since I now have larger projects to manage rather than small tickets to work on daily or weekly. Once I stopped heavily utilizing my physical notebook, I stopped creating daily to-do lists for myself to accomplish.
Not having a go-to place to list out all the current and future things I will need to complete has led to the problem of me randomly remembering important things I need to do for work at inconvenient times, like when I’m trying to fall asleep. I’m sure many can relate to that. This mental clarity step reminds me of the book “Getting Things Done” by David Allen that I read a couple years ago. One of the main points of that book is you need to be constantly dumping thoughts out of your head onto paper (or anywhere you want as long as it’s consistent) so your brain can trust it doesn’t need to constantly remind you of important things at inappropriate times. If you know that you always write important tasks in the same location, you know that anything important is in that location and not just in your head. The Harvard Business Review article made me realize I need to get back to that organization method and start actually using the digital note page I made awhile ago that is supposed to act as my catch-all list of items on my plate now and in the future.
One final note on the mental clarity step of keeping work at work– I actually do still manage to complete an end-of-day wrap up each work day where I write out everything I accomplished throughout the day along with notes for what I need to do the next day and a review of the next day’s calendar. I occasionally skip days of this, so I would like to schedule time for this each day going forward so I’m more diligent about doing it.
The Need to Feel Accomplished
The final step to keeping work at work recommended in the article that I’ve been struggling with the most recently is step 4, which says that you need to get work done at work. It may seem crazy for someone to not get work done during their work day if they’re showing up on time and leaving usually later than they should, but it is entirely possible if you allow your entire schedule to be consumed by meetings with no or minimal time between them. My job has morphed into a collaboration-focused position where I suddenly need to have meetings upon meetings about everything related to the projects I am working on. This means that on an average day, I have multiple hours of meetings with colleagues, and somehow they all seem to leave 30-minute gaps between to tease me with the possibility of getting work done, but then I never actually get time to focus in those gaps.
This cycle of continual meetings and no long stretches of work time has made it really difficult for me to have any decent amount of time to focus on the deliverables I need to complete. While sure, you could theoretically get good work done in the 30 minutes between meetings, reality is much different when you need to work on a confusing or difficult task. Those types of work items are better suited for longer stretches of dedicated focus time, at least one hour but hopefully two or more. That is a rare occurrence in my current work life and I want to change that, and will do so by following the recommendations of this HBR article, and actually some of my own advice from a previous blog post. I need to schedule blocks of one or more hours each day to focus on work. My plan is to do that on Friday afternoons the week before or Monday mornings the week of, so I can block out work time for an entire week to get ahead of meetings that will inevitably be scheduled.
Summary
While the advice of the Harvard Business Review article isn’t entirely new to me, it did act as a great trigger to remind me of the valuable work skills I have neglected recently so I can revive them. Going forward, I am going to revitalize my use of my own calendar and digit notebook to see if that helps me feel more in control and less caught up in the whirlwind at work.
Give the HBR article a read and see if any of it speaks to you like it spoke to me. Is there something in your work-life balance situation that could be improved to reduce your overall stress?