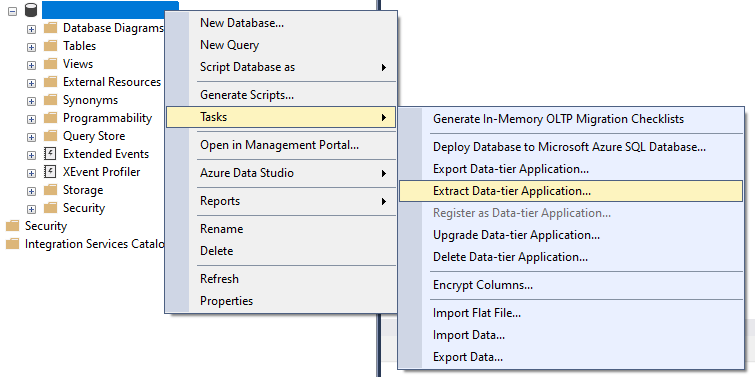
If you’ve been following along in my series on using Bicep templates to deploy database-related resources in Azure, you may have seen my template for creating Azure SQL Servers and Databases on GitHub which contains a section for defining role assignments. I haven’t yet covered the specifics of that type of resource in a post, so I will be going over that today to simplify the information you need to know to assign particular Role-Based Access Control (RBAC) roles to resources you’re creating in Bicep templates. Because why would you want to manually add roles to a resource that you’re automatically deploying? (You don’t!)
The template I am pulling the role assignment section from creates an Azure SQL Server, Azure SQL Database, and then a Key Vault, and you can learn more about that in my previous post. What I didn’t cover previously though, is that in my actual use case, I need to then give my team admin rights on the Key Vault after it’s created so that we have the permissions needed to add secrets to the Key Vault.
The Full Template
If you would like to see the Bicep template I will be covering in today’s post in full, instead of piecing it together from this post, you can find it on my GitHub.
Assigning RBAC Roles to Resources with Bicep
The process of creating role assignments on Azure resources using Bicep templates is relatively simple. The only data you need to supply to create such role assignments are the Object ID of the group or user you want to assign the role to and the ID for the specific role you want to assign. The hardest part of that is to find the ID of the role assignment in the Azure portal.
Get the Object ID for the user or group
To get to the Object ID value for the user or group to which you want to assign a role, navigate to Entra ID in the Azure Portal, then search for and select the user or group from the dropdown list. When you open the user/group, you will find the Object ID value to copy into your template.
Finding the ID for the Role Assignment
The easiest way to figure out the ID value of the role assignment you want to give to a user or group is to go to the type of resource that will get the assignment, in this case a Key Vault, go to the IAM page of the resource in the portal, and then view role assignments and view the JSON for the needed assignment. If you know of a better way, please let me know in the comments below!
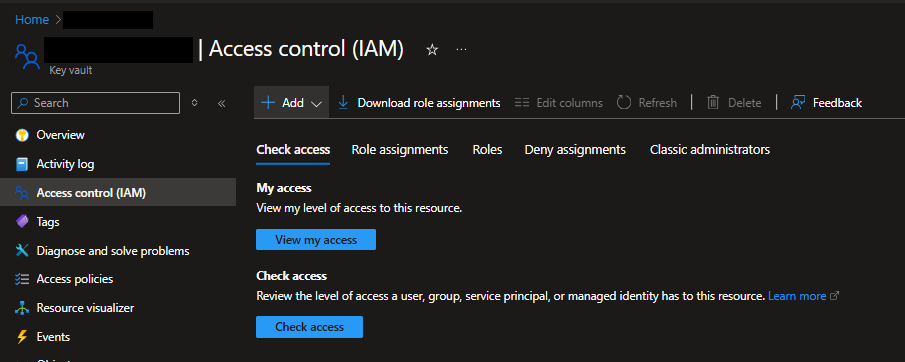
First, navigate to an existing Key Vault in your Azure environment and go to the “Access control (IAM)” page.
Screenshot showing the Access control page for a Key Vault resource in the Azure Portal
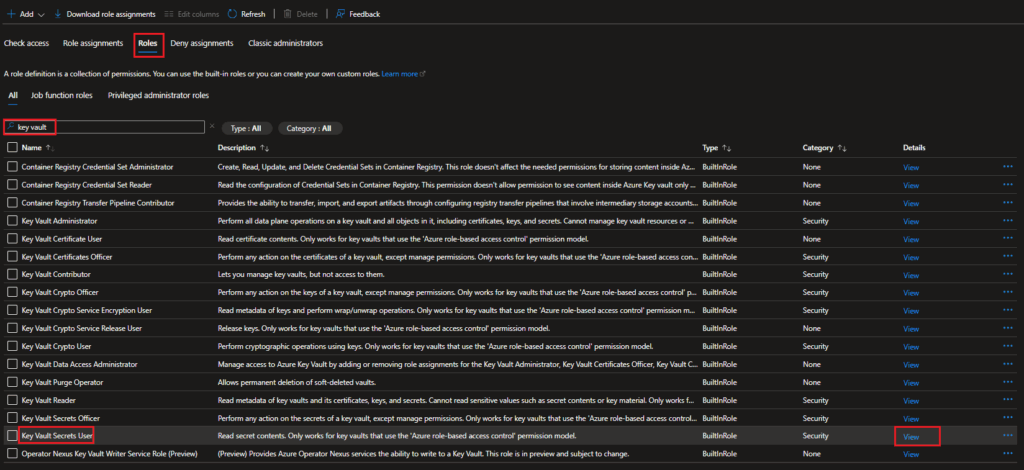
Then, click on the “Roles” tab. On that page, search for “key vault”, or whatever keyword will help you find the role you’re looking for. Once you’ve found the role you want to add through your Bicep template, click on the “View” link for the role under the “Details” column.
Screenshot showing how you can find a specific role from the Roles tab of the Access control page for a resource
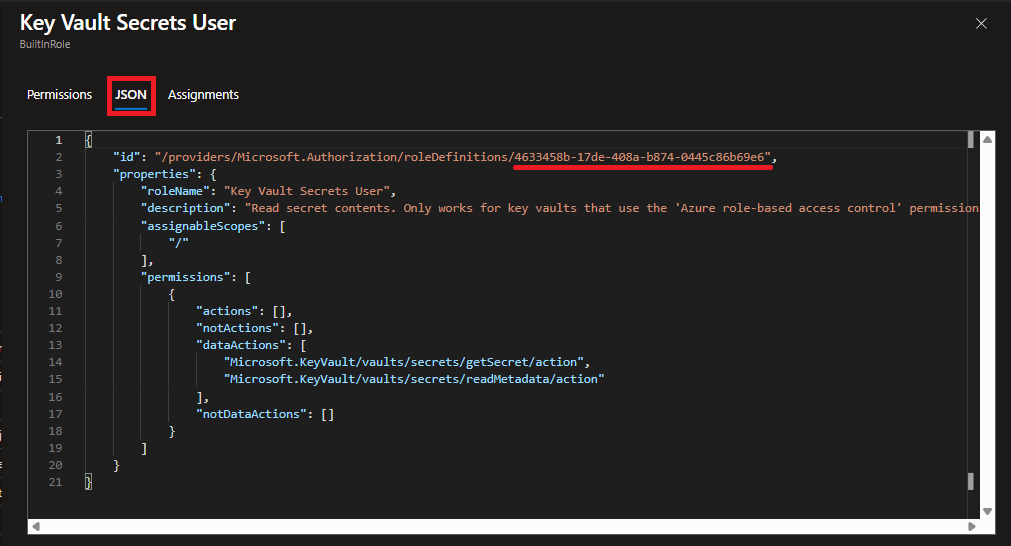
When you click on “View”, it will open another pane with details about the role. In that pane, select the “JSON” tab and then copy out the GUID value from the end of the string for “id” in the JSON description.
Screenshot of the Azure Portal showing where you locate the ID of a role assignment from the JSON details of the role
That is the value you will need to put into your template, so keep that handy.
Creating the roleAssignment resource
The short definition to assign a role to a user or group via Bicep is like the following:
var roleDefIDKVAdmin = '00482a5a-887f-4fb3-b363-3b7fe8e74483' /* The role ID for "Key Vault Administrator" */
var admin_entra_group = '0000-0000-0000-0000' /* Object ID for our Entra group */
var roleAssignmentName = guid(admin_entra_group, roleDefIDKVAdmin, resourceGroup().id)

resource roleAssignment 'Microsoft.Authorization/roleAssignments@2022-04-01'= {
  name: roleAssignmentName
  properties: {
    principalId: admin_entra_group
    roleDefinitionId:resourceId('Microsoft.Authorization/roleDefinitions', roleDefIDKVAdmin)
  }
}
Variables
I have 3 variables in my template that simplify the process of specifying the settings for the roleAssignment resource.
roleDefIDKVAdmin: The ID value I retrieved from the Azure Portal for the role I want to assign
admin_entra_group: The Object ID for the Entra group I am assigning the role to
roleAssignmentName: A value I generate to give to the roleAssignment resource based on the other two variables. Important to note: the part “resourceGroup().id” is what ties the role assignment to the key vault, because I am granting the role assignment at the resource group level. If you want to apply the role assignment to a single resource, you would do symbolicName.id instead.
Resource definition
Once you have the 2 values retrieved as I specified above, you simply need to pass the variables into the correct locations of the resource definition. The name of the resource is given the name from variable roleAssignmentName. The principalID is the user or group the role should be given to, which is provided through variable admin_entra_group. And finally, the roleDefinitionID which we provide by using the resourceId function in Bicep, which retrieves the actual ID value for a role given the ID value we retrieved manually from the portal. We are required by Bicep formatting to use this function instead of simply passing in that value ourselves.
Summary
Once you retrieve the ID of the user or group you want to give a role assignment to, get the ID for the specific role assignment you want to give, then tie those together with the Bicep template, it’s very simple to set up the resource definition to assign that role to that group when the template deploys.
This is the fifth in my series of posts about working with Bicep, the declarative scripting language created by Microsoft as the modern facade for Azure Resource Manager templates. Today’s post is focusing on a small bit of information that may be important for some Azure environments.
For those of us who work in Azure and have Azure SQL Servers and Databases, we often want those resources to be available to other resources, such as applications, within the Azure environment. To grant that access through the portal, there is a simple checkbox on the Networking page of the Azure SQL Server that will allow that. But if you’re trying to declaratively create your Azure infrastructure with Bicep like I am, how are you meant to accomplish checking that same box? That is what this post will answer.
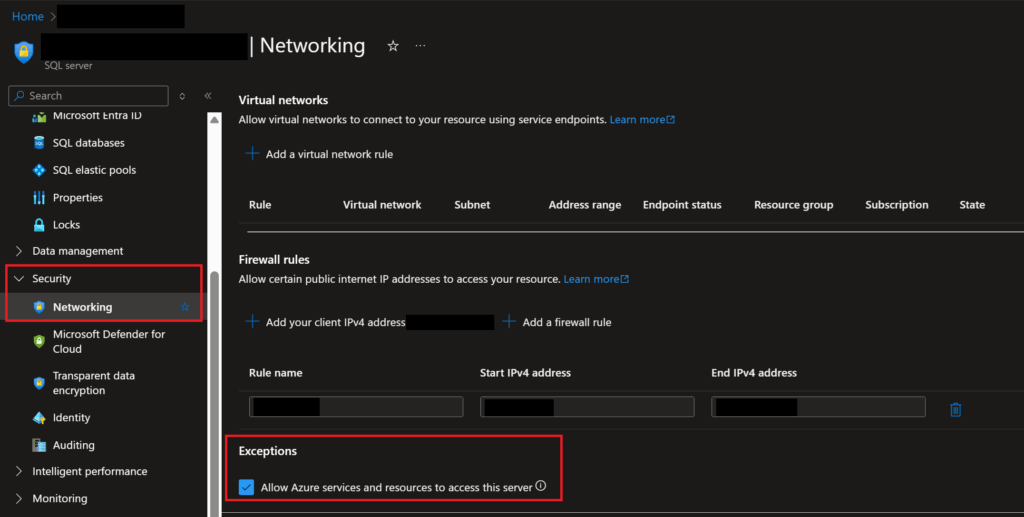
For those of you who may not be as familiar with what I was referencing above, what I am referring to is this checkbox that you find on the Networking page of an Azure SQL Server instance in the Azure Portal.
Screenshot showing the checkbox I am talking about, which allows other Azure resources to access the SQL Server resource
The purpose of this checkbox, as you can learn by hovering over the information icon at the end of the line of text for the checkbox, is to configure the firewall settings to allow inbound access from Azure resources. By default, this box is left unchecked.
Screenshot showing the information about the checkbox in the Portal screen
However, if you are in a situation where you have a separate application that is going to be accessing the server and database (which is fairly common), you will also likely need to ensure this networking rule is checked when creating new Azure SQL Servers.
How to check that box in a Bicep template
Understanding what the checkbox does
The heart of what that checkbox is doing in the background when it is checked is creating a firewall rule which indicates to Azure services if they are allowed to connect to the server and database or not. You can see what it’s doing by querying the system table which contains the list of server firewall rules, which I wrote about in a previous post.
When the box is checked, you can see a firewall rule for the server in the table sys.firewall_rules (run on the master database), called “AllowAllWindowsAzureIps” with start and end IP addresses both set to 0.0.0.0.
Screenshot of SSMS showing query that lists all server firewall rules
Conversely, if that box is not checked on the portal, you will not see a firewall rule in the table with that name or IP address range. Once you understand that the checkbox is setting a specific firewall rule for you in the background, it becomes simple to figure out how you can make that box get checked through a Bicep template.
Bicep setup to check the box
Since the checkbox in the portal is creating a simple firewall rule with a specific name and IP address, we can recreate that easily within a Bicep template by creating a firewallRule resource within the template and tying that to your Azure SQL Server with the parent attribute.
Create the sqlServer resource in the template
First, create the SQL Server resource so that we can tie the firewall rule resource to it. If you would like to see how to define such a resource to then create a firewall rule for, see last week’s post.
Create the firewallRules resource in the template
After you’ve create the Azure SQL Server resource in your script, the next step is to specify a second resource of the type firewallRules which we will use to check that box on the server’s networking page.
The important parts to note from that resource definition are the following:
name: 'AllowAllWindowsAzureIps': This specifies the name of the firewall rule that is going to be created. In this instance, the rule needs to have this specific name in order to check the settings box in the portal and allow the access
parent: sqlServer: This line is what tells the template that this firewall rule needs to be applied to the server we created in the same template previously, with the symbolic name of sqlServer.
endIpAddress: '0.0.0.0': This, along with the startIpAddress, must be set to all 0s, which is what Azure looks for when trying to see if another Azure resource has access to the server. This “range” is special, reserved for this situation.
startIpAddress: '0.0.0.0': This, along with the endIpAddress, must be set to all 0s, which is what Azure looks for when trying to see if another Azure resource has access to the server. This “range” is special, reserved for this situation.
Then you can also specify any and all Azure SQL Databases you want to be on your server in the template if you would like and then deploy the template. After the template has been deployed, navigate to your new server in the Azure Portal and review the networking settings to see that the “Allow Azure services and resources to access this server” box is successfully checked.
Summary
If you’ve been wondering how you can get the one box on the Azure SQL Server Networking page in the portal checked by using a Bicep template, it’s as simple as adding a firewall rule for the server with a start and end IP address of all 0s. This special firewall rule is used to indicate to Azure that a given resource is available to access through other Azure resources.
Let me know in the comments below if this tip helped you or if you have any questions regarding setting up firewall rules for an Azure SQL Server using Bicep.
Continuing on in my series about doing Infrastructure as Code (IaC) using Bicep templates in the Azure environment, today’s post will cover how to create an Azure SQL Server and Azure SQL Database with a deployable Bicep template. If you haven’t seen it yet, also check out my previous posts about creating an Infrastructure as a Service (IaaS) virtual machine with a Bicep template and using a Custom Script Extension with that type of template.
If you would like to see the Bicep template I will be covering in today’s post in full, instead of piecing it together from this post, you can find it on my GitHub.
What the template does
This template creates 3 different resources, which are the ones my team wants to spin up any time we have a new project of a certain type. The resources it creates are: Azure SQL Server, Azure SQL Database, and a Key Vault.
The Azure SQL Server and Azure SQL Database are the fully cloud, Platform as a Service (PaaS) resources for SQL Server. These resources make it very easy to create a new server and any number of databases on that server without having to manage the infrastructure yourself and to only pay for what you need to use.
The Key Vault is a resource type that allows you to store any secrets, certificates, or keys in a secure location which is accessible to other privileged resources in your subscription (like a pipeline executing code). This resource would be optional for others who are only looking to create the server and database, it’s just something I’ve included because I have it in my production template for my team.
In addition to those 3 resources, there are a few others created in my Bicep template that I will be covering in-depth in future posts to keep things shorter here, so you’ll only see those in my GitHub repo for now.
How to know what configurations to choose
When I first started writing this template, I had no idea what configuration values to choose. When looking at the Microsoft documentation for the resource type in Bicep, it seemed like there were endless possibilities for what I could choose to configure the resources. That was overwhelming to me at first. I then had the idea that I would compare the list of possible values in the documentation for the resource type to the settings of an existing resource with settings similar to what I wanted for my new machine.
That effort originally started with me looking at the normal portal view of the resource, but I didn’t stick with that for long. I quickly realized that the portal view of settings doesn’t show a lot of values that I was looking for. But I figured out that you can view all the setup information for a given resource in the portal in a JSON format, which is very similar to the Bicep formatting I was needing. I believe this JSON document is likely what would be used by Azure Resource Manager (ARM) to create the same resource, which is why it’s available for every resource in the portal.
To view the JSON version of the resource settings, navigate to the resource in the portal, then near the top right corner of the Overview page, you will have a link to “JSON View”.
Screenshot showing where you can find the JSON view of a resource definition in the Azure Portal
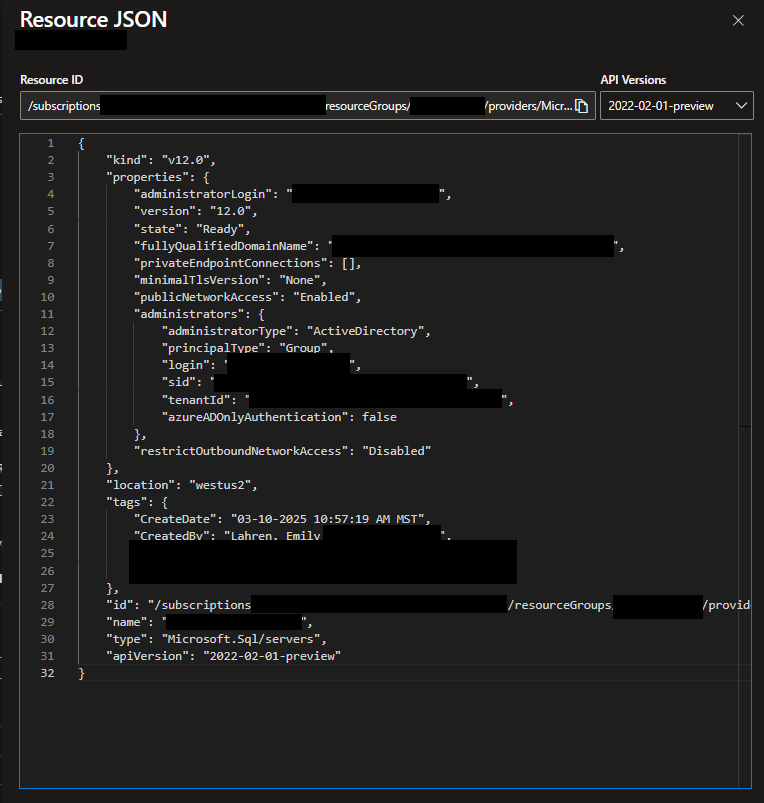
When you open that pane, you will see something like the following, with all pertinent details of the resource, which you can then use to help you create your Bicep template.
Screenshot showing the JSON definition for an Azure SQL Server resource
Creating the template
Parameters
When creating a new Bicep template, the first thing you’ll need to decide (apart from what specific resources you need to create) are what parameters you will need to input into the template, which will usually be fed in from a pipeline which deploys the template. For my template, I created the following parameters:
serverName (string): The name you want to give to the Azure SQL Server that the template is going to deploy. You may want to add a minLength and maxLength setting to this parameter is you are worried your template deployers are not going to choose names that are within the length requirements Azure requires.
databaseName (string): The name you want to give to the Azure SQL Database that the template is going to deploy. You may want to add a minLength and maxLength setting to this parameter is you are worried your template deployers are not going to choose names that are within the length requirements Azure requires.
keyVaultName (string): The name you want to give to the Azure Key Vault that the template is going to deploy.
location (string): The region you want the resources deployed in. If you are always going to want to use the same region, you can change this to a variable instead. I have set a default for this of “westus2”.
saLoginName (string): The login name that you want to have created for the system admin (SA) user for the SQL Server. When you create an Azure SQL Server resource, you are required to provide an SA, so I am setting that value by passing it in as a parameter to the template at runtime.
saLoginPassword (secure string): The password you want to give to the SA login the server will be created with.
Variables
For the three resources I’m discussing the creation of in this post, there are no variables needed.
Resource: Azure SQL Server
Once you have your parameters and variables defined for the template, the next step is to start defining the main resources you want to create. Depending on the settings and configurations you need for your own SQL Server, you may need to define this resource differently. In my template, I have the following definition for the Azure SQL Server resource:
For the name of the server, I pass in the parameter “serverName”. Then, under the properties object, I define the required elements of the resource, which are:
administratorLogin: set to the value of the parameter saLoginName
administratorLoginPassword: set to the value of the parameter saLoginPassword
publicNetworkAccess: I have set this to “enabled” so that we’re able to access this resource through the public internet, which is required for normal usage and adminstration of the server and databases after they’re created.
adminstrators: This is a more complicated setting that is its own object. This “administrator” setting is the Microsoft Entra Admin for the server, which is essentially an Entra user or group that becomes the super user of the server with complete control to do whatever they want on the server and databases on it. I set this to an Entra group my team uses for ourselves by setting the principalType to “Group” and then giving the name of the group for login, and then the ID value and tenant ID for our group. You can find the “sid” value as the Object ID value for the group or user in Entra in the Azure Portal. And you can also find your Tenant ID through the portal as well.
restrictOutboundNetworkAccess: I have set this to “disabled” because we want the server and databases on it to be able to send data outside of themselves so that we can use them like normal.
Resource: Azure SQL Database
Depending on the settings and configurations you need for your own SQL Database, you may need to define this resource differently. In my template, I have the following definition for the Azure SQL Database resource:
For a SQL Database resource definition in Bicep, it’s really important to specify the parent value so that Bicep and Azure Resource Manager (ARM) know what server the database should be deployed onto and that the server resource should be created before the database resource. For my template, I made sure to specify the “symbolic name” of the Azure SQL Server resource I created previously in the template, which is “sqlServer”. After specifying the parent, you will also need to specify the name of the resource, which I used a parameter for, and then the region the resource should be deployed in, which I also used a parameter for.
The next thing you’ll need to specify is the sku of the database, which is the type settings for the database which dictate price, performance, and storage. In this case, I have chosen to make a database in the General Purpose tier, which is a little cheaper, and then to give it 2 CPUs. I think the easiest way to find the specifications for this section is to review an existing resource in your environment and see what values it is set to, or refer to Microsoft documentation.
Once you’ve set up the sku information, you’ll then need to specify the general properties of the SQL Database through the properties object in the resource definition. For mine, I set the following:
collation: This is the standard collation type you want your database to be setup with. I have chosen the default for North America/US, which will use English and then be case-insensitive and accent-sensitive.
maxSizeBytes: This is the number of bytes you want to be able to store in your database. That number I have set equates to 34 GB approximately, which I believe is the default.
catalogCollation: Same as the normal collation listed above
zoneRedundant: I’ve chosen not to make my database zone redundant, because I want it to be as cheap as possible and won’t be severely impacted if the entire Availability Zone goes down.
licenseType: I chose “LicenseIncluded” which means we will pay for the license and database as we use it, we don’t have an external license key to provide
readScale: I elected to not have the database setup for scaling for reads
requestedBackupStorageRedundancy: I selected “Geo”, which means we will have some redundancy, but not much. This is the standard my team set for this type of scenario.
isLedgerOn: I do not want this to be a ledger database so I’ve set this value to “false”.
availabilityZone: I’ve set as “NoPreference”
Resource: Key Vault
While most of you probably aren’t here for learning how to create a Key Vault with a Bicep template, I thought I would include it just because I have it in my production template. As with every other type of resource, you may want to change the below definition to match your own needs.
Just like with the other resources defined above, I set the name of the resource and the region it should be deployed in using parameters. And similarly to the definition of the SQL Database resource, for the Key Vault definition I also needed to define a sku, which is the pricing model for the resource. I chose Standard, and I really don’t know what other options there may be since this is such a simple type of resource.
The tenantId value is the ID for my tenant resource, so the template knows where to deploy the Key Vault. For networkAcls, I chose to not setup any bypass and to “Allow” traffic by default. Then the rest of the values are ones that seem self-explanatory to me and I believe are set to the defaults for all Key Vaults.
Summary
Creating an Azure SQL Server and an Azure SQL Database through Bicep is a fairly quick and simple process, much simpler than defining an IaaS VM like in my previous posts. That is due to the fact that the SQL Server and SQL Database are both fully-cloud resources, they’re not something you are able to access the infrastructure for. Since Azure manages the infrastructure, it is much easier for them to create these resources from a template.
After a previous in-depth post about creating a Bicep template to deploy an Azure Infrastructure as a Service (IaaS) virtual machine, which included the use of a Custom Script Extension (CSE), I want to go more into depth about some of the trials I went through while trying to get the Custom Script Extension to work. Troubleshooting it wasn’t the easiest thing in the world, since Azure doesn’t give much feedback at all from the failure to deploy that resource from a Bicep template, so I am hoping I can give anyone else struggling to implement the Custom Script Extension resource to run a PowerShell script after deploying an Azure resource some assistance with their process.
This post only has the code for CSE itself, and not the rest of the template I use it in. If you would like to see the full template, please view it on my GitHub.
In the Bicep world of infrastructure as code templates in Azure, there is a resource type that is called a “Custom Script Extension” which isn’t so much a “resource” as you would normally expect in a Bicep template. Normally, a “resource” is what it sounds like: an Azure resource you want to create, like a server, network security group, database, and even things like role assignments. But for the Custom Script Extension, it’s a method of running a PowerShell script on a Virtual Machine (VM) resource after it has been deployed, to install software or do other necessary setup on the machine.
My use case for a Custom Script Extension
The reason why I use a Custom Script Extension in my Bicep template when I create an Azure IaaS VM is so that I can initialize the disks related to the VM so they can actually be seen and used like you would expect. For some reason, when you create an Azure VM with a Bicep template, it does not automatically join the created disks to the machine. Due to this, when you first log in to the machine after it has been created, you won’t see the disks in the File Explorer like you would expect. Thankfully, PowerShell and the Custom Script Extension allow me to initialize those disks and name them what we normally want them to be named without having to login to the server and do it manually myself.
I originally had my PowerShell (PS) script set to also join the machine to our corporate domain after it was created, but I recently removed that part because it would not work with the protectedSettings section of the extension description, which you’ll see below. If you want more details about why I couldn’t get this to work and thus had to remove the most problematic sections from my PS script, keep reading.
My setup for a Custom Script Extension
The following is the Bicep resource script I used as part of my wider IaaS VM creation script to setup the VM after it is deployed.
A quick explanation of that definition is that it’s creating a resource of an extension type for VMs, and it’s dependent upon the VM which I specify further up in the full Bicep template. The script extension is set to execute a PowerShell command so that I can run a file called SetUpWindowsVM.ps1, which is downloaded by the script runner from the storage account location specified in a variable called initializeDiskScript. There are two different sections of “settings that you can specify: a normal settings section whose values will be output to the log after deployment, and then a section of “protected settings”, whose values do not get output to the log after deployment.
How the Custom Script Extension Works
After the Bicep template has created the VM, it will then set about running the specified script file I designated in my CSE resource definition. The first step to do that is to download the file from the specified fileUris location, which for me is an Azure Storage Account. The extension is able to connect to that Storage Account, since I provided the name and access key in the protectedSettings, and then download the file from there onto the local machine. The general location it’s downloaded to is: “C:\Packages\Plugins\Microsoft.Compute.CustomScriptExtension\1.*\Downloads\<n>”, where “1.*” is the version of Bicep you’re using and the “<n>” is a seemingly random integer value that the extension picks. For me, that was always “0”. After the file is downloaded, the CSE handler tries to execute the commandToExecute that you specified in your Bicep template. Since the PowerShell file will be downloaded locally to the area that CSE expects to use it from, you do not need to specify the full path to the file location, you can use the relative path formatting.
If you’re having issues with the CSE, like I was, you can get insight into what happened when the CSE ran by viewing the logs in this location: “C:\WindowsAzure\Logs\Plugins\Microsoft.Compute.CustomScriptExtension”. For more on that, see section below.
Issues with the Custom Script Extension
As of the time this was posted, I’ve been going back and forth with Microsoft support for several weeks to figure out how I could possibly use the commandToExecute specification in the protectedSettings object of the resource definition, and I have not yet resolved the error while working with them. The issue I am having is that the PowerShell script that I actually want to run includes the usage of a parameter containing a password, so I should use the protectedSettings to pass in the command with the password parameter so that the password is not output to the deployment log in plain text after the template is deployed. However, if I put the commandToExecute into the protected settings, nothing seems to happen and the script is not executed. If I put the same exact command into the normal settings, the script completes successfully yet my password it unsecurely output to the log, which I do not want.
Since I haven’t been able to resolve this problem, even with the help of Microsoft support, I have updated my PowerShell script to remove the section that joins the machine to the domain, which removes the need for me to pass through a password, so I can use the normal settings section to successfully call the commandToExecute. I am going to continue working with Microsoft support to see if we can finally come to a resolution, but I didn’t want to keep waiting on this post. If I ever fix the problem, I will update here.
Troubleshooting help
As I mentioned in the section above, you may run into random issues with the Custom Script Extension of Bicep (CSE) if you include it in your templates. Overall, I think it is still worth using this resource type, but you do need to be armed with some knowledge to help yourself as much as possible. These are the things I found useful when troubleshooting different issues with the CSE.
You will need to delete your VM and redeploy it so many times while troubleshooting issues, so be ready for that. Thankfully, deleting a VM and all its associated resources through the Azure Portal has gotten a little easier recently, so that will save you a little time.
If you are unsure whether the problem is with your PowerShell script or your Bicep template, create a test version of your VM as it would be created by your template (or run the template to create the VM then log on to that) and manually run the same PowerShell script on the machine. If it runs when you execute it manually, then the issue is not the PowerShell script but with the CSE.
Do not create the CSE nested under the resource creation specification for the VM, list it as its own separate resource definition, like I have in my template. It’s much harder to understand what’s happening if you put it as a nested resource, and then you can’t troubleshoot it on its own because the entire VM creation will fail if the CSE fails.
Make sure you specify the dependsOn property in the CSE resource definition, or else it will likely get deployed out of order. Bicep is supposed to be smart enough to know that some things should be deployed before others, but it doesn’t seem to understand order of operations for the CSE.
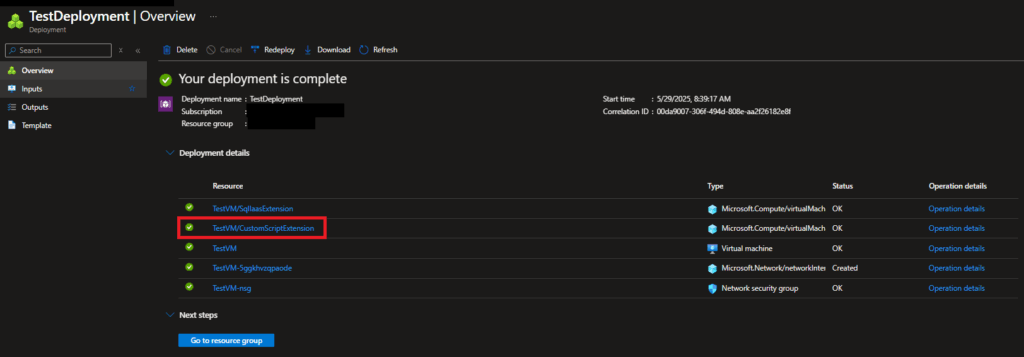
To view the logs of the CSE after it’s been deployed to get a sense of what was happening, you can see that by going to the Deployments section of the resource group you deployed the template into. Open the specific deployment you created for your template, then click on the link for the CSE resource deployment.
Screenshot showing the deployment overview where you can find more details on the CSE resource deployment
Check to make sure the file downloaded onto the local machine by the CSE handler is the correct file. It would be in this general location on the machine: “C:\Packages\Plugins\Microsoft.Compute.CustomScriptExtension\1.*\Downloads\”. I never saw it be wrong, but it doesn’t hurt to double-check.
Check the execution logs of the CSE after it runs on the machine. You can find all logs in this location on the machine after it’s been created and the CSE executed: “C:\WindowsAzure\Logs\Plugins\Microsoft.Compute.CustomScriptExtension”. The most useful log to me was the one called “CustomScriptHandler”, since that shows the exact steps the CSE handler ran when it executed your script (or tried to execute it).
Set your PowerShell script to generate a log when it runs, because that will either tell you what happened and went wrong in PowerShell, or it will not be created at all like in my situation, showing that the CSE is the problem.
Review this Microsoft document for other troubleshooting information about the CSE.
Mostly, you will need a lot of time and patience to properly troubleshoot issues when the Custom Script Extension goes wrong.
Alternatives to this resource type
While I haven’t used this yet, there is an alternative resource type availabe to use instead of the Custom Script Extension (CSE), and it’s called RunCommand. If you would like to read more about this resource type to see if it would be a better fit for you, there is a great Microsoft blog about it.
Summary
While I may have gotten very frustrated using the Custom Script Extension resource type in Bicep recently, I still think it’s a very useful feature that could save you a lot of manual work in setting up a virtual machine, if you can get it to run the way you need. If you’ve also run into issues with this resource type, I would love to hear about them in the comments below! Otherwise, I will keep you all updated if I find a resolution to my specific issue after posting this.
Today’s post will be the first technical post of this series and will focus on the script you need to write to generate an Infrastructure as a Service (IaaS) virtual machine (VM) in Azure. For my purposes, I’ve created such a Bicep template to create this resource to speed up our process of making IaaS VMs to host SQL Server instances–for our applications that cannot utilize a Platform as a Service (PaaS) version of SQL Server.
Since the post is very detailed and long, please use the table of contents below to jump forward to specific sections if you would like.
In the template I am about to walk through, I first create the Azure IaaS virtual machine resource. I then create the minimum required networking resources–a network interface and a network security group, which sets up access rules for the server. I then create a resource to install the SQL IaaS extension on the VM, which will connect the main virtual machine resource with the SQL virtual machine resource in the portal. My final step of the template is to create a Custom Script Extension resource which allows me to run a PowerShell script on the VM after it’s created, which finalizes the required setup I need for my machine. All these steps work together to make the bare minimum requirements of the type of VM I need to create.
Getting the entire template file
I have broken down a full Bicep template into its parts in the post below. If you would like to see the template in its entirety for an easier overview, you can find it on my GitHub here.
How to know what configurations to choose
When I first started writing this template, I had no idea what configuration values to choose. When looking at the Microsoft documentation for the VM resource type in Bicep, it seemed like there were endless possibilities for what I could choose to configure the machine. That was overwhelming to me at first. I then had the idea that I would compare the list of possible values in the documentation for the resource type to the settings of an existing resource with settings similar to what I wanted for my new machine.
That effort originally started with me looking at the normal portal view of the resource, but I didn’t stick with that for long. I quickly realized that the portal view of settings doesn’t show a lot of values that I was looking for. But I figured out that you can view all the setup information for a given resource in the portal in a JSON format, which is very similar to the Bicep formatting I needed. I believe this JSON document is likely what would be used by Azure Resource Manager (ARM) to create the same resource, which is why it’s available for every resource in the portal.
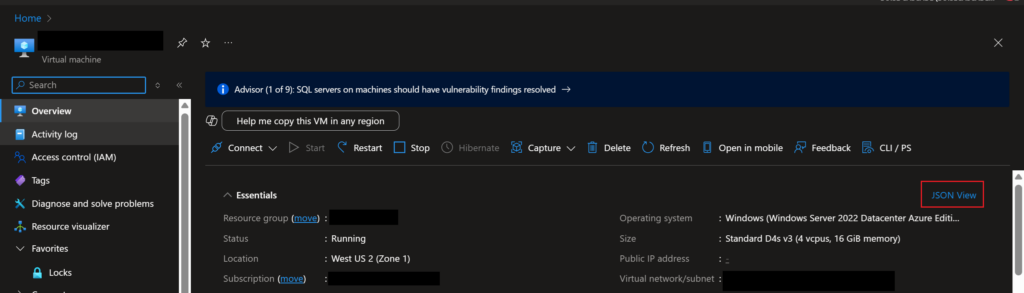
To view the JSON version of the resource settings, navigate to the resource in the portal, then near the top right corner of the Overview page, you will have a link to “JSON View”.
Screenshot of the Azure portal showing how you can locate the JSON view for any resource
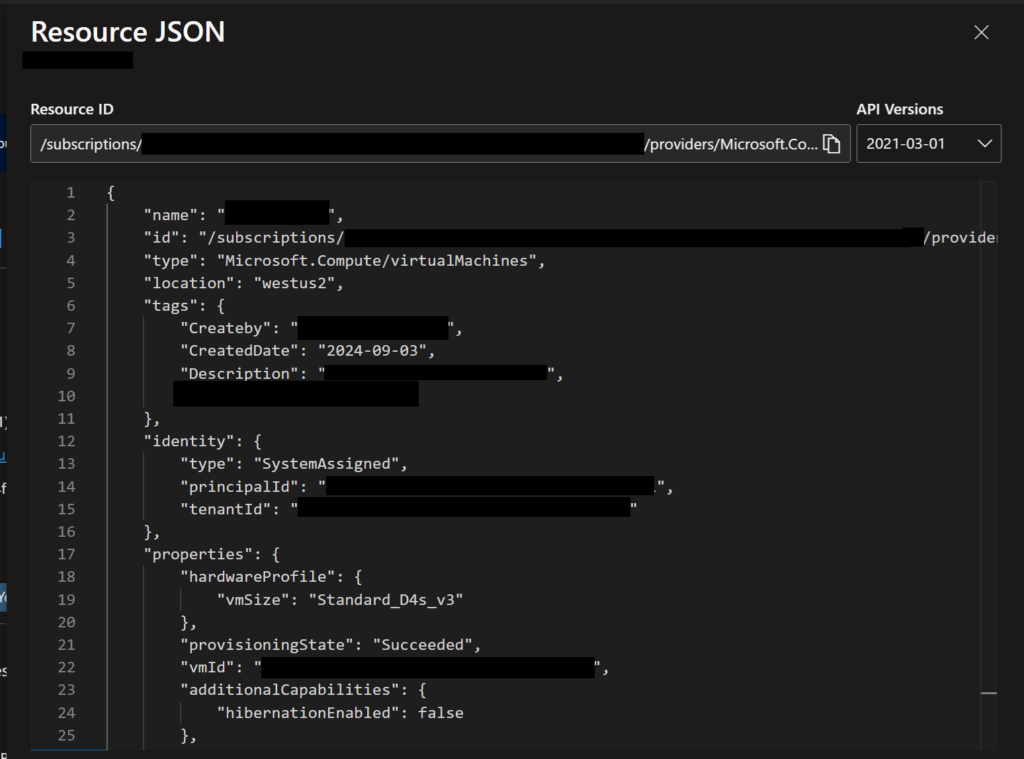
When you open that pane, you will see something like the following, with all pertinent details of the resource, which you can then use to help you create your Bicep template.
Screenshot of an example JSON view of an Azure VM
Writing the template
Parameters
When creating a new Bicep template, the first thing you’ll need to decide (apart from what specific resources you need to create) is what parameters you will need to input into the template, which will usually be fed in from a pipeline that deploys the template. For my template, I created the following parameters:
vmName (string): The name I want to give to the VM that will be created
dataDiskNameBase (string): A base string that I will use to name the data disks that I will create and attach to the VM. This base name follows my team’s standard naming strategy for disks.
adminPassword (string): The password that should be assigned to the total admin user the VM will be created with
adminUsername (string): The username that should be given to the ultimate admin user created for the VM
domainAdminPassword (string): This password is used in the PowerShell script I run after the VM is created
storageAcctKey (string): The key associated with the storage account where my PowerShell script (used by the custom script extension resource) is stored
storageAcctName (string): The name of the storage account where my PowerShell script is stored
resourceTags (object): A list of key-value pairs for the resource tags I want assigned to the VM after it’s created
Variables
Variables in Bicep are used so that you don’t have to repeatedly type the same values over and over, like variables in other scripting and programming languages. For my Bicep template, I created the following variables:
sqlExtensionName: This variable is used to give a name to the resource for the SQL IaaS extension
customScriptExtName: Used to store the name I want to give to the custom script extension resource
initializeDisksScript: The URL to the PowerShell file that I have saved in a storage account, which will be run by the custom script extension resource
Resource: Virtual Machine
Once you have your parameters and variables defined, the next step is to define the main virtual machine resource. Depending on the settings and configurations you need for your VM, you may need to define this resource differently. In my template, I have the following definition for the VM resource:
resource sqlVM 'Microsoft.Compute/virtualMachines@2024-07-01'= {
  location:'westus2'
  name: vmName
  properties:{
    hardwareProfile: {
      vmSize:'Standard_D4s_v3'
    }
    additionalCapabilities:{
      hibernationEnabled:false
    }
    storageProfile:{
      imageReference: {
        publisher: 'MicrosoftWindowsServer'
        offer: 'WindowsServer'
        sku: '2022-datacenter-azure-edition-hotpatch'
        version:'latest'
      }
      osDisk:{
        osType: 'Windows'
        name: '${vmName}_OsDisk_1_${uniqueString(vmName)}'
        createOption:'FromImage'
        caching:'ReadWrite'
        deleteOption:'Delete'
        diskSizeGB: 127
      }
      dataDisks: [for i in range(0,3):{
        lun: i
        name: '${dataDiskNameBase}${i}'
        createOption:'Empty'
        caching:'None'
        writeAcceleratorEnabled: false
        deleteOption:'Detach'
        diskSizeGB: 256  // The disks should all have 256 GB except for the 4th which should have 128, so this checks the index value
      }
      ]
      diskControllerType:'SCSI'
    }
    osProfile: {
      computerName:vmName
      adminUsername: adminUsername
      adminPassword: adminPassword
      windowsConfiguration:{
        provisionVMAgent: true
        enableAutomaticUpdates: true
        patchSettings:{
          patchMode:'AutomaticByPlatform'
          automaticByPlatformSettings:{
            rebootSetting:'IfRequired'
            bypassPlatformSafetyChecksOnUserSchedule: false
          }
          assessmentMode:'ImageDefault'
          enableHotpatching:true
        }
      }
      secrets: []
      allowExtensionOperations: true
    }
    networkProfile:{
      networkInterfaces:[
        {
          id:netInterface.id
        }
      ]
    }
    diagnosticsProfile:{
      bootDiagnostics:{
        enabled:true
      }
    }
  }
  tags:resourceTags
  identity:{type:'SystemAssigned'}
}
That is a lot of script to look through, so I will break it down into its components and explain what each does.
Location and Name
Location and name are pretty self-explanatory: the Azure region you want the resource deployed in and the name you want to give to the resource. For the location, I specified ‘westus2’, and for the name, I specified the vmName parameter that I would get input from when deploying the template.
Hardware Profile
Next in the resource definition is the specification of all properties for the VM, which is the meat of the resource definition, so I’ll walk through it section by section. The first property set is the “hardware profile”, which is the VM hardware specification/type. I chose a standard version.
hardwareProfile: {
      vmSize:'Standard_D4s_v3'
    }
Additional Capabilities
Next is to specify “additional capabilities” for the VM, which I only use to set the hibernation setting to off (false).
The next section is much longer, which is where we specify everything needed for the storage that should be attached to the VM, using the storageProfile property.
The “imageReference” object within the “storageProfile” property is where you specify the type of operating system you want to install on the VM, which you do by choosing a standard Azure VM image that should be installed on the machine. You could also specify a Linux-based image or even your own custom image if you have one already. In the future, I will be updating this template to use a custom image that already has SQL Server and SSMS installed, so I no longer have to do those steps manually as well.
This object is where you specify the specific Operating System information for the VM, as well as the name of the disk the OS will be installed on, and how big that disk should be.
The next step of defining the storage profile for the VM is to create any data disks that you want the VM to have. For my case, I need to create 3 separate data disks, because that’s what my team requires for our SQL Server setup. To easily create the data disks with fewer lines of code and less manual specification, I’ve used a loop in the dataDisk specification to loop through 3 times to create 3 different disks.
dataDisks: [for i in range(0,3):{
        lun: i
        name: '${dataDiskNameBase}${i}'
        createOption:'Empty'
        caching:'None'
        writeAcceleratorEnabled: false
        deleteOption:'Detach'
        diskSizeGB: 256
      }
      ]
To enable the process to create 3 unique disks, I specify the name of each disk to use the parameter “dataDiskNameBase” which I pass in when deploying the template, so they’ll get a unique but useful name. I have all my disks created as Empty, since that’s the only way I could get the template to deploy successfully. Each disk is created with 256 GB of storage.
Disk Controller Type
The final setting for the storageProfile property is the diskControllerType, which is what controls the connections between the VM and disks. I set it to “SCSI” because that is what our existing VMs were using.
diskControllerType:'SCSI'
OS Profile
The next property that needs to be specified for the VM resource is the osProfile, which gives more specific settings that should be used for the Operating System setup.
The computer name for the OS is set to the same vmName parameter I used for the general resource name above. The adminUsername and adminPassword are set to the input parameters with those same names as well. This admin user is the super user that the VM is created with, which will be what is used to initially set up the computer and will allow you to log in even before your VM is joined to your domain and allows your normal login process.
Next, you need to specify the configurations particular to Windows, and I pretty much set these all to what appear to be default values.
Finally, you can specify any necessary secrets, but I had none, and then you can choose to allow extensions or not, which I allowed.
Network Interface
When creating an IaaS VM, you will need to specify a network interface resource that connects network security groups to the VM. You do this by specifying the interface through the networkProfile property.
This section is very short. The only thing I specified within the networkProfile is the ID for the network interface resource I will create later in the template. I specify that value by using the semantic name of the resource (netInterface) then added .id to get to the ID value of that resource. Bicep is smart enough to know that the network interface object should be created before the VM, so specifying the ID in this method will not cause any deployment issues.
Diagnostics, tags, identity
The final things that I specify for the VM resource definition is the diagnosticProfile, where I specify that I want boot diagnostics to be saved, the tags that should be assigned to the resource after it has been created, and the Identity the resource should be created with, which I put as the system-assigned managed identity (not a custom identity).
Resource: Network interface
Next up, we need to specify the creation of a network interface, which is required for the VM to use the network security group we specified in that resource script above. The network interface resource specification is much simpler than that of the VM.
The first specification of that resource is the name, which I create by combining the name of the VM it is associated with, plus a unique string (using the uniqueString() function) to make the resource name unique but still meaningful. Next, I provide the location the resource should be deployed to, the tags I want to apply to the resource using the input parameter, and finally get into the properties and detailed configurations of the resource.
For the properties of the network interface, we need to create a sub-resource of type “IP Configuration” which is used to specify the subnet the network interface should be deployed to. For the template to appropriately identify and configure information for the subnets that should be used, I had to use a function called resourceID(), to which I fed the subnet names so it could return the IDs of those subnets for use by the IP configuration.
Then, under the properties of the IP configuration, I specified that I want the private IP address of the resource to be given dynamically, that the IP configuration is the primary, and that the IP address version should be IPv4. Which closes out the creation of that sub-resource.
Continuing with the rest of the properties for the main network interface setup, I specified that I want to enable accelerated networking, I did not want to utilize IP forwarding, and I did not want to disable state tracking for TCP. Finally, we come to the most important part of the creation of the network interface, which is to specify the ID of the network security group (NSG) that we want to associate with the interface. To do that link, you need the ID of the NSG, which you can do by combining the semantic name of the NSG resource plus “.id” to retrieve the ID that will be generated when it’s deployed.
The final configuration I specify in the network interface properties is the type, which is Standard.
Resource: Network Security Group
The further we get into the Bicep template, the shorter the resource definitions get, thankfully. Our next resource specification is for the Network Security Group (NSG), which dictates what network traffic will be allowed into and out of the VM we’re creating.
Like with the previous resources, we first specify the name, location, and tags before getting into the property specifications. The properties for this type of resource are fairly simple–just the inbound and/or outbound network access rules. For my resource, I created only a single rule to allow the required inbound traffic for a SQL Server instance. The rule I specified allows inbound traffic from any source IP to port 1433.
Resource: SQL IaaS Extension
The next resource I create in the template is one that allows me to install the SqlIaaSExtension onto the newly created virtual machine, after it’s been created. This extension is what allows you to connect a SQL Server instance installed on an IaaS virtual machine to the Azure portal and to connect to the Virtual Machine resource itself. The resource type for this is extensions under the virtualMachines resource type.
Most of the settings I specified for this extension resource are fairly standard, since there’s not much to change. I gave it the name, location, and tags that I wanted, just like with the rest of the resources. One key property of the resource specification to note is the “parent” value, which is how we tell Bicep/ARM that this resource is related to another we previously specified, so the other resource should be created before this one is. Bicep is usually good at understanding relationships between resources and which should be created first, but for this resource type, you need to specify it explicitly.
Resource: Custom Script Extension for PowerShell
The final resource I specify the creation of in my Bicep template for my IaaS VM is a CustomScriptExtension resource, which allows me to run a custom PowerShell script on the VM I create after it has been created. In my PowerShell script, I run commands to initialize the disks I attach to the VM, since that is not done for you if you create a VM using a Bicep template.
As with the previous resources, I specify the semantic name and location of the resource. I then also must specify the dependsOn value to tell Bicep/ARM that this resource should be deployed after the previously defined resource called ‘sqlVM’. That means that the custom extension resource will only be created after the main VM has been created, as it should be.
The properties object of this resource is where the magic happens, which tells Bicep that the “extension” you’re creating is one that you’ve created yourself to run a script. The publisher value is still Microsoft, but the type is “CustomScriptExtension”. The settings object is where you specify everything you need to tell the extension what script it should be running. In my case, the fileUris list only contains a single object, which is the variable containing the URL location of where my PowerShell file is stored on a Storage Account. Then the commandToExecute string contains the exact command that needs to be run on the VM to execute the PowerShell script I want, along with the required parameters of the script (which in this case is only the “password” parameter).
A cool feature of the custom script extension capability is that there is a protectedSettings object, which you can put any secret values into, and Bicep/ARM will keep those secrets hidden even in the log output of the template deployment. If you put those same values into the settings object instead, the values passed into those parameters would be displayed in the deployment log, which isn’t good for keeping secrets. For my protectedSettings object, I passed in the storageAccountName where the PowerShell script is saved and the storageAccountKey to provide access to that Storage Account. While the name isn’t secretive, I did put it in the protectedSettings to get rid of a warning in the VS Code editor.
Summary
Whew! That was a lot to get through! I hope my breakdown above of all resource creation steps needed for a Bicep template creating an IaaS virtual machine proved helpful to you. There are so many little pieces that go into creating a Virtual Machine through a Bicep template that you never really see when creating the same resource through the portal. If there is anything that I didn’t clarify well enough, please let me know in the comments, and I will clarify the best I can. There are a lot of lines that go into making this type of Bicep template, and it felt like a big time suck at the beginning of writing it, but it is worth the time to create the template to very quickly deploy this resource type repeatedly in the future whenever you want.
I am starting a multi-week series of posts covering the topic of Bicep, Microsoft’s Infrastructure as Code scripting language, since I have been working with this tool heavily for the past several months. You may wonder why a database developer is using Infrastructure as Code, since DevOps engineers typically do that. However, I decided to learn Bicep as a proof of concept for my team since we repeatedly find ourselves creating the same types of resources for our projects. We would like to reduce the amount of time and effort we put into creating our infrastructure so we can spend more time developing databases and pipelines to get our users the things they care about.
Stay tuned in the coming weeks for more details on how I have started integrating Bicep templates into my database development lifecycle.
Bicep is a declarative scripting language created by Microsoft as a successor to and addition on top of their existing Azure Resource Manager (ARM) templates. (Yes, the new templating script language is called Bicep because the original was called ARM.) Bicep is a scripting language that allows you to easily and quickly write declarative scripts to define how you want Azure resources to be created. These scripts, called templates, are used for Infrastructure as Code, which means you are generating your infrastructure of cloud objects using code instead of provisioning them manually through a portal. The main competitor for Azure Bicep is Terraform, which is a multi-platform tool that essentially does the same thing. But Bicep is developed by Microsoft to work only with the Azure cloud, so it is better suited for deploying Azure resources than Terraform is.
After you have created your Bicep script defining the resources you want to deploy to your Azure cloud environment, you deploy that template either manually or through a pipeline, and Azure gets to work creating the specified resources. In the background, as the deployment begins, the first thing Azure Resource Manager does is convert the Bicep script into the traditional JSON script used by ARM templates, so that it can understand and process your requests, since Bicep is essentially a nicer skin built for ARM. Once the template has been converted to JSON, Azure Resource Manager starts parsing all resource requests and sending those to the correct ARM APIs to create those resources.
If your template is set up correctly, all your requested resources will deploy to your cloud environment, and the time it takes to deploy depends on the resources you are creating.
Use cases for Bicep
Bicep templates are great for any Azure cloud users who find themselves creating the same types of resources over and over again, or for anyone who wants to make their environment re-deployable. For example, if you need to recreate your development environment from production after each deployment cycle, you could write Bicep templates to do that work for you. Essentially, if you are doing resource deployment on a regular interval and you would like to stop doing all that work manually, to reduce human error or to make the process more efficient, Bicep may be the tool for you.
What I use Bicep for
I started using Bicep as a proof of concept for my team to determine if it would be suitable for our needs for creating Azure Infrastructure as a Service (IaaS) Windows servers which we install SQL Server on. As of the time I am writing this, I still haven’t figured out 100% how to generate those servers exactly as we need them through Bicep, but I’ve gotten a good way through writing a template to provision what we need. I have proven that Bicep will work for that, but there are some final technical needs, such as using a custom virtual machine (VM) image with SQL Server already installed with our required settings, which I haven’t quite figured out yet.
Another use case that I have completed a proof of concept for is to generate all required minimum resources for our Azure-based AI chatbots with one template, which has already been immensely useful for me and my team. Creating fully cloud-based resources with Bicep has proven to be much easier to accomplish than creating the IaaS servers I started with, because all specifications and settings for those resources are managed by Azure, so Bicep handles them easily. It took me only a single afternoon to write my AI chatbot backend Bicep template, whereas it took me over a week to get my IaaS Bicep template partially working.
This new AI backend template creates an Azure SQL Server, Azure SQL Database, firewall rules, key vault, key vault role assignment, storage account, auditing on the SQL Server, and a Search Service for managing the document indexes used by the bots we’re developing for our business users. When I was doing this all manually, it would take me about an hour to work through the portal and deploy each of these resources. But now that I’ve turned it all into a Bicep template, it takes only a few minutes to deploy it all.
My thoughts on Bicep
Created using icon from Freepik on FlatIcon.com
Overall, I think Bicep is a cool and useful tool to use to create your Azure resources using a single script, which can be deployed over and over again. It really speeds up the creation of resources and reduces the chance of manual error while clicking through the portal setup of the same objects. There are several flaws with how it operates, such as not always understanding the hierarchy and order of deployment required for related resources, like it claims to do easily, but that isn’t an insurmountable challenge.
As with most scripting or programming languages, I wish there was more and better documentation from Microsoft to help us newbies figure things out faster, but it’s not impossible to learn. I would recommend that anyone who is tired of manually deploying the same or similar Azure resources repeatedly look into using Bicep to speed up their infrastructure work.
Best resources for learning Bicep
I learned most of what I know about Bicep from a Microsoft Learn workshop that is free online. The first learning path I worked through was the Fundamentals of Bicep, which I would recommend for any developer who is new to Bicep. After I completed that one to get a general understanding of writing Bicep, I then completed a few separate modules from the intermediate and advanced Bicep learning paths. Then there were many things I just had to learn on my own through other resources outside of Microsoft or through my own trial and error.
Summary
Bicep is a great tool that all types of developers working in the Azure cloud can likely use to speed up their development lifecycles. If you’re interested in learning more about Bicep, stay tuned for the next few weeks as I take a deeper dive into how Bicep works using detailed real-world examples.
A task I was requested to implement a while ago in an Azure Synapse pipeline was to have the pipeline reseed a table identity column to prepare it for new data that will be calculated and inserted into the table as part of an optimizer solution someone is writing. This request challenged me to learn about identity reseeding since I had never even considered that would be something I would ever need to do, and it also challenged me to make that reseeding query work in a Synapse pipeline.
The process isn’t difficult, but it was a little finicky since a higher level of permissions is needed to run the reseeding command, and some people, like me, might not want to give their Synapse pipeline sysadmin permissions. This post will cover general information about what it means to reseed an identity column and then how you can do that reseeding from a pipeline.
I completed a project where we upgraded the database servers for a business group, putting their main database onto an Azure Platform as a Service (PaaS) database instead of an old Azure virtual machine. Part of the project was to see if we could rewrite their optimizer into a new Python script instead of their current, very dated, C-based program that requires a VM to run on. Unfortunately, the business group decided to not go with my new script (as I mentioned in a previous post), so we had to come up with a way for them to continue running their current DLL program in the updated environment. For those who don’t know, the PaaS Azure databases no longer have the ability to run DLLs natively like on-prem or Infrastructure as a Service (IaaS) instances do, which meant that we had to find a way to continue running their program without the ability to run it natively on their upgraded database server.
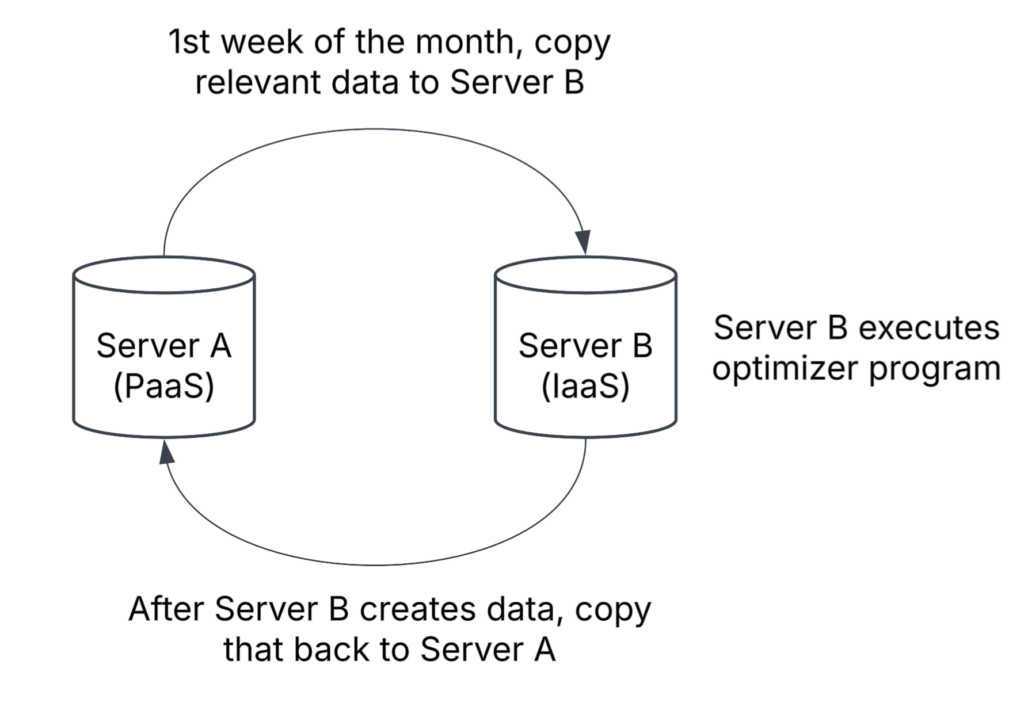
The solution we came up with is to create a new and updated Azure IaaS VM that can run SQL Server and the DLL optimizer program. To get that to work and be cost-effective, when the time comes each month for their program to run, we are going to copy the relevant data for the optimizer from the main PaaS database into this VM’s database, the DLL will be executed which will calculate and load data into a couple of tables, then we will copy that calculated data back to the main server and power down the VM for the rest of the month.
So what does that have to do with identity columns?
Flow diagram that gives an overview of the process requiring me to reseed an identity every month
One of the tables that will have its data generated by the DLL, which will then be copied back to the main table on the main server, has an identity column. On Server A, the table contains customer data up to the beginning of the current month and the maximum identity column value is something like 165487998. On Server B, where the new data for this month will be calculated and prepared to be loaded back to Server A, the table also has that same identity column but the table is truncated each month before calculating the new data. That means that if we did nothing about the seed value for the table on Server B, the identity column value would restart at 1 and work its way up as new data was loaded, which would cause primary key conflicts when the data is loaded back to Server A. We need to prevent that issue and start the current month’s records at the identity value where we left off on Server A, so I needed to find a way to update the identity seed value for Server B’s table when the pipeline runs each month.
What is an identity column?
An Identity Column is a column in a SQL Server database table that has its value automatically generated when a new record is inserted into the table. These columns are frequently used for primary keys (PKs) because an Identity Column must be unique, which is perfect for PKs. When you create an identity column on a table, the default is to have the value of that column start at 1 and increment by 1 every time a new record is inserted. Those default values can be changed to fit your needs. The value that you want the column to start at is called the “seed”; the value you want to increment the column by is called the “Increment”.
For example, if I want to have a column that is automatically generated for me but I only want to have those values be even numbers, you can set the Seed for the column to be 2 and the Increment for the column to be 2, so the first value will be 2, the second will be 4, the third will be 6, and so on. But traditionally, I’ve only ever seen an Increment of 1 used, and I’ve never needed to set a different Seed value before this project.
How do I know if a column is an Identity?
Viewing the Column Properties
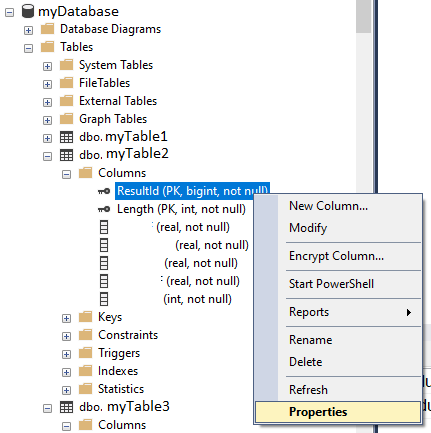
There are several ways to find out if a column is an Identity, but the method I use is to look at the properties of the column using the Object Explorer, whenever possible. In the Object Explorer for your server connection, navigate to the table you want to check for an Identity, expand the table, then expand “Columns”. Once you have the list of columns opened, you can right-click on any column and select “Properties” which is where you’ll find if it’s an identity or not.
Note: This method will not work with Azure PaaS servers, which severely limit the the information you can see from context menus and dialog windows.
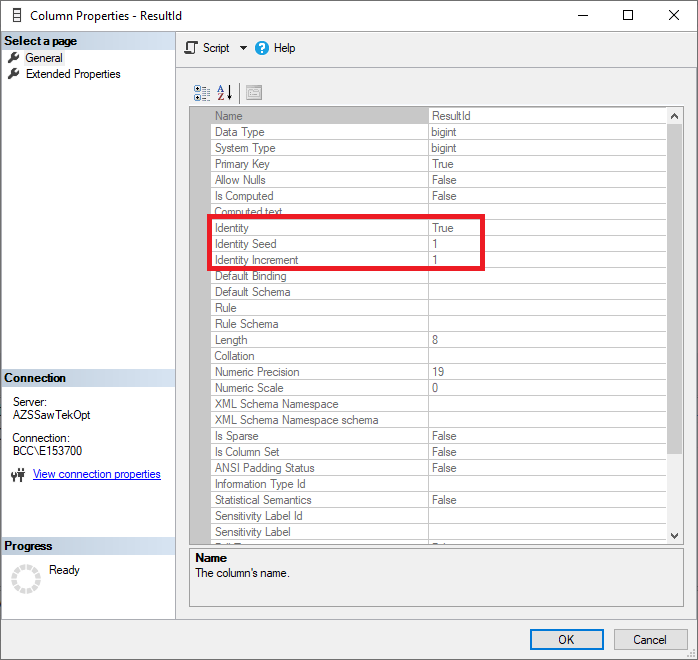
Screenshot of SSMS showing how you can access the Properties menu of a column to see if it’s an identity or notScreenshot of the Properties window of a column showing that the column is an identity
In the above screenshot showing the properties for my selected column, you can see that the value for the property “Identity” is set to “True” indicating that the column is an identity column. Then below that, you can see that the “Identity Seed” is set to 1 and the “Identity Increment” is also set to 1. Those two values mean that the first value that will be assigned to a row inserted into the table will be 1, then the value will go up by 1 for every new record inserted.
Scripting the Table
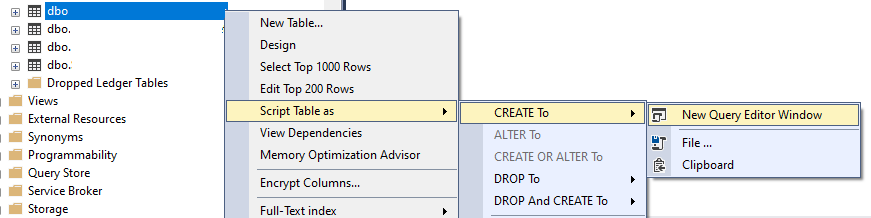
Another way you could quickly learn if a table has an Identity column and what the settings for that column is would be to right-click on the table in the Object Explorer and script the table to a new query window.
Script out the table you want to check for an identity column
Once the script has been generated, you will easily be able to tell if a column is an identity because it will be included in the SQL query to generate the table.
Note: The values for Identity Seed and Identity Increment may not be accurate! In the screenshots above where I show how to find out if a column is an identity or not, both the Seed and Increment values show as being set to 1, but I know for sure that the Seed has been changed to a much larger value. The properties of the column may not reflect the actual values.
Finding identity columns on Azure SQL Databases
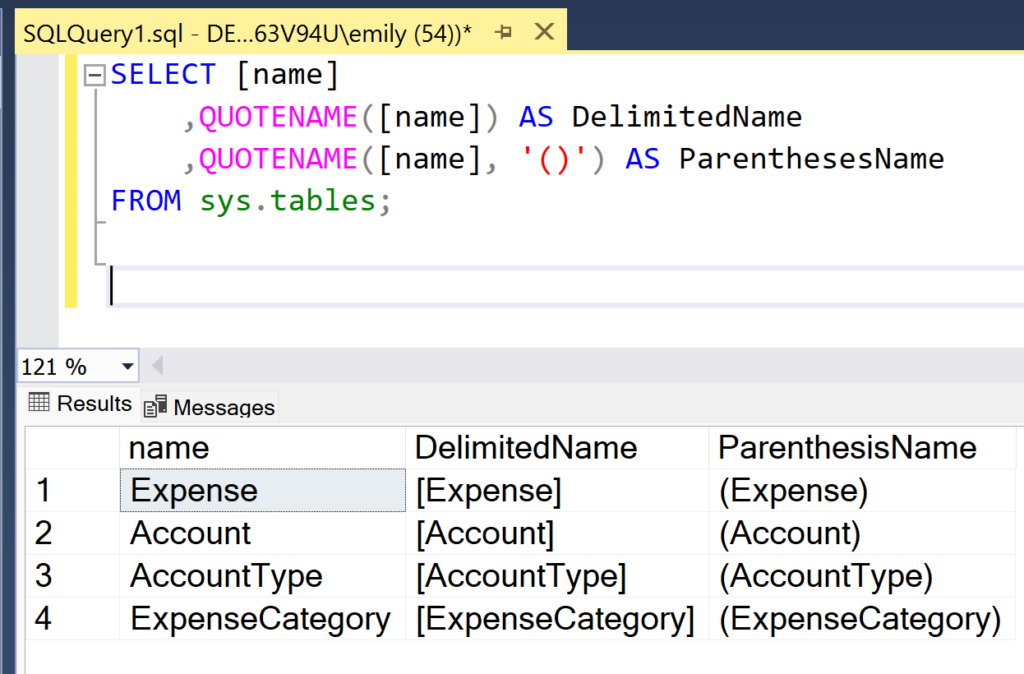
As I said in a note above, you cannot simply right-click on a column in the Object Explorer for an Azure SQL Database (PaaS database) and view the properties for the column like you can with IaaS or on-prem versions of SQL Server. To see whether a table has an identity column on Azure SQL Databases, you will either need to script out the table like the previous section said or you can use the following T-SQL query.
SELECT [object_id],
	[name],
	column_id,
	system_type_id,
	max_length,
	[precision],
	scale,
	is_identity,
	seed_value,
	increment_value,
	last_value
FROM sys.identity_columns
WHERE OBJECT_NAME(object_id) = 'TableName';
Data you can find about a table’s identity column by using the identity_columns view
When you run that query, you will see results like the following, which show the column that is an identity for the table. If the table doesn’t have an identity column, no results will be returned by the query.
Checking Identity Properties with DBCC CHECKIDENT
As I mentioned in a Note above, you can’t always trust that the values for Identity Seed and Identity Increment are correct in the Properties dialog or how they’re scripted out when you script out a table. So how do you know what the true values are? You can use the query on sys.identity_columns above or you can use the DBCC CHECKIDENT command.
DBCC CHECKIDENT ('dbo.TableName', NORESEED)
Note: Be very careful with the formatting of that `DBCC CHECKIDENT` command, because changing the `NORESEED` value to anything else and running it could reset or change the seed value inadvertently. Use caution when using this command and make sure you have it set exactly as you want. See the resources section at the end of this post for more documentation about this command to familiarize yourself with it.
When you run that above command, it will output a message that tells you what the Identity Seed value is currently set to and what the highest value of the column is as well (for when the Identity value has been incremented above the Seed value). In my example, I have only added a single record to my table so that one record has the outputted identity value, and the current column value is the same as the seed since there’s only one record in the table.
The output of the CHECKIDENT function when you specify the NORESEED option
What is reseeding?
Reseeding is changing the value of the Identity Seed value for the Identity column so that it starts the value of the column at a number other than 1 or whatever it was originally set to. For my case, I need to retrieve the maximum value of the Identity column from Server A’s copy of the table, then set the Seed for Server B’s table to that value + 1 (so it starts at the next value above the current identity value in the source table). That means that I need to change the Seed value for my table on Server B to 128166810 instead of 1.
How to manually reseed a column
If you want to manually reseed an Identity column using a SQL command directly on the database, you can do so by using the following command:
DECLARE @MaxIdentity int = 128166809;
DECLARE @ReseedValue int = @maxIdentity + 1

DBCC CHECKIDENT ('dbo.LengthAnalysisResultsHeader', RESEED, @ReseedValue);
Permissions Needed to Run Reseed Query
According to the Microsoft documentation (linked in the Resources section at the bottom of this post), one of the following permissions needs to be assigned to the entity that is running the DBCC CHECKIDENT command:
sysadmin server role
db_owner database role
db_ddladmin database role
But that document also specifically mentions that Azure Synapse requires db_owner.
How to reseed an identity column from an Azure Synapse pipeline
For my scenario, I don’t want to run the reseed command manually because the Seed value will be changing every month when our processing runs and generates new data. I have added the DBCC CHECKIDENT command to my Synapse pipeline that’s already loading the data between my two servers so that it’s reseeded automatically right when it needs to be.
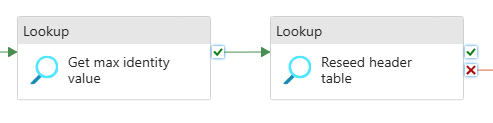
In a Synapse pipeline, the reseeding based on a value from another server can be completed with two Lookup activities:
You only need two Lookup activities in your synapse pipeline to programmatically reseed an identity column
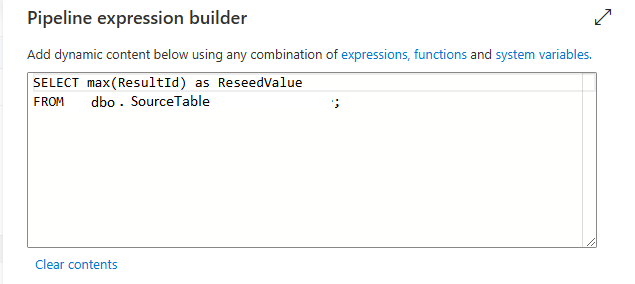
First Lookup Activity – Get the Identity value
The first Lookup will query the source database, in my scenario Server A, to get the maximum value for the column that is the Identity.
Second Lookup Activity – Set the Identity value
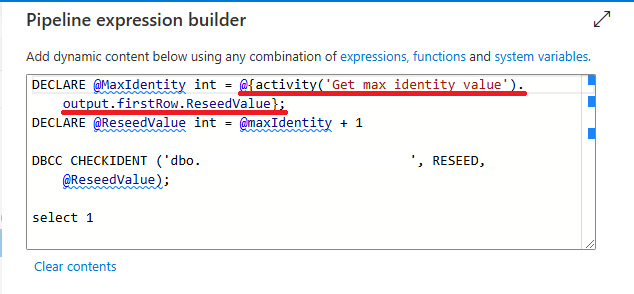
The second Lookup will run the DBCC CHECKIDENT command, which doesn’t return any results, and will then run a SELECT 1; to satisfy the requirements of the Lookup activity that something should be returned:
DECLARE @MaxIdentity int = @{activity('Get max identity value').output.firstRow.ReseedValue};
DECLARE @ReseedValue int = @maxIdentity + 1
DBCC CHECKIDENT ('dbo.TableName',RESEED,@ReseedValue);
select 1;
Let’s break that reseed query down a little more. The first line is creating a SQL variable called “MaxIdentity” which is an integer, and then setting the value of that variable to the output from the previous Lookup activity, which was called “Get max identity value”. To get the specific value from that preceding activity, we need to add .output after the activity call, then .firstRow to specify we want to get the value from the first row of the output of that activity, then finally add .ReseedValue which is the column name returned from the previous lookup activity.
DECLARE @MaxIdentity int = @{activity('Get max identity value').output.firstRow.ReseedValue};
Summary
Reseeding the Identity column of a SQL Server table manually is a piece of cake because it only requires one small SQL statement. But to do the same process in an automated and repeatable manner is a different story. It’s not overly complicated to create a Synapse pipeline that reseeds a table’s Identity column on demand, but there are some quirks to getting the expressions to do so correctly which involved a lot of guessing and checking for me. I am still new to working with Synapse pipelines in-depth though, so perhaps this wouldn’t be such a difficult task for you more experienced Synapse developers. 🙂
If you run into any issues while setting up the above process yourself, I would love to help as much as I can, so please leave a comment below!
Have you been in a situation where you were working with the Azure CLI Bash terminal and then something went wrong with the image used to persist your data across sessions and your workspace seemingly got corrupted? I have had that happen to me recently, and I think it was because I updated my computer from Windows 10 to Windows 11, so Azure thought my computer changed and that corrupted the image.
I tried a couple of things to fix the situation so I could start working in the CLI space again to do my work, but I couldn’t fix the problems and errors I was getting. Then I set about figuring out how to clear the whole thing and start again. Thankfully, I only had two files on the virtual workspace, which I backed up on my local computer and in a repo anyway, so resetting the whole thing didn’t have negative effects for me. Continue reading to learn how I successfully reset my Azure CLI virtual workspace so I could get working again.
Before updating my computer to Windows 11, I had been successfully reusing the same Azure cloud terminal virtual workspace for several weeks while learning to work with Bicep and testing a template repeatedly. I only encountered issues with the Azure CLI Bash terminal after the computer upgrade, and I am guessing it’s due to Azure considering my computer as a different machine after the update. I guessed that based on this StackOverflow answer which discusses how you cannot share virtual disks between different Virtual Machines (VMs) or else you can get corruption issues.
Even though that StackOverflow thread is referencing a disk issue for Virtual Machines and their disks, it seems like the same issue can happen when you try to use the same Azure account and its virtual CLI environment on two different computers, based on my experience. And this StackExchange answer says that a similar Linux error indicates a file system corruption.
I knew I had an issue when I used the Azure CLI Bash terminal for the first time with my updated computer. Immediately upon getting into that virtual environment and trying to check on my saved Bicep template there, I received the error:
I tried deleting the file so I could recreate it but got the same error when trying to do that. It seemed like I was stuck and really just needed to restart the whole thing and try again. The StackExchange answer referenced above said to unmount the corrupted file system disk and run a Linux command, but I knew that I couldn’t do that for this virtual environment, so I needed to figure something else out to get things working again.
How I reset my Azure CLI Bash workspace
Note: Please be cautious when following these steps as what you’re about to do may not be possible to undo.
Since you are not able to manipulate the file system in the Azure CLI virtual environment and unmount a disk like you could if you got this error on your own machine, you have to fix the error above in another way.
Trying a simpler fix first
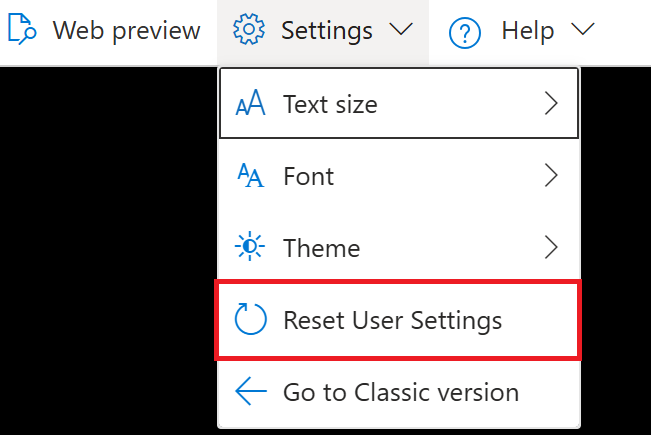
There is one way you may be able to fix your environment that is less harsh than what I had to do, which is to choose the option in the Cloud Shell in the Azure Portal to “Reset User Settings”. This action, according to the Microsoft documentation, deletes your data from the shell by terminating the current session and unmounting the linked storage account. To do this reset, select the dropdown in the Shell window in the portal for “Settings”, then click “Reset User Settings”.
Select “Reset User Settings” from the “Settings” menu in the Azure CLI in the Portal
After completing that step, you will need to start a new Cloud Shell/CLI session, which may or may not fix the error you are seeing. In my case, doing this step did not fix the issue because the actual issue was with the image being used to regenerate my virtual environment. Continue on to the next sections if you continue to have the same error after resetting your user settings.
Identify the Storage Account for your virtual environment
The first step in doing the full reset of your workspace after getting the above error is to identify the storage account your environment data is persisted to. In my case, it is in a storage account called “azcliemily” with a file share called “azcliemilyfs”. I’m not sure if I created this storage account a while ago and have just forgotten about that or if the system created one for me when I set up my CLI workspace for the first time. The naming for your storage account and file share is likely different.
The easiest way to determine where your files are stored for your CLI sessions is to open the Azure CLI from within the Azure portal.
To get to the CLI from within the Azure Portal, click on the “terminal” looking icon in the top right menu of the screen
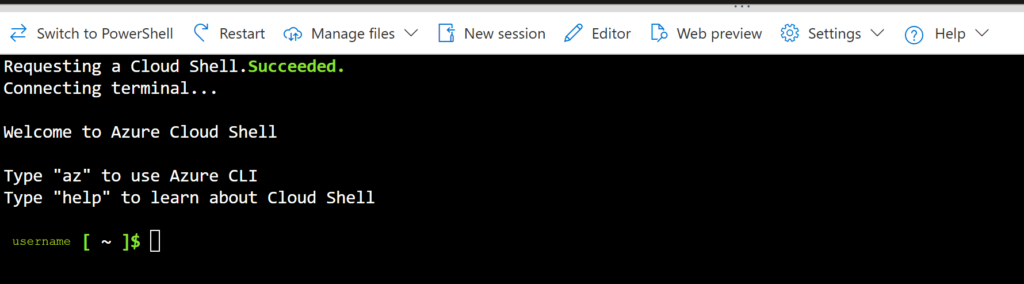
When that opens, if you are here because you are having the same error I was, everything in the shell/CLI should already be set up for you and you should see something like this.
When you open the CLI terminal in the Portal, you should see something like this when it first starts up
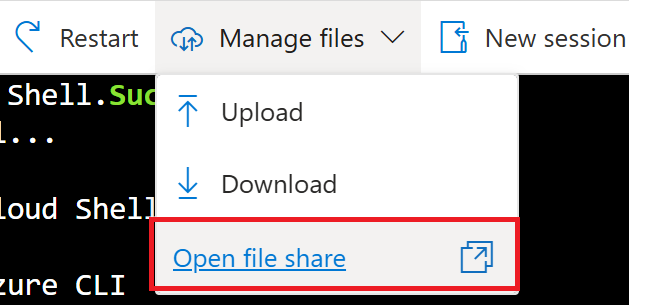
To view the file location for your workspace, click the dropdown for “Manage Files” at the top of the shell window, then select “Open file share” which will open a new tab.
You can access the file share where the files for the session are stored by opening the dropdown for “Manage Files” and then choosing “Open file share”
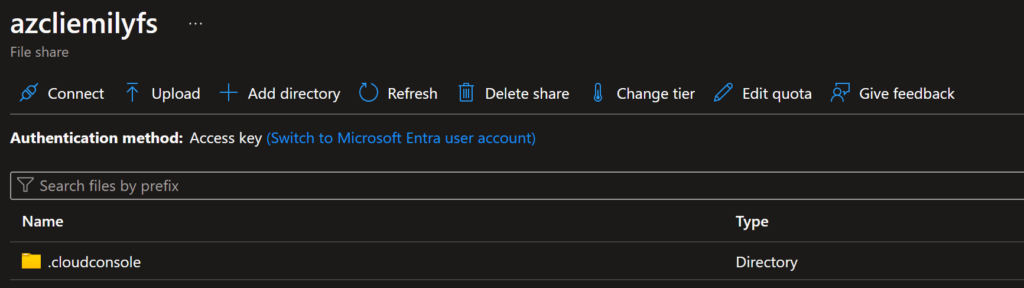
The file share page will look something like this:
The file share that Azure uses to persist your CLI virtual environment between sessions should look something like this.
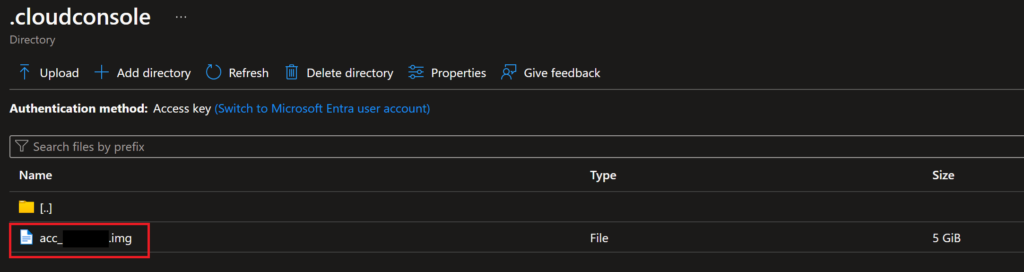
Delete the image file used for your virtual environment
Note: Please be cautious when following these steps as what you’re about to do may not be possible to undo.
If the above “Reset User Settings” step didn’t work, like it didn’t for me, you may need to completely delete the machine image that Azure has created and is using for your virtual environment in the CLI. The error I got seems to indicate that there is corruption within the disk, so the only way for me to get rid of the corruption and access my files again is to delete the disk image being used so Azure is forced to make a new one when I start my next session.
The consequence of proceeding with this method is that you will lose anything and everything that you had stored in your CLI virtual environment. For me, this was only two test files, but it could be a lot more for you.
If you are going to proceed with the following steps, please save off everything from your virtual environment that you don’t want to lose.
Once you are sure you are ready to proceed at your own risk, navigate to the file share location we identified in the above section, then go into the folder “.cloudconsole”. In this folder, you will see a file with the type “.img”, which is a disk/machine image, the one that Azure uses to spin up disks on the backend for you when you open a new Cloud Shell/Terminal session. For my session, the file was named “acc_username.img”.
Opening the folder “.cloudconsole” in your file share should show you a file with the type “.img”, which is the machine image for your environment
If you haven’t done so already, please first open a Cloud Shell in the portal and choose “Reset User Settings” before moving on to the next step so that this file share/storage account is unmounted from your Cloud Shell session.
Once you have done that reset, delete the .img file from the file share. This step may be irreversible so proceed with caution!
After you have deleted that image file, you can open a new terminal session with the Azure CLI or use the Cloud Shell from the Portal and then work through the normal steps of setting up a new virtual environment. When you choose to persist your files between sessions, Azure will create a new machine image to use to store those files, which should no longer have the corruption you were seeing previously.
Summary
If you run into what appears to be disk corruption issues with the Azure CLI virtual workspace, like if you are working with Bicep deployments or anything else through the CLI and are saving files between sessions, I highly recommend starting completely fresh with your environment if you can. It doesn’t take very long to do an entire reset of the virtual environment and it easily fixes errors that indicate disk corruption which occurred for whatever reason (like if you upgrade your computer’s OS so Azure thinks you’re trying to use the same session from two different computers).
Let me know in the comments below if this solution worked for you!
One of the easiest ways to duplicate SQL Server database objects from one database to another–such as in a situation where you want to copy the structure of a production database down to a development database to help with testing and development–is to create a file called a DACPAC from the database you want to copy. With SQL Server, there are two ways to copy a database without creating and restoring a full database backup: 1) Create a full copy of the database structure and data by exporting to a BACPAC file, or 2) Create a copy of only the database structure by exporting to a DACPAC file.
This post will cover how you can import a previously generated DACPAC file onto an Azure SQL Database to duplicate the structure of another database with little effort on your part. It specifically covers copying an existing Azure SQL Database to another Azure SQL Database. This process may work with on-prem or managed instances of SQL Server, but I haven’t tested that yet.
Have an Azure SQL Server or Database to load the DACPAC to
Note: The source and target databases can be on the same Azure SQL Server or on different ones.
What are DACPACs and BACPACS?
There have already been many blog posts written on the subject of the difference between DACPACs and BACPACs, so I will refrain from trying to duplicate that information. Essentially, a DACPAC is an export of the schema/structure of a database, including the database users and logins. A BACPAC is similar to the DACPAC except that it contains the data from the database as well. If you would like more detailed information about both of these types of files, I recommend reading this post from SQLShack.
Then if you’re like me and are now wondering what the difference is between a BACPAC file and a full database backup (BAK file), I found this resource on SQL Server Central that explained the difference well.
Why use a DACPAC?
As I mentioned in the introduction above, the primary use case for making and importing a DACPAC file of your database is to quickly copy all database objects–including tables, procedures, functions, and even users–to a new version of the database, such as when trying to create a new dev version of an existing production database. That was my exact use case and what triggered me to write this post. I got tired of manually copying tables, procedures, and functions from one database to another whenever we needed a new version of a database.
How to Create a DACPAC File
When you have a source database that you would like to copy over to a new database, without the data, you should create a DACPAC from SQL Server using a “Task” on the database. To do this, right-click on the database name in the Object Explorer, select “Tasks” then select “Extract Data-Tier Application”. This will open a wizard for you to create a DACPAC file of the selected database.
Choose to “Extract Data-tier Application” from the context menu of the Database in the Object Explorer
If instead, you click on “Export Data-Tier Application”, you will be brought to a wizard for creating a BACPAC file, which is not what we intend to do during this process, so make sure you choose the option to Extract a data-tier application.
After selecting that option, you will see a screen like the following. Review the introduction page and make sure it refers to creating a DAC package (see screenshot below, underlined in red) and not a BAC package.
The introduction page of the “Extract Data-tier Application” wizard, confirm that it is going to extract to a DAC package, not a BACPAC.
Step through the wizard, provide a name for the “Application” (database name), and choose where you want the file to be downloaded to on your local machine.
The DACPAC extraction properties page of the “Extract Data-tier Application” wizard
Once you have reviewed the settings for your file, click “Next” until the creation process starts. Once that has been completed, you will have successfully created a DACPAC file which is stored in the location that you chose.
Using a DACPAC to Format an Azure SQL Database
There are two different ways that you can deploy a DACPAC to an Azure SQL Server. The first way is to deploy the DACPAC to create a database, the second is to update an existing database with the DACPAC.
Overview of the Steps
Choose whether you want to create a new database with the DACPAC or update/format an existing database
If choosing to create a new database:
Right-click on the “Databases” folder in the Object Explorer of SSMS, choose “Deploy Data-tier Application”
Specify the DACPAC you want to use and the name of the database you want to create
Run the wizard which will create a database with default settings
If choosing to use an existing database, whether blank or already in use:
Right-click on the database, select “Tasks” then “Upgrade Data-tier application”
Specify the DACPAC file you want to use
Review the changes the wizard identifies between the DACPAC and the target database
Run the wizard which will update the target database with all changes necessary from the DACPAC
Deploying a New Azure SQL Database using a DACPAC
If you want to make your new Azure SQL Database on an existing Azure SQL Server and don’t want to do that through the portal, you can create a new database on the server by “deploying” a DACPAC to create a new database.
The main downside to this method of using a DACPAC is that the database will be created with the default setup, which for me is a General Purpose standard database with 2 vCores. That level of database may be pricy for some people, or it could be underperforming for others, depending on your needs. Due to that downside, that is not the method I chose to use my DACPAC with, but I still researched it so I could understand both ways. If you want to know how I used a DACPAC, skip down to the section for “upgrading” with a DACPAC below.
Deploying a Data-Tier Application
To create a new database from a DACPAC, you first need to connect to your target server through SSMS in the Object Explorer. Once you have connected, right-click on the “Databases” folder and choose “Deploy Data-Tier Application” from the list.
Choose to “Deploy Data-tier Application” from the context menu of the Databases folder in the Object Explorer of SSMS
This will open a wizard that is very similar to the one for “upgrading” a data-tier application (discussed below). On the overview page of the wizard, you can confirm that you are going to deploy a DACPAC and not a BACPAC.
The introduction page of the “Deploy Data-tier Application” wizard
The first thing you will need to do in this wizard is to choose the DACPAC file you previously created.
The page of the “Deploy Data-tier Application” wizard where you choose the DACPAC file you want to deploy from
Click Next to move to the following page, where you will choose the name of the database you will deploy.
The page of the “Deploy Data-tier Application” wizard where you choose the name of the new database you want to deploy from the DACPAC
Click Next to move to the Summary page and review the process that the wizard is about to execute to ensure everything is set the way you want. Click Next again to deploy the DACPAC and create a new database from that file.
Once that process completes, you can close the wizard and then check on your database through the Object Explorer to see that you now have a new database with the same objects as the source database. At this point, you will also be able to see the newly created database in the Azure Portal under that SQL Server, where you can make any changes you would like to the default setup chosen by the deployment.
Updating or Formatting an Existing Azure SQL Database with a DACPAC
This method of “updating” an existing Azure SQL Database is helpful if you already have a database that you want to align with another, or if you have already created a blank database meeting your standards that you want to quickly deploy database objects to. In the previous section, the method of “Deploy a Data-Tier Application” creates a new database from the specified DACPAC, but that database is created with the default Azure SQL Database settings, which is “General Purpose: Standard-series (Gen5), 2 vCores”. That database setup is estimated to cost (in our setup) $373 per month.
If that default setup for a database doesn’t work for you or you don’t want to fix that after the database has been created, you can use this second method of “upgrading” your existing database with the DACPAC. Before you can complete this method, you first need to create a blank database on your Azure SQL Server, through whichever method you prefer. Or use any other existing Azure SQL Database that you are fine with overwriting with the DACPAC.
Upgrading a Data-Tier Application
Connect to your target database in SSMS through the Object Explorer. When you are ready to import the source database objects onto this new database, right-click on the empty database then select “Tasks” then “Upgrade Data-tier Application”.
Choose to “Upgrade Data-tier Application” from the context menu of the existing database you want to deploy the DACPAC to
This will open another wizard that will walk you through the process of “upgrading” your chosen database with the DAC package of another database.
The introduction page of the “Upgrade Data-tier Application” wizard
On the second page of the wizard, you will be prompted to select the DAC package you would like to use for the upgrade. Browse to the DACPAC file you created earlier, then click Next.
The page of the “Upgrade Data-tier Application” wizard where you choose the DACPAC file you want to deploy to the database
After you click Next, the system will start detecting changes between the target database and the DACPAC you selected, which may take a few minutes.
The page of the “Upgrade Data-tier Application” wizard where the wizard checks for differences between the DACPAC and the target database
If you have already imported the DACPAC before or have anything on your target database that is different from the source, you will receive a warning like this:
The page of the “Upgrade Data-tier Application” wizard where you confirm that you are okay with proceeding despite the risk of data loss from deploying the DACPAC
I got that warning because I had already imported the DACPAC so I no longer had a blank database. In this situation, you are required to check the box that you’re okay with overwriting the existing structure by continuing. If it’s your first time attempting to import the DACPAC onto a blank database, you should instead receive a green check box on this page.
On the next page, choose whether or not you want to roll back in the event of a failure during the “upgrade”. I chose to not have it roll back since this was going to be a new dev database that I could tweak, fix, or simply recreate if something went wrong. You may want to choose differently.
The page of the “Upgrade Data-tier Application” wizard where you choose the rollback option you want the wizard to use when deploying the DACPAC
The final step will be for the system and you to review the “upgrade” plan. You will see a list of all changes that will be applied to the database on the “Review Upgrade Plan” page. If you’re happy with the proposed list of changes, click Next until the upgrade process starts and the DACPAC gets applied. Once that process completes, you can close the wizard and then check on your database through the Object Explorer to see that you now have database objects deployed to the database that you didn’t before.
The page of the “Upgrade Data-tier Application” wizard where you review all the changes that will be applied based on the DACPAC
Can’t I just import the DACPAC from the Azure Portal?
This was the first thing I tried when trying to import my DACPAC into an Azure SQL Server. I uploaded my DACPAC file to a storage account, then clicked “Import” on the SQL Server page in the Portal. This started a new deployment where the SQL Database was created but then the deployment of the DACPAC to the database failed so I was left with an empty database on my server. The error I received when the deployment failed was related to not specifying a BACPAC file for the import process, so it expects that file type instead of a DACPAC.
If you can figure out how to import a new database to a SQL Server using the Portal, I would love to hear about it in the comments below.
Summary
If you, like me, were confused about how you could import a DACPAC file into a database on an Azure SQL Server (because the Microsoft documentation for this isn’t great), I hope these instructions help you with your import. It is as simple as creating the DACPAC file and then using a wizard to “upgrade” or “deploy” your database using the DACPAC.
I have a short post today because I’ve gotten a little behind on my editing and want to get something out today. This week, I learned about the most useful little string function available in SQL Server that I wish I had known about previously. The function is QUOTENAME()which isn’t the most intuitive name for a function.
What the function QUOTENAME() does is put delimiters around a string, which is especially useful for certain columns in your queries. Where this comes in handy are scenarios where you are going to use the outputs of your SQL queries in other future queries, so having the strings delimited to meet SQL Server standards is essential.
For example, say you want to generate a list of the tables in your database and then you are going to use that list of table names in another query, so you would like the table names to be surrounded with square brackets–a SQL Server best practice. Instead of manually adding the brackets yourself, which I have done too many times to count, you can use the QUOTENAME() function that will do it for you. This function will also let you specify other delimiters, like parentheses, if you would like that instead. There are other delimiters you are allowed to specify, more than I was expecting, so check out the W3Schools page on the function for more details.
Demo of the function
Here is a demonstration of the function being used on the [name] column of the sys.tables table.
SELECT [name]
	,QUOTENAME([name]) AS DelimitedName
	,QUOTENAME([name], '()') AS ParenthesesName
FROM sys.tables;
This screenshot shows two uses of the QUOTENAME() function: one with the default setting of square brackets and one specifying the parentheses.
In the example above, I have displayed the normal [name] column from the table and then used the same QUOTENAME() function two different ways. The first usage of the function only inputs the column that I want to be delimited, which then gets the default delimiter of square brackets. If you, however, would like to use a different delimiter, like parentheses, you can specify that as the second parameter to the function. In my testing, you can specify QUOTENAME(column, '('), QUOTENAME(column, ')'), or QUOTENAME(column, '()') and they all give you the same parentheses delimiting.
Summary
If you often find yourself manually putting bracket delimiters around values you retrieve from SQL Server with queries, please consider using the QUOTENAME() function in the future instead to save yourself time and manual effort. I know I will for sure be using this now.