Tag: ETL (page 1 of 1)

Reseeding Table Identity from Synapse Pipeline

A task I was requested to implement a while ago in an Azure Synapse pipeline was to have the pipeline reseed a table identity column to prepare it for new data that will be calculated and inserted into the table as part of an optimizer solution someone is writing. This request challenged me to learn about identity reseeding since I had never even considered that would be something I would ever need to do, and it also challenged me to make that reseeding query work in a Synapse pipeline.

The process isn’t difficult, but it was a little finicky since a higher level of permissions is needed to run the reseeding command, and some people, like me, might not want to give their Synapse pipeline sysadmin permissions. This post will cover general information about what it means to reseed an identity column and then how you can do that reseeding from a pipeline.

What’s in this post

Background

I completed a project where we upgraded the database servers for a business group, putting their main database onto an Azure Platform as a Service (PaaS) database instead of an old Azure virtual machine. Part of the project was to see if we could rewrite their optimizer into a new Python script instead of their current, very dated, C-based program that requires a VM to run on. Unfortunately, the business group decided to not go with my new script (as I mentioned in a previous post), so we had to come up with a way for them to continue running their current DLL program in the updated environment. For those who don’t know, the PaaS Azure databases no longer have the ability to run DLLs natively like on-prem or Infrastructure as a Service (IaaS) instances do, which meant that we had to find a way to continue running their program without the ability to run it natively on their upgraded database server.

The solution we came up with is to create a new and updated Azure IaaS VM that can run SQL Server and the DLL optimizer program. To get that to work and be cost-effective, when the time comes each month for their program to run, we are going to copy the relevant data for the optimizer from the main PaaS database into this VM’s database, the DLL will be executed which will calculate and load data into a couple of tables, then we will copy that calculated data back to the main server and power down the VM for the rest of the month.

So what does that have to do with identity columns?
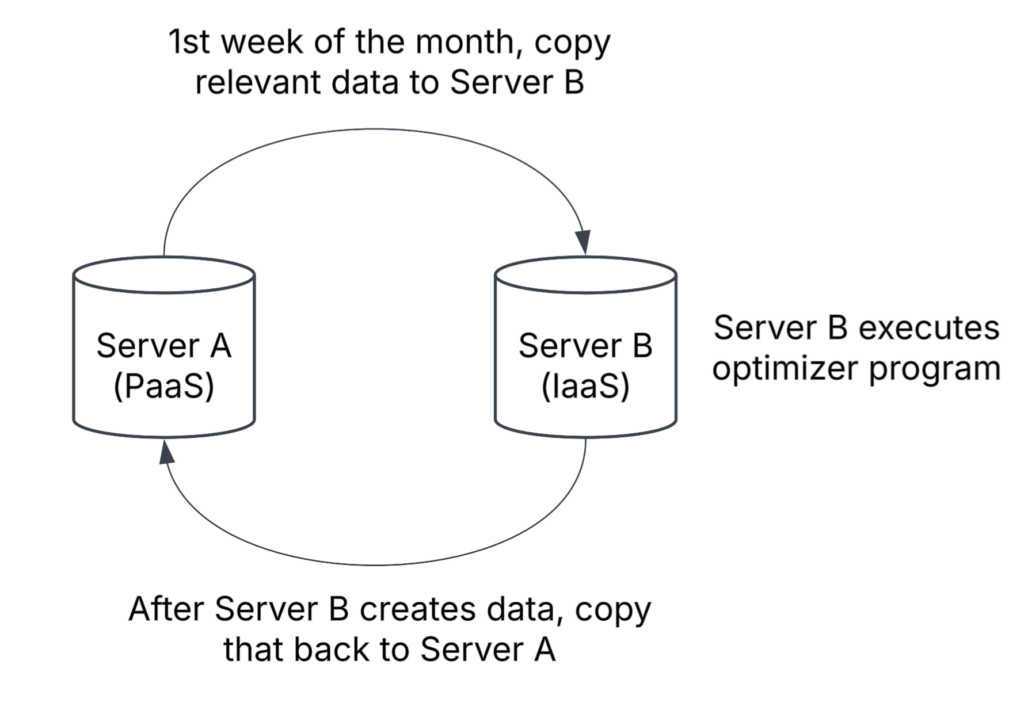
Flow diagram that gives an overview of the process requiring me to reseed an identity every month

One of the tables that will have its data generated by the DLL, which will then be copied back to the main table on the main server, has an identity column. On Server A, the table contains customer data up to the beginning of the current month and the maximum identity column value is something like 165487998. On Server B, where the new data for this month will be calculated and prepared to be loaded back to Server A, the table also has that same identity column but the table is truncated each month before calculating the new data. That means that if we did nothing about the seed value for the table on Server B, the identity column value would restart at 1 and work its way up as new data was loaded, which would cause primary key conflicts when the data is loaded back to Server A. We need to prevent that issue and start the current month’s records at the identity value where we left off on Server A, so I needed to find a way to update the identity seed value for Server B’s table when the pipeline runs each month.

What is an identity column?

An Identity Column is a column in a SQL Server database table that has its value automatically generated when a new record is inserted into the table. These columns are frequently used for primary keys (PKs) because an Identity Column must be unique, which is perfect for PKs. When you create an identity column on a table, the default is to have the value of that column start at 1 and increment by 1 every time a new record is inserted. Those default values can be changed to fit your needs. The value that you want the column to start at is called the “seed”; the value you want to increment the column by is called the “Increment”.

For example, if I want to have a column that is automatically generated for me but I only want to have those values be even numbers, you can set the Seed for the column to be 2 and the Increment for the column to be 2, so the first value will be 2, the second will be 4, the third will be 6, and so on. But traditionally, I’ve only ever seen an Increment of 1 used, and I’ve never needed to set a different Seed value before this project.

How do I know if a column is an Identity?

Viewing the Column Properties

There are several ways to find out if a column is an Identity, but the method I use is to look at the properties of the column using the Object Explorer, whenever possible. In the Object Explorer for your server connection, navigate to the table you want to check for an Identity, expand the table, then expand “Columns”. Once you have the list of columns opened, you can right-click on any column and select “Properties” which is where you’ll find if it’s an identity or not.

Note: This method will not work with Azure PaaS servers, which severely limit the the information you can see from context menus and dialog windows.
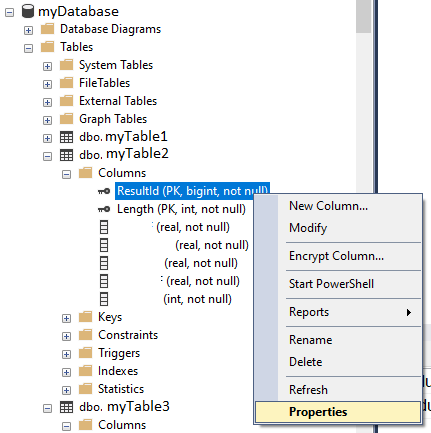
Screenshot of SSMS showing how you can access the Properties menu of a column to see if it’s an identity or not
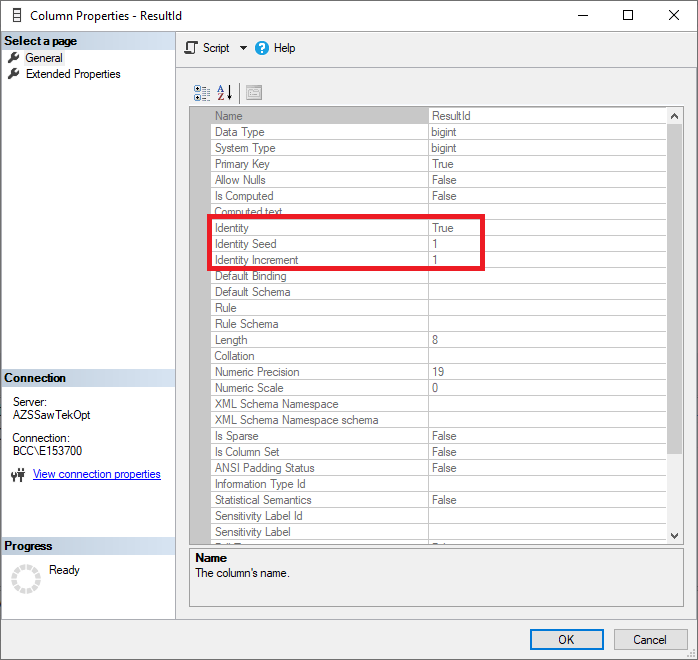
Screenshot of the Properties window of a column showing that the column is an identity

In the above screenshot showing the properties for my selected column, you can see that the value for the property “Identity” is set to “True” indicating that the column is an identity column. Then below that, you can see that the “Identity Seed” is set to 1 and the “Identity Increment” is also set to 1. Those two values mean that the first value that will be assigned to a row inserted into the table will be 1, then the value will go up by 1 for every new record inserted.

Scripting the Table

Another way you could quickly learn if a table has an Identity column and what the settings for that column is would be to right-click on the table in the Object Explorer and script the table to a new query window.

Script out the table you want to check for an identity column

Once the script has been generated, you will easily be able to tell if a column is an identity because it will be included in the SQL query to generate the table.

Note: The values for Identity Seed and Identity Increment may not be accurate! In the screenshots above where I show how to find out if a column is an identity or not, both the Seed and Increment values show as being set to 1, but I know for sure that the Seed has been changed to a much larger value. The properties of the column may not reflect the actual values.

Finding identity columns on Azure SQL Databases

As I said in a note above, you cannot simply right-click on a column in the Object Explorer for an Azure SQL Database (PaaS database) and view the properties for the column like you can with IaaS or on-prem versions of SQL Server. To see whether a table has an identity column on Azure SQL Databases, you will either need to script out the table like the previous section said or you can use the following T-SQL query.

SELECT [object_id], 
	[name], 
	column_id, 
	system_type_id, 
	max_length, 
	[precision], 
	scale, 
	is_identity, 
	seed_value, 
	increment_value, 
	last_value
FROM sys.identity_columns
WHERE OBJECT_NAME(object_id) = 'TableName';
Data you can find about a table’s identity column by using the identity_columns view

When you run that query, you will see results like the following, which show the column that is an identity for the table. If the table doesn’t have an identity column, no results will be returned by the query.

Checking Identity Properties with DBCC CHECKIDENT

As I mentioned in a Note above, you can’t always trust that the values for Identity Seed and Identity Increment are correct in the Properties dialog or how they’re scripted out when you script out a table. So how do you know what the true values are? You can use the query on sys.identity_columns above or you can use the DBCC CHECKIDENT command.

DBCC CHECKIDENT ('dbo.TableName', NORESEED)

Note: Be very careful with the formatting of that `DBCC CHECKIDENT` command, because changing the `NORESEED` value to anything else and running it could reset or change the seed value inadvertently. Use caution when using this command and make sure you have it set exactly as you want. See the resources section at the end of this post for more documentation about this command to familiarize yourself with it.

When you run that above command, it will output a message that tells you what the Identity Seed value is currently set to and what the highest value of the column is as well (for when the Identity value has been incremented above the Seed value). In my example, I have only added a single record to my table so that one record has the outputted identity value, and the current column value is the same as the seed since there’s only one record in the table.

The output of the CHECKIDENT function when you specify the NORESEED option

What is reseeding?

Reseeding is changing the value of the Identity Seed value for the Identity column so that it starts the value of the column at a number other than 1 or whatever it was originally set to. For my case, I need to retrieve the maximum value of the Identity column from Server A’s copy of the table, then set the Seed for Server B’s table to that value + 1 (so it starts at the next value above the current identity value in the source table). That means that I need to change the Seed value for my table on Server B to 128166810 instead of 1.

How to manually reseed a column

If you want to manually reseed an Identity column using a SQL command directly on the database, you can do so by using the following command:

DBCC CHECKIDENT ('dbo.TableName', RESEED, <NewSeedValue>);

You can use variables with this command as well:

DECLARE @MaxIdentity int = 128166809;
DECLARE @ReseedValue int = @maxIdentity + 1

DBCC CHECKIDENT ('dbo.LengthAnalysisResultsHeader', RESEED, @ReseedValue);

Permissions Needed to Run Reseed Query

According to the Microsoft documentation (linked in the Resources section at the bottom of this post), one of the following permissions needs to be assigned to the entity that is running the DBCC CHECKIDENT command:

  • sysadmin server role
  • db_owner database role
  • db_ddladmin database role

But that document also specifically mentions that Azure Synapse requires db_owner.

How to reseed an identity column from an Azure Synapse pipeline

For my scenario, I don’t want to run the reseed command manually because the Seed value will be changing every month when our processing runs and generates new data. I have added the DBCC CHECKIDENT command to my Synapse pipeline that’s already loading the data between my two servers so that it’s reseeded automatically right when it needs to be.

In a Synapse pipeline, the reseeding based on a value from another server can be completed with two Lookup activities:

You only need two Lookup activities in your synapse pipeline to programmatically reseed an identity column

First Lookup Activity – Get the Identity value

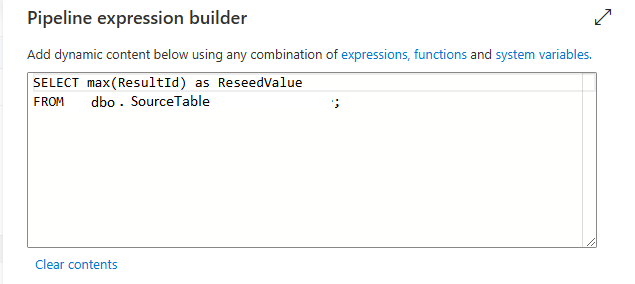
The first Lookup will query the source database, in my scenario Server A, to get the maximum value for the column that is the Identity.
Second Lookup Activity – Set the Identity value

The second Lookup will run the DBCC CHECKIDENT command, which doesn’t return any results, and will then run a SELECT 1; to satisfy the requirements of the Lookup activity that something should be returned:

DECLARE @MaxIdentity int = @{activity('Get max identity value').output.firstRow.ReseedValue};
DECLARE @ReseedValue int = @maxIdentity + 1
DBCC CHECKIDENT ('dbo.TableName',RESEED,@ReseedValue);
select 1;
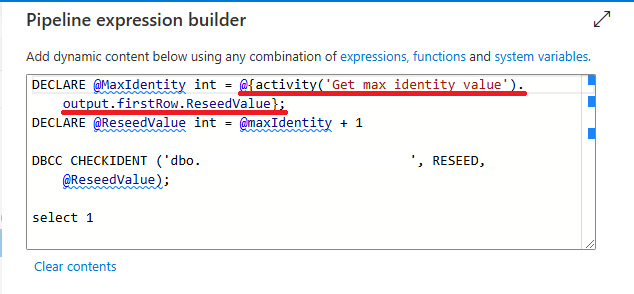
Let’s break that reseed query down a little more. The first line is creating a SQL variable called “MaxIdentity” which is an integer, and then setting the value of that variable to the output from the previous Lookup activity, which was called “Get max identity value”. To get the specific value from that preceding activity, we need to add .output after the activity call, then .firstRow to specify we want to get the value from the first row of the output of that activity, then finally add .ReseedValue which is the column name returned from the previous lookup activity.

DECLARE @MaxIdentity int = @{activity('Get max identity value').output.firstRow.ReseedValue};

Summary

Reseeding the Identity column of a SQL Server table manually is a piece of cake because it only requires one small SQL statement. But to do the same process in an automated and repeatable manner is a different story. It’s not overly complicated to create a Synapse pipeline that reseeds a table’s Identity column on demand, but there are some quirks to getting the expressions to do so correctly which involved a lot of guessing and checking for me. I am still new to working with Synapse pipelines in-depth though, so perhaps this wouldn’t be such a difficult task for you more experienced Synapse developers. 🙂

If you run into any issues while setting up the above process yourself, I would love to help as much as I can, so please leave a comment below!

Resources

Related Posts

Moving Data Between Azure SQL Databases–the Fast Way

I have done more database creation in the past couple weeks than I had done in the previous year combined, all because my team is working on making several different AI chat bots for our business users and we are being very agile about our development process. At first we had separate Azure SQL Databases for each chat bot to use for its backend, but then I decided it would be more prudent, cost effective, and easier to manage if we combined the three related bots into a single database. This meant that I needed to move data from three disparate databases into one single database, and I wanted to do it easily without any extra tools.

How I decided to move the data between the databases was to quickly export to a flat file then import that flat file onto the new database–since I only had a few hundred rows to move from each source database. As far as I am aware, this should work with all modern types of SQL Server (on-prem, IaaS, Azure SQL Database). Read on to learn how to follow the same process I did.

What’s in this post

Exporting the data from the source

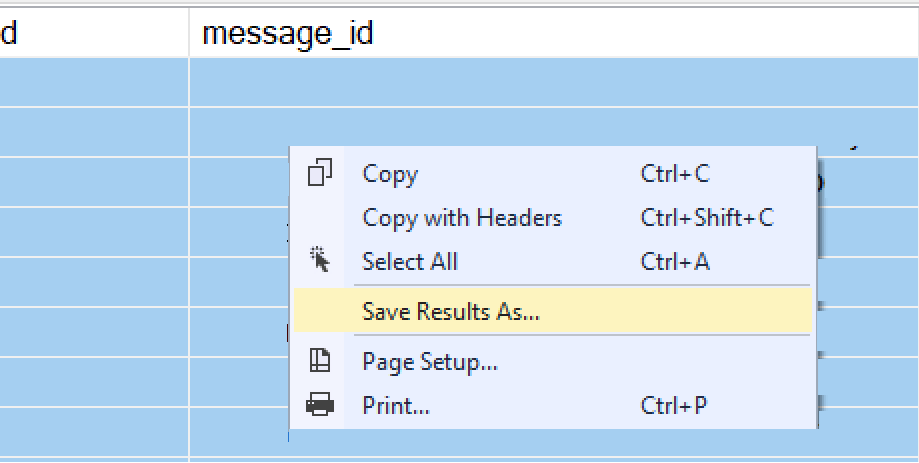
On your source database in SSMS, run a SELECT query to retrieve all the data you want to copy over to your target database. Once you have your result set, select all records, right-click on them, then choose “Save Results As…” from the menu.

Screenshot showing the "Save Results As" option when right-clicking on the results of a query in SSMS
You can export your query results using “Save Results As…” from the right-click dialog

That will open the normal “Save As” dialog, and you can choose where to save your results. Save the file to your computer.

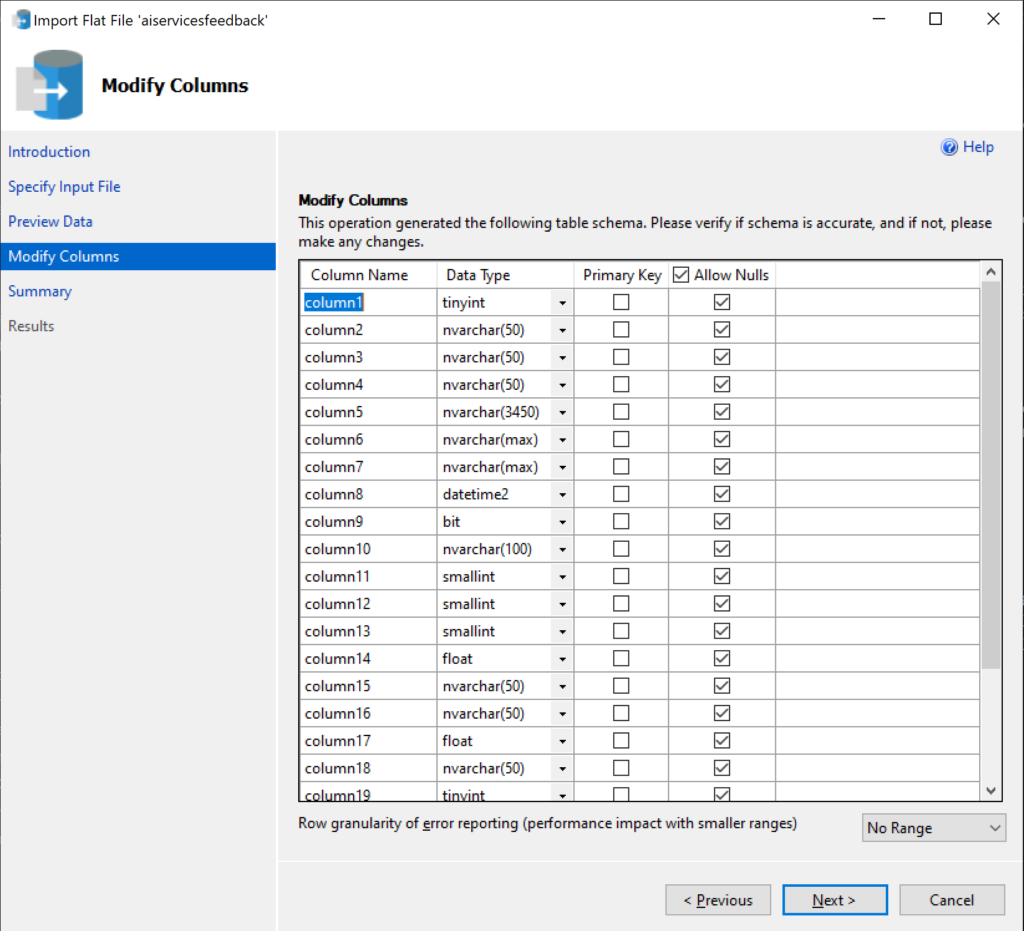
Once the file has been saved, I recommend opening the CSV using Notepad++ or similar tool to review the formatting of the data. There were a few times when I went through this process that the columns names did not get exported to the flat file, and instead the columns were generically named “Column1”, “Column2”, and so on (see final screenshot below for what this would look like when trying to import). Chances are that you won’t run into this issue, but it doesn’t hurt to check. If for some reason your file doesn’t have the correct column names that you expect, simply export the query results to a file again and it should fix the issue.

Importing the data to the target

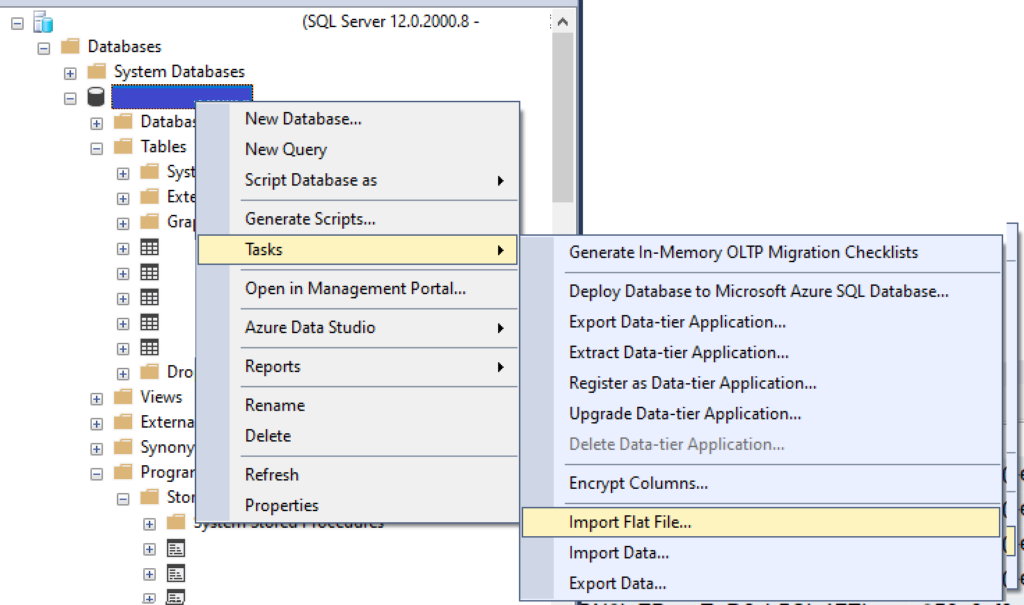
To import the data onto your target database, connect to it in SSMS as well, right-click on the database name in the Object Explorer, then choose “Tasks” > “Import Flat File”. This will open a wizard to help you import the data.

Screenshot showing where to navigate to in the database menu to import a flat file
Import a flat file using the Task “Import Flat File”, which will open a wizard tool for you

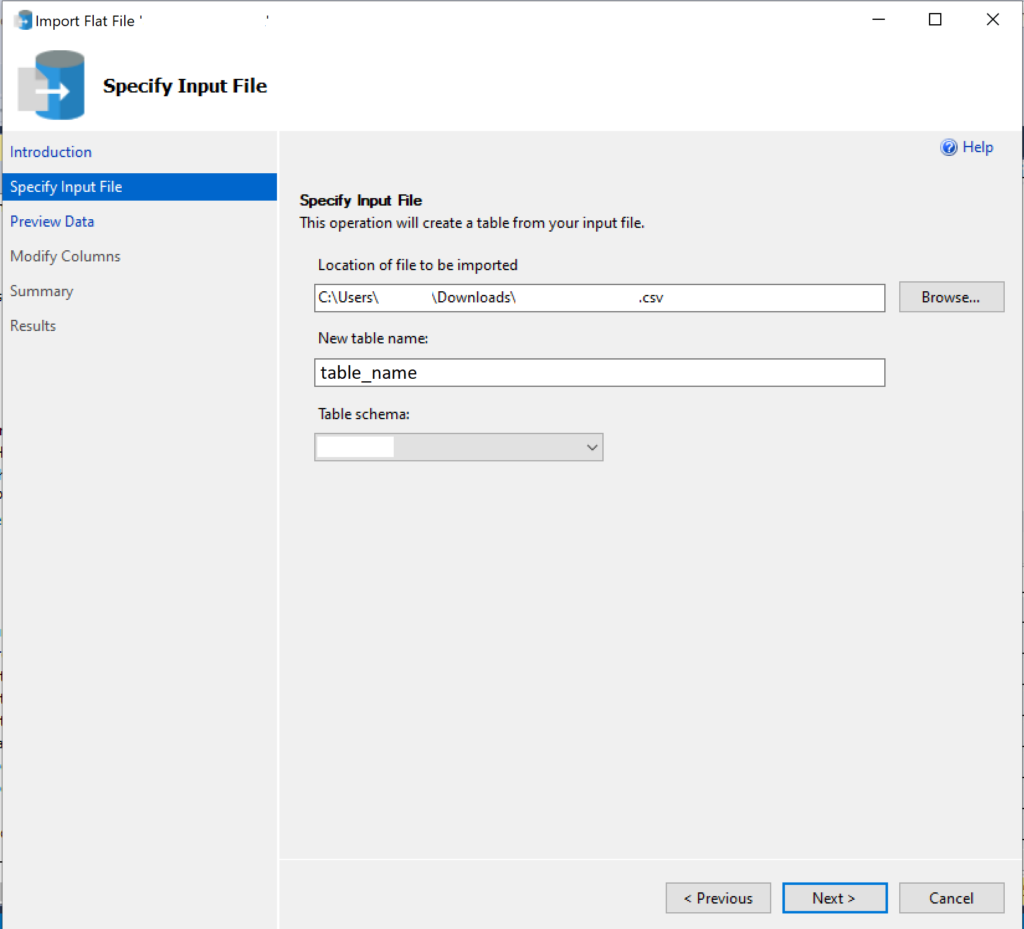
In the dialog that opens, browse to the file that you previously exported from the other database. Once you select that file, a table name is generated that the data will be imported to. You can change the name of that table if you wish. Also, choose the schema that table will go into. This process creates a new table from the imported data, so make sure you don’t use an existing table name.

Screenshot of the Import Flat File wizard where you specify the file you want to import and the table you want to load the data to
Specify the CSV file you created during the export process and the name of the new table you want to load the data into

Click “Next” to move to the next page, where you can preview the data that will be imported. If the data looks good to you, click “Next” to move to the “Modify Columns” page where you can change some settings on the table columns if you would like. I chose to “Allow Nulls” for all columns, just to make things easier for myself in this import process. I plan on deleting this table after I copy the data from it into the final target table, so it doesn’t matter to me if every column allows nulls.

Screenshot of the Import Flat File wizard showing the screen where you can modify the columns of the new table you are going to create during import
This screenshot shows you what can happen if the export process goes a little wonky–the column names from the source may not be put into the CSV file and thus only show as generic names in the Import wizard. From this menu, though, you can modify the properties of the columns in the new table that is going to be created for the import.

Keep clicking “Next” to move through the rest of the pages, review the process before you opt to import, then import the data. Once the import wizard has completed its work, you will now have a new table in your database, essentially a staging table.

To get the data from your staging table into the final target table in your database, you can use an INSERT INTO tablename SELECT... query. This step also allows you to modify the data before moving it into the target table if you need to. In my case, I needed to add an extra column to the data that the source table didn’t have but the target requires, so I hard-coded the value for that column into my SELECT statement so it would be added to the final table.

Cleanup

After you have moved your data into its final destination, make sure to clean up the temporary new table that you created during the import wizard process, to keep things as neat as possible in your database.

Summary

Using this method to copy data between two Azure SQL Databases may be considered a bit lazy, but I truly think it’s the most efficient way to get data from point A to point B. Sure, I could have made a pipeline or used some other system to move the data around, but I only had a few hundred records to copy over so this method worked great for me. Let me know if this method saved you time as well!

Related Posts

How to View Pipelines Associated with A Synapse Data Source

This morning I received a question from a colleague about how to set up a new linked service for an on-prem server to use that as a data source for a pipeline. As part of my review of our current pipelines setup to make sure I was answering properly, I needed to find an example pipeline where we were already doing that. I had a linked service and associated data source doing exactly what I needed to share with this other person, but then I got to wondering if that data source was even used anywhere and set out to find out. As per usual though, Google betrayed me and wasn’t giving me anything related to the question I was asking, so I had to figure out the answer for myself. Which is why I am now sharing with you the simple way you can see what pipelines are using which data sources, and thus linked services, in your Synapse Analytics workspace.

What’s in this post

Seeing the Data Sources associated with a Linked Service

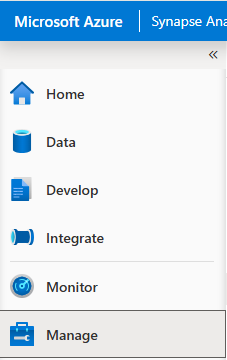
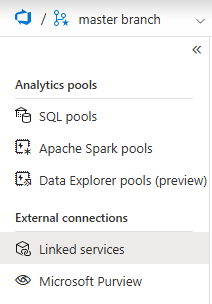
In Azure Synapse Analytics studio, it is very easy to figure out what data sources have been created using a given Linked Service. To view this information, you go to the “Manage” page in the workspace, then select the page for “Linked Services”.

Screenshot showing the left hand menu in the Synapse Analytics studio
Open the Manage page to view Linked Services
Screenshot showing the "Manage" menu with Synapse Analytics studio
Open the Linked Services page under Manage to view all Linked Services in the workspace

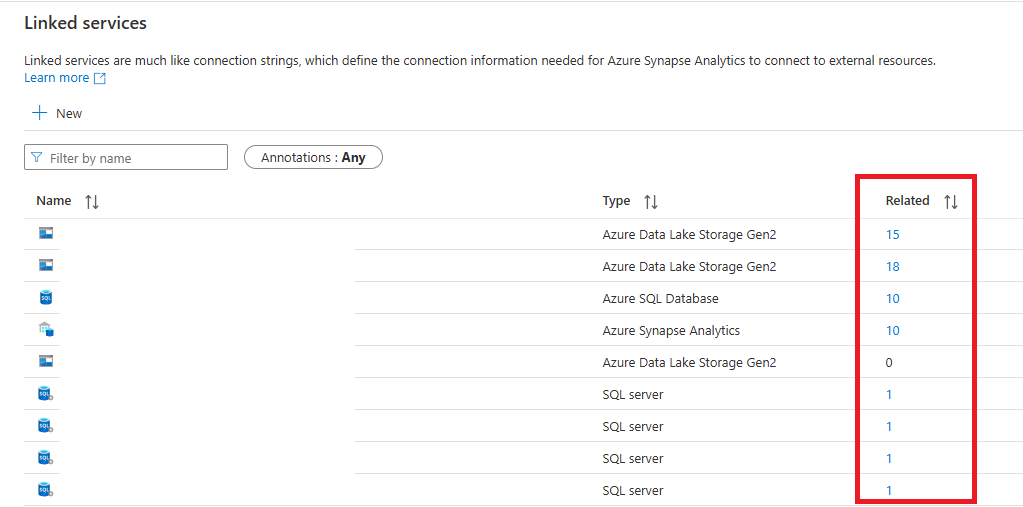
Once you are on the Linked Services tab, there is a column in the list of services called “Related” which lists the number of related data sources for each Linked Service. If you click on the number, it will open a new pane of information telling you which data sources are created using that Linked Service.

Screenshot showing the Linked Services page in the Synapse Analytics studio management tab, where you can view the data sources related to a Linked Service.
Click on the linked numbers in the Related column of the Linked Services list to see data sources using the Linked service
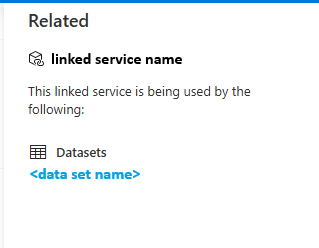
Screenshot showing the list of data sources related to a Linked Service
When clicking on the linked numbers in the Related column, you will see this Related pane.

In that “Related” pane, the names of any related data sources will be links, so you can click on those to take you to the data source editor for that specific data source within the workspace.

Seeing which pipelines use a Data Source

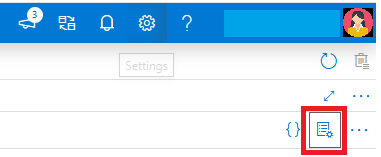
Once you navigate to the Data Source editor, you are then able to view which pipelines are using that data source. To view that information, you simply need to click on the “Properties” icon in the top right corner of the Data Source editor tab.

Screenshot showing where to locate the Properties panel of a data source so you can view the related pipelines
The Properties pane for the Data Source can be accessed from the top right corner of the Studio window.

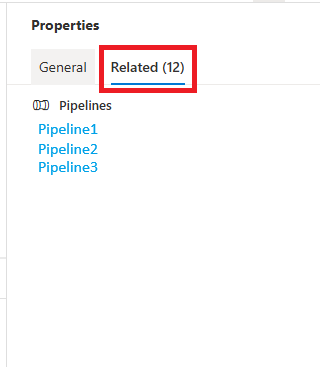
Once you have the Properties pane opened, click the “Related” tab to view the list of any pipelines that are using the data source.

Screenshot showing the list of pipelines related to the current Data Source
In the Properties pane for the Data Source, all related pipelines can be found on the Related tab

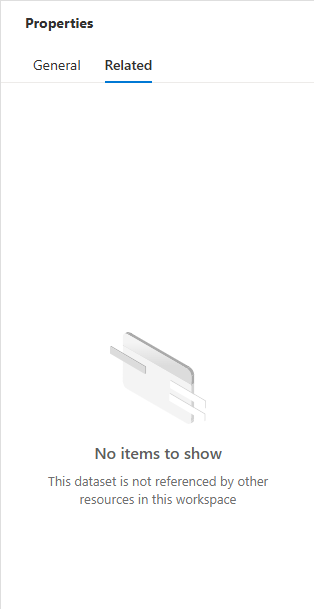
If there are no pipelines using the data source, you will instead see this on the “Related” tab.

Screenshot showing an empty Related Pipelines panel for a given Data Source in Synapse Analytics studio
If there are no pipelines using the Data Source, you will see “No items to show”

Summary

I wish I had looked for this information sooner, because I think it could have saved me some time while working with Synapse pipelines. Viewing the Data Sources related to a Linked Service and then what pipelines are using a given Data Source is simple to accomplish and helpful for seeing the relationships between items in your Synapse workspace.

Related Posts

First Thoughts About Azure

As many of you probably already know, my cloud development career started in AWS, which I worked with for just about 3 years while I worked at Scentsy. Since my recent transition to a new job at a different company, I have started to develop in Azure instead, and it’s been a learning journey. Although both platforms allow for cloud development and processing, they have quite a few notable differences in what is offered and how they offer it, which is what I’m going to cover in this post today. My goal for this list isn’t to have a technical or all-inclusive list of the differences, but more of a difference a developer might feel in their own work if they make the same switch that I have.

What’s in this post:

Azure seems simpler

Azure is simpler yet still robust. Sometimes I feel like AWS tries to overcomplicate their services in order to make them seem fancier or more cutting-edge. And it also seems like they split what could be one service into multiple just to increase their total service count. Azure combines multiple functions I was used to in AWS into a single service. An example of that is Azure DevOps, which combines your ticketing/user story system with your DevOps pipelines and your Git (or other) repos. In my past job, we used TeamCity and Octopus Deploy for the pipelines, Jira for the ticketing, and Bitbucket to store our code, so I was a little confused my first couple of weeks in my new role since everything seemed to only be in one location. But I now find it nice and easier to work with.

Azure has better cloud ETL development

In the Azure cloud platform, there is a service called Synapse Workspace or Synapse Studio, and a second service called Azure Data Factory, which both allow you to create ETL pipelines right in the cloud. AWS has Glue, but that really doesn’t seem to have the same feel or capabilities that either Synapse or Azure Data Factory (ADF) has in the Azure realm. I have already updated and created several pipelines in each of those services in Azure and I really enjoyed working with them because they were very intuitive to get working with as a newbie and I could do everything I needed for the ETL right in the cloud development workspace.

When I worked with Glue in the past, it definitely did have some limited capabilities for making drag-and-drop ETLs in the cloud, but the service seemed to have a lot of limits which would force you to start writing custom PySpark code to make the data move. While writing custom code is also possible with Synapse and ADF, they both are built with more robust built-in components that allow you to make your ETLs quickly without writing any more custom code than a few SQL queries. I have really been enjoying working in these new services instead of AWS’ Glue.

More on Azure Data Factory

Another reason why I have been enjoying working with Azure Data Factory (ADF) is because it seems to be a modern version of the SSIS I am already familiar with, and located in the cloud instead of on an ETL server and local developer box. Although the look of ADF isn’t exactly the same as SSIS, it still is the drag-and-drop ETL development tool I love working with. And since it’s developed by Microsoft, you get all the best features available in SSIS ETL development without having to work with the old buggy software. I’m sure as I keep working with ADF that I’ll find new frustrating bugs that I’ll need to work around, but my experience with it so far has been only positive.

Power Automate & Logic Apps

Two other tools that aren’t available in the AWS ecosystem and that don’t seem to have an analog in AWS are Power Automate and Logic Apps. While these tools are more aimed at people who are not developers, to allow them to automate some of their daily work, they are interesting and useful features for certain scenarios and I am enjoying learning about them and playing with them. One of the best parts about working with Azure services is that it’s fully integrated into the entire Microsoft ecosystem, so you can pull in other non-Azure Microsoft services to work with Azure and expand your horizons for development. I’m not sure yet that I would 100% recommend working with Power Automate or Logic Apps for task automation (I’m still not done learning it and working with it), but it at least is another option to fall back on in the Microsoft realm that isn’t available in AWS.

Copilot isn’t what they want it to be

While most of my experience with Azure so far is positive, there are a couple annoying things I’ve noticed that I think are worth sharing, although neither of them are so egregious that it would prevent me from recommending working with this platform.

The biggest negative about Azure for me so far is that Microsoft keeps trying to shove Copilot (their AI assistance tool which seems only slightly more advanced than Clippy) into every single product they offer even when it provides no benefit or actually detracts from your total productivity. The perfect example of this is the “New Designer” for Power Automate. For some unknown reason, Microsoft has decided that instead of allowing you to do a drag-and-drop interface for task components to build your automation flow, everyone should instead be required to interact with Copilot and have it build your components instead. That might be useful if you had already been working with Power Automate in the past so knew what capabilities and components it offered. But as someone totally new to this space who is trying to learn how to use the tool and has no idea what is currently possible to develop, it feels basically impossible to communicate with the AI in any meaningful way in order to build what I want. I don’t know what to ask it to create when I’ve never seen a list of tasks that are available. Luckily, for now it is possible to toggle off the “New Designer” and switch back to the old that allows you to add each individual component as you go and select those components from a list which gives you a short description of what each does. Maybe in the future I’ll be more open to using Copilot with everything I develop, but right now, as a new developer in Azure, it doesn’t work for me.

Unintuitive service naming

The only other nitpick I have about the Azure and Microsoft cloud ecosystem is that sometimes, the names they pick for their services don’t make sense, are confusing, or are the same thing as a totally different service. Microsoft doesn’t seem to be that great at naming things to make them understandable at a quick glance, but I suppose that can also be attributed to the desire of all cloud computing companies to make themselves look modern and cutting-edge.

The best example I can give of this phenomenon right now is that a data lake in Azure is built on what are called Storage Accounts, which is the blob storage service within Azure. It’s not as confusing to me now that I’ve been dealing with it for a month and a half, but that name doesn’t seem at all intuitive to me. Each time my colleagues directed me to go to the “data lake” I would get confused as to where I was supposed to navigate since the service I would click into was called Storage Accounts instead.

Summary

Although it felt like such a big switch in the beginning to move from an AWS shop to an Azure shop, I have already started to enjoy developing in Azure. It has so much to offer in terms of cloud ETL development and I can’t wait to keep learning and growing with these tools. I’ve already compiled so many things that I can’t wait to share, so I am hoping I will get those posts ready and posted soon so others can learn from my new Azure developer struggles.