Tag: Database Tools (page 1 of 2)

SQL Server 2022 – Getting the Installer Link to Work

I recently went through a whole day long ordeal trying to figure out how to get the ISO/installer for SQL Server 2022 so I could install it on a few VMs I made for a software upgrade, which I wrote about in a post last week. After spending way too much time just getting the installer downloaded, I then ran into another issue where when I clicked on the link to do a new installation of SQL Server 2022, the link did absolutely nothing. The solution for this problem ended up being simple, but it had me scratching my head and bothering my teammates to try running the installer as well before I figured out what needed to be done.

What’s in this post

The Problem

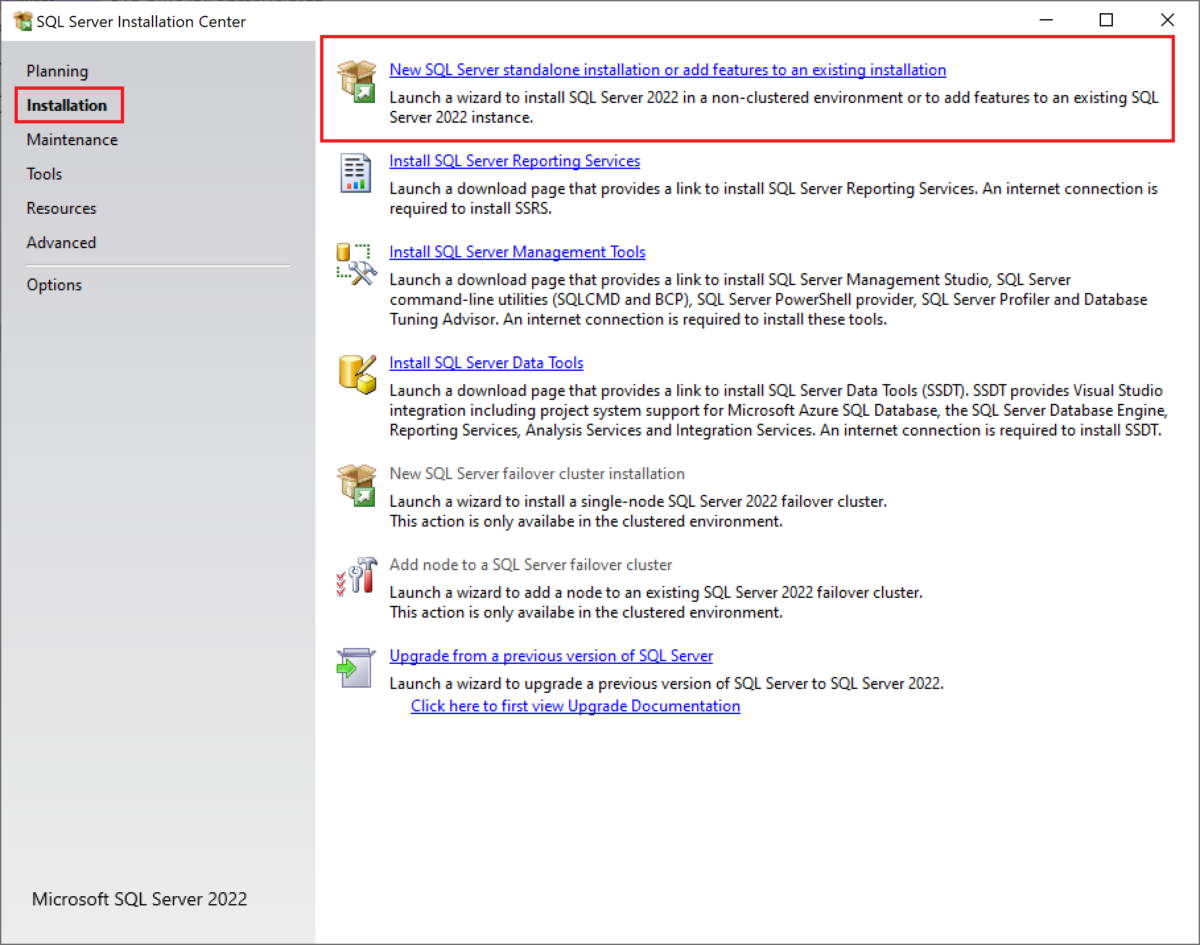
When you run the setup.exe or installer for SQL Server 2022, and select the option for “New SQL Server standalone installation or add features to an existing installation”, the software may do nothing when you click that link. It may have a spinning cursor for a small moment, but then nothing happens at all, no matter how long you wait.

The Solution

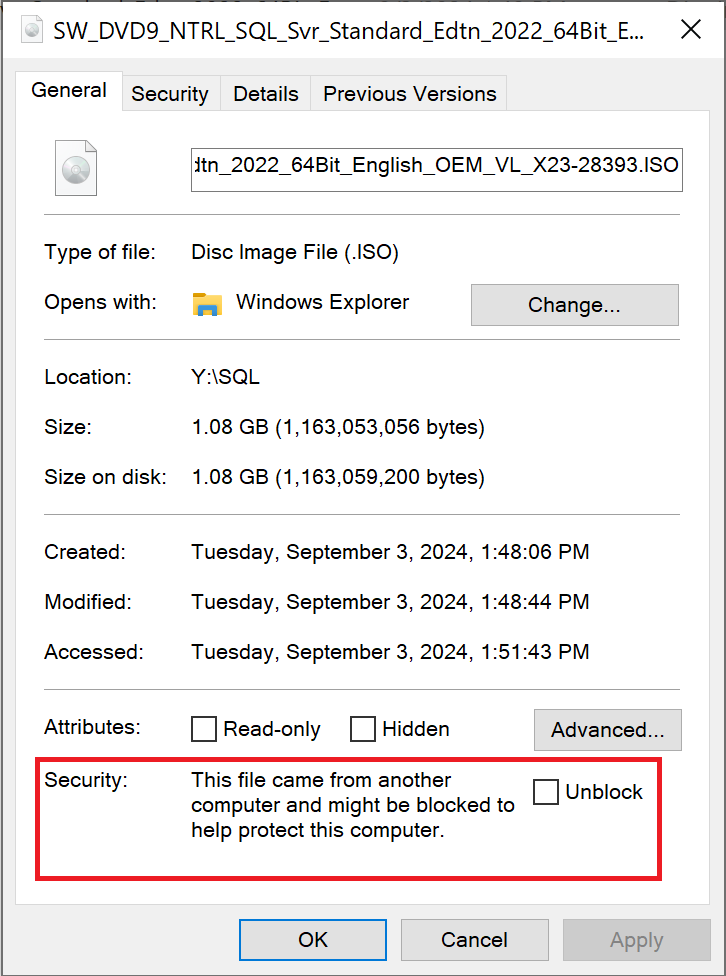
I found the answer to this issue on StackExchange. When I first downloaded and ran the installer, the standard Windows dialog came up asking if I wanted to trust the publisher of the program, since it was Unknown. I clicked yes. But despite that apparently, my computer had the file set to blocked, so when I clicked the link to start a new installation, the installer was blocked and nothing ran. To fix this problem, do the following.

Go to wherever you have the ISO file saved, for me this was the Downloads folder. Right-click on the file and select Properties. Then on that General/main page of that dialog, at the bottom there will be a checkbox that says “Unblock” with a message about security if you unblock the file. Check the box then click “OK”.

If you were experiencing the same issue that I was, you should now be able to reopen the installer file and click the link to start a new installation, and move on with your day.

Summary

There seems to be a bug with the installer for SQL Server 2022 where clicking the option to start a new installation seems to do nothing. This bug can be resolved by “Unblocking” the installer file through the Properties dialog of the file.

How to Download SQL Server 2022

You would think that figuring out how to download the installer for SQL Server 2022 Standard or Enterprise editions would be a simple task, much like the process for how you download any other installer or ISO for any other version of SQL Server. But with 2022, Microsoft seems to have changed their method for getting the software to people, making it a lot more locked down than other versions are. I’m not sure why this change was made, and if you have some insight please feel free to share it in a comment, but it was made and I have finally figured out how to get that installer with this new system. It took my colleagues and I a whole work day to figure this out. We had to work with our Microsoft account managers to get to the bottom of it, and it seems a little crazy to me that it would be that unintuitive to find the ISO for this software.

What’s in this post

Background

In my company’s current architecture, we create SQL Server virtual machines (VMs) by creating standard Windows servers through the Azure portal, and then one of the database developers will logon to the VM and install SQL Server through the ISO/installer, instead of creating a SQL Server VM from a provided image in Azure. In the past, when we needed to install SQL Server onto a VM, we would google something like “SQL Server 2019 download” and click on the link that takes you to the Microsoft downloads page, and then get the ISO from there. When we tried to do the same for SQL Server 2022, we were taken to a downloads page that only allowed you to download Developer or Express editions, and if we wanted to do Standard or Enterprise, we could only get an evaluation version after providing our information to start a free trial.

We obviously did not want a short trial version of the software, we wanted the full Standard edition, but could not find a full installer/ISO for that version. For a few months, we gave up and installed 2019 instead of 2022 whenever we needed to create a new server, but we reached a point where we are required to use 2022 for some applications, so I set out to find out how to get the Standard edition of SQL Server.

The Proper Method

There are two different ways that we found we could get a Standard or Enterprise edition of SQL Server 2022, and I’ll start with the method that I think they’re intending people to use. If your organization uses SQL Server in Azure already, you will likely need to go through this same method to get the installer for 2022.

I unfortunately can’t get any screenshots of this method of the process because I’m not an elevated user in our organization, but there is a way for your Azure tenant owner (and a few other select individuals) to get the latest ISOs and installers for every piece of Microsoft software your company has licenses for. I believe it is at admin.microsoft.com, but you can talk to your account representative to find out for sure. You can then navigate to “Billing” and then “Your Products” and then “Volume Licensing” where you can view all your licenses and get the downloads for them.

This is how we resolved the installer issue in our organization; we had our tenant owner download the ISO from this location and save the file in a shared location. Going forward, whenever we need an installer for any Microsoft product that we use, we will be required to have that one person download the files and send it to us (not a super convenient method if you’re a developer that doesn’t have full access to your entire Azure tenant).

Once you have the ISO, you can run it as you usually would to install any version of SQL Server, and your license key will be prefilled into the installer so you don’t need to worry about specifying that at any time during the installation process.

The Workaround Method

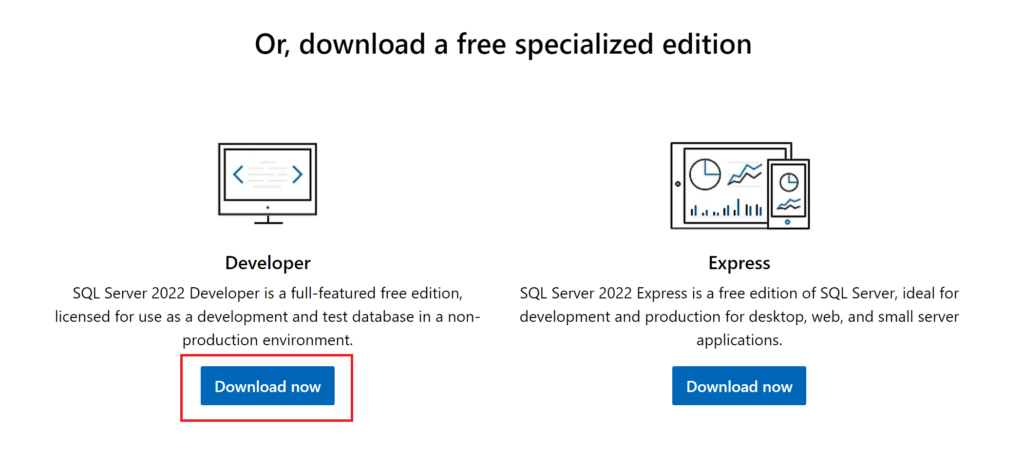
Before we had talked to our Microsoft account managers, this is the route we were going to use to be able to install SQL Server 2022 on our VMs. Go to the SQL Server 2022 page on the Microsoft website (https://www.microsoft.com/en-us/sql-server/sql-server-downloads) then download the “Developer Edition”.

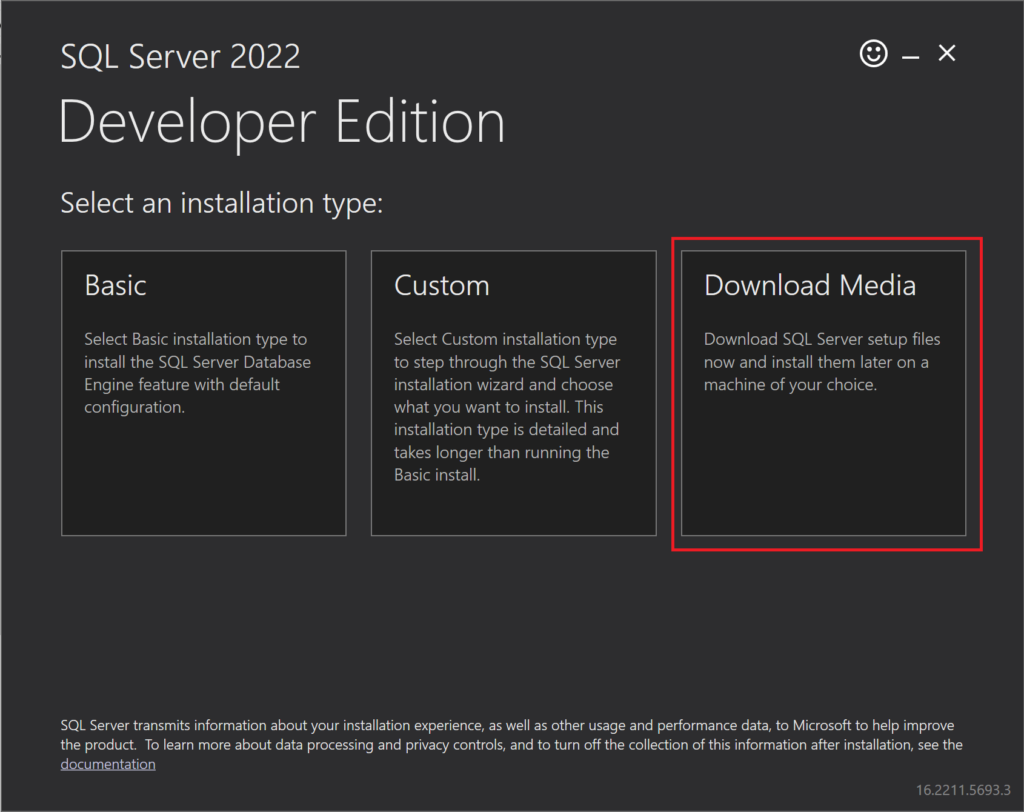
After you download that version, run the installer that you downloaded. When it first opens, click the option that says “Download Media”:

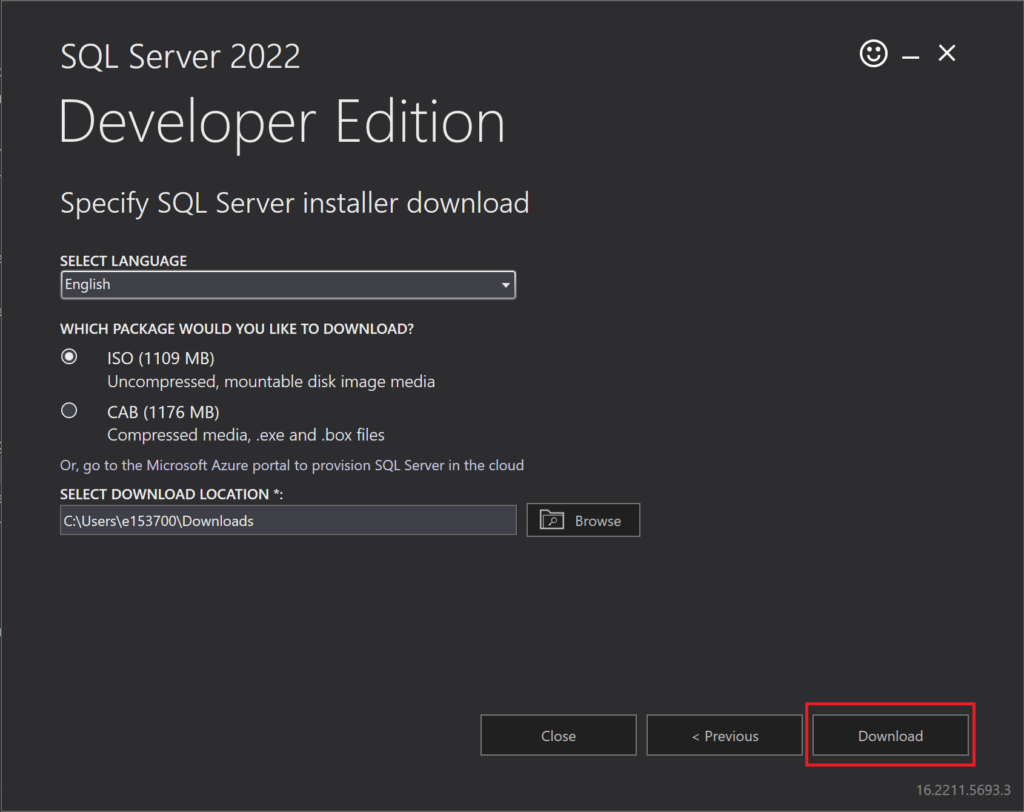
On the next page, click “Download”, which will download the ISO for SQL Server:

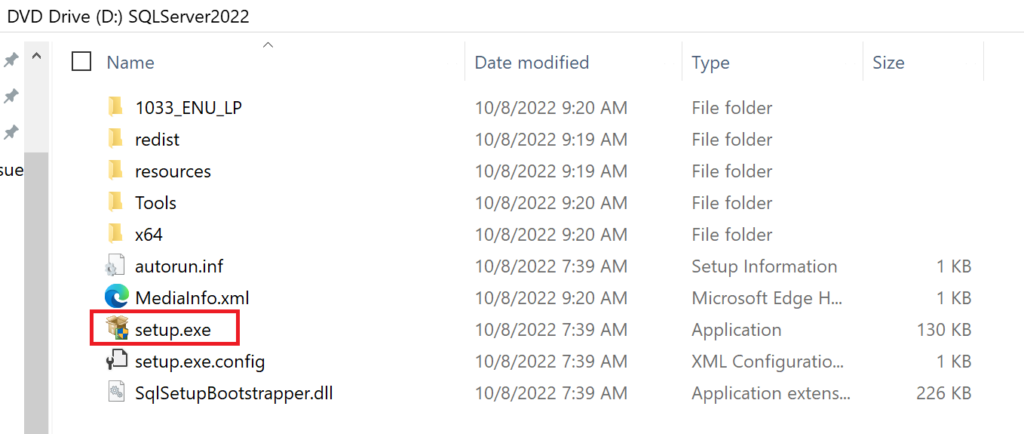
After the ISO file has downloaded, double-click on the file in File Explorer, which will mount a “DVD” to your system, which will open another directory. In that directory, double-click on “setup.exe” to run the installer for SQL Server.

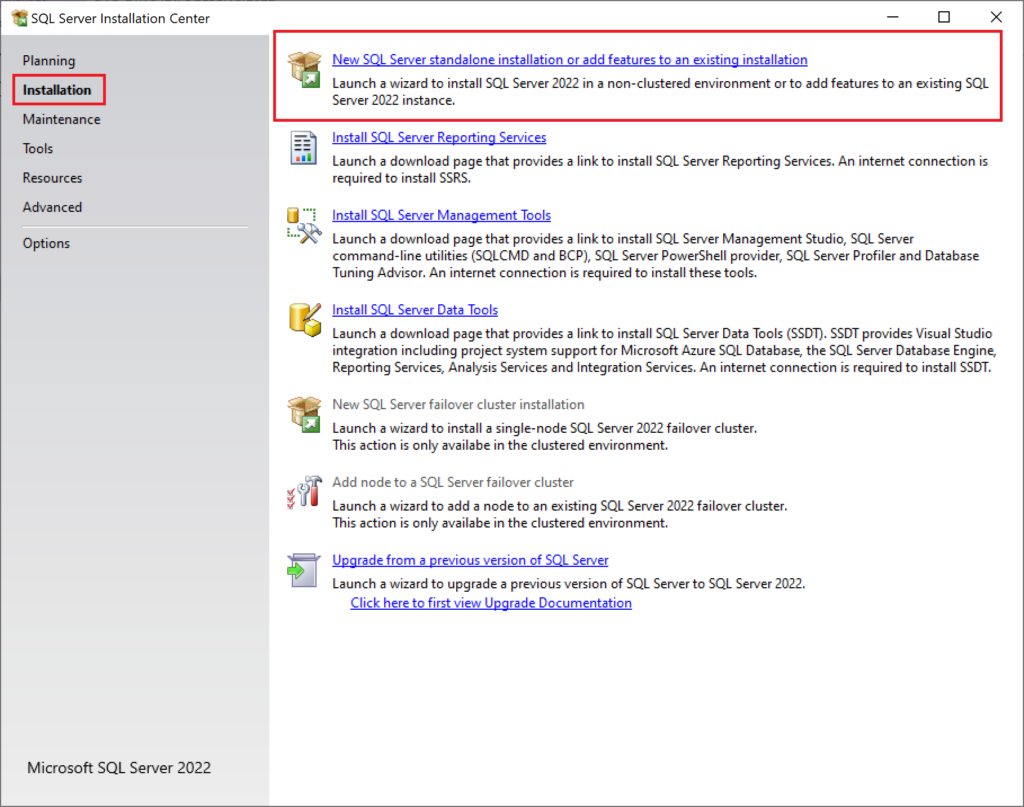
When the installer window opens, click on the “Installation” page from the left-hand pane, then click on the first link that says “New SQL Server standalone installation or add features to an existing installation”.

If you have an issue where clicking that link doesn’t open anything else, seems to do nothing, check out my other post about how to resolve that issue.

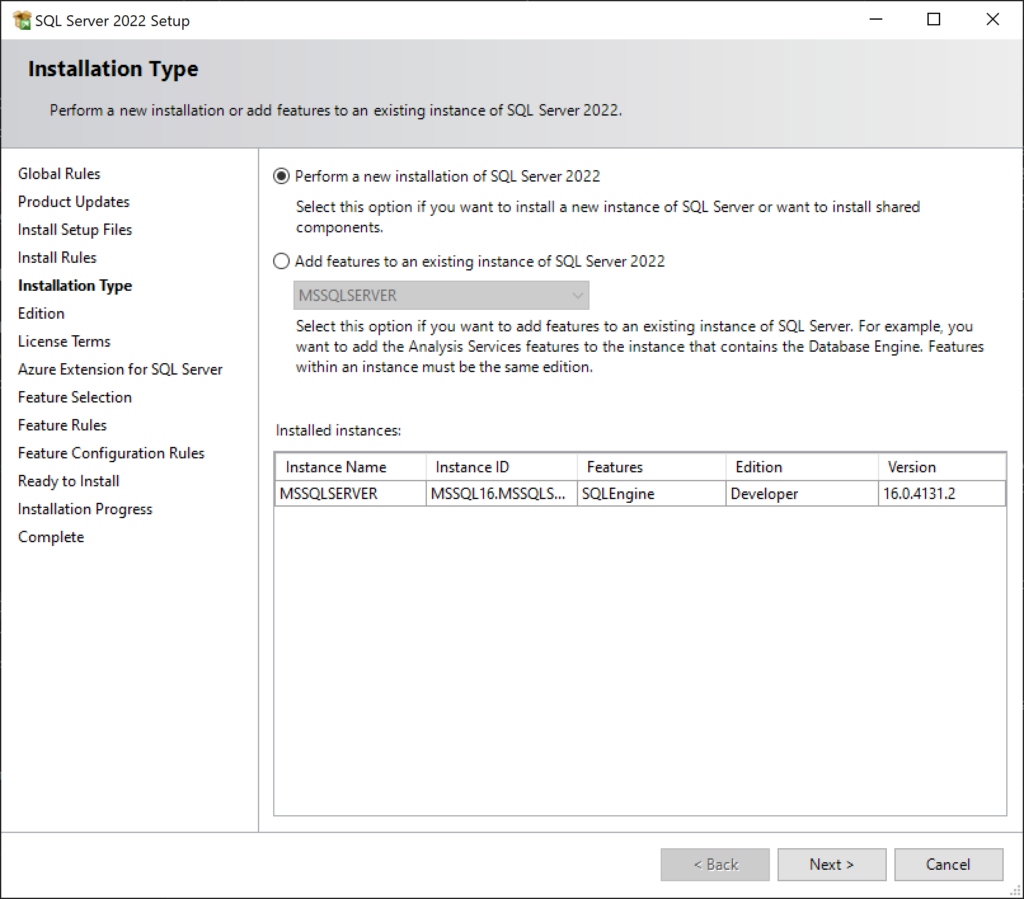
Click “Next” multiple times to move through the initial installation steps for SQL Server 2022. Review the information on each page before moving past it to ensure the settings are what you want them to be. When you come to the following page, keep the radio button for “Perform New Installation” selected then click “Next” again.

The “Edition” page is the one we’ve been needing to get to. On this page, you can change the selection from “Specify a free edition” to either one of the other two options to install Standard or Enterprise editions.

If you select the option for “Use Pay-As-You-Go billing through Microsoft Azure”, there is a dropdown menu that will let you specify Standard or Enterprise editions. Note that going with this option would then later require you to specify Azure Subscription information to bill the server usage to.

If you select the option for “Enter the product key”, you can then give a license key for SQL Server 2022 if you already have one. Review the two optional checkboxes under the license key box to select any options that apply to you. It looks like if you don’t specify a license key after choosing this option, you can still move forward with the installation, but there must be some point in the future of using the software where you’ll be required to provide a license key to keep using it.

Note: If you go through the “proper method” I listed above, the license key should be prefilled in the third option when you get to this page with the properly downloaded ISO file. For our situation, we also need to make sure the checkbox below the license key box “I have a SQL Server license with Software Assurance or SQL Software Subscription” is checked, since we use Software Assurance for our licensing.

After you’ve made your selections for the “Edition” page of the installer, you are ready to move through the rest of the installation process, specifying whatever options required for your own version of SQL Server.

Summary

There are two different methods I have found for getting the installer for SQL Server 2022 Standard edition, and neither of them are necessarily intuitive. Based on your needs, you can choose either the “proper” or the “workaround” methods. I hope this tutorial has helped you download the software without having to spend a day figuring it out like my coworkers and I had to.

Oracle Cloud World 2024- Day 1 In Review

Today was my first day at Oracle Cloud World in Las Vegas, and also my first time ever at an Oracle conference, since I only recently started doing database administration with this RDBMS. As with any technology conference, the day was jam-packed with many different sessions. Although I obviously cannot convey all the information I learned at my sessions throughout the day, I will try to summarize the interesting and key points I took away from each.

What’s in this post

Keynote Session 1: “Customers Winning with the Cloud and AI”

I’m not going to lie, I went into this conference and this sessions not having a great opinion of Oracle, due to the multiple negative experiences I had with their database platform in the past few months. However, this keynote was not a useless session, because I did learn that MGM Resorts owns a huge number of properties and hotels in Las Vegas, which is interesting from a big data perspective, and that the CIA is the first customer of Oracle. There are a lot of rumors online about how Oracle came to be and how it may or may not relate to a CIA project codename, but I couldn’t find any reputable sources, so we’ll just leave it at the CIA being the first and one of the largest customers of Oracle.

Besides those interesting tidbits, this keynote mainly contained somewhat dry interviews with different large customers of Oracle talking about how they’ve utilized Oracle products to revolutionize their businesses and how they’ve started to use AI in their technology journeys. This was the beginning of discussions surrounding “AI” that continued throughout most of the sessions today. (On that topic, I’m starting to feel like the term “AI” is being watered down or misused at this conference to represent things that really shouldn’t fall under that term…)

“Accelerate Your IAM Modernization to Multi-cloud Deployments”

This session was not what I expected it was going to be, and it wasn’t the only one where that happened today. However, even though the content of this session wasn’t what I thought it was going to be, I did learn a few interesting things. The presenters gave many startling facts about the costs associated with data breaches as well as the causes of those breaches. The statistic that I found most interesting is their claim that 60% of breaches resulted from poor patch management.

I was hoping that this presentation was going to cover more of the technical details of implementing and modernizing IAM within the Oracle ecosystem, but it proved to be a general overview of what everyone should be doing instead, which was what disappointed me about it. However, it at least gave me some topics that I can do further research on by myself to learn more about IAM in Oracle, such as the Oracle Access Manager. At least if I couldn’t get the technical details I wanted, I still got some direction about what to research next.

“Create a Data Pipeline with Data Transforms in Autonomous Database Data Studio”

This presentation was more the style of what I was expecting of most of the sessions I chose today, but it once again covered completely different information than what I thought it would. This session was different than what I expected because I was not aware that “Data Transforms” is an Oracle product; I thought that it was being used as a general term in the title. If I had known that the presentation would be covering a specific service, I would have had a better understanding of what I was about to learn. My confusion of expectations did not make the presentation unenjoyable or uninformative, though.

What I learned from this session is that Oracle has two different ETL platforms available to move data around, similar to how Microsoft has SSIS for SQL Server (and other databases). Data Transforms was the service covered by this session, but they did mention Oracle Data Integrator (ODI) which is another, older ETL service. Data Transforms can move data between tons of different types of databases, not just Oracle, and it seemed to have a lot of interesting and easy to use ETL capabilities. It seems like they are trying to make this tool be the data flow tool of the future, especially since they covered 3 different features that are about to be added, like vector search/query capabilities. Although I haven’t had the chance to use this tool myself, I want to temper the expectations for what it can accomplish due to my own personal experiences with other Oracle services. Maybe it’s as fantastic and as useful as they say it is, or maybe it’s just another sales pitch that is better than the real user experience. If you have personal experience, good or bad, with Data Transforms I would love to hear about it in the comments below.

Keynote Session 2: “Oracle Vision and Strategy”

Of all the sessions today, I think this one had the most interesting pieces of information, although none of it was directly applicable to me or my company. The biggest downside of this keynote was that it went way over time, so I had to head out before the end of it. The two major topics of the keynote, presented by Larry Ellison, the founder and CTO of Oracle, were the joining of Oracle Cloud with the other major cloud providers and then covering various different topics surrounding artificial intelligence and how they want to use it to fix all the problems of the application and database development world.

While I like the idea of them putting Oracle databases into the other cloud platforms–Google Cloud Platform, AWS, and Azure–because it gives me hope that maybe one day we could migrate our Oracle databases to a less fragile ecosystem, it did leave me wondering if one day in the future there will just be one single mega-cloud system and monopoly originating from the combination of the current big four (but maybe I’ve just been reading too many dystopian novels lately).

I thought the second part of the keynote, surrounding current and potential uses of AI integration with other software systems, was more interesting and also a bit scary. Interesting in that automating mundane and error-prone processes makes our lives as database developers and administrators easier. There are so many things Mr. Ellison mentioned automating with AI that sounded great and useful to me. But it also scared me a bit, as it felt like there was an undertone of invasiveness being discussed under the guise of security. Security, on the technological and physical level, is important for individuals, groups, and even our whole country, but I personally believe security should not come at the cost of personal freedom and privacy. Some of the proposed and planned uses of AI, specifically how it relates to biometric authentication for every aspect of our lives, left me feeling a little uneasy (but once again, maybe it’s due to the large number of dystopian books I’ve read lately).

“Access Governance: The Key to Ensuring the Survival of Our Digital Lives”

I think this session was the best presentation of the day, as far as straight communication abilities go. The team of presenters was very well put together and knew their topics well without having to read off their slides at all, and I really appreciated that.

The topic of this session was once again about managing who can access what, including the use of Identity and Access Management (IAM) as one of the core topics. The presentation was lead by a member of the Oracle leadership team, who was accompanied by three Oracle customers, including a senior security engineer from Uber. Hearing from the different customers about their experience using IAM in general, not just the Oracle services, offered a great perspective on managing access to applications and databases, and gave me some ideas to take back to my own work. The main Oracle services covered were Oracle Access Governance and the Intelligent Access Dashboard, which I’ll need to do further research on myself now.

“AI-Based Autoscaling with Avesha for Simplified OKE Management on OCI”

This was my last session of the day, and although I was tired and dreaming of my hotel room, I did find it to be another interesting presentation, although not super applicable to my work life. The title is quite a mouthful, but what it covered was how a small company called Avesha has created 4 different tools to help you autoscale and manage Kubernetes clusters in Oracle Cloud Infrastructure (OCI). Their 4 tools all seemed like they would be very useful for people who are working with Kubernetes in Oracle, since apparently the autoscaling in OCI doesn’t always work as well as people want it to (coming from comments from the audience during the Q&A at the end of the presentation).

While I don’t think my company will be using any of Avesha’s tools anytime soon, they did seem like they could be extremely useful to other organizations. And the presenters definitely understood their own products, down to the fine details of how they work, which is always a green flag I appreciate with software vendors.

Summary

Wooh, that was a lot of information to recap and cover for a blog post! After attending these six sessions on this first day of Oracle Cloud World, I’m a little bit overwhelmed an exhausted, and not quite ready for another day and a half of more info dumps. But that’s okay because it’s what’s to be expected from conferences like this. I am hoping that the sessions I picked for tomorrow are more applicable to my current role, but even if they aren’t, I’m sure I’ll learn more interesting things throughout the day.

First Thoughts About Azure

As many of you probably already know, my cloud development career started in AWS, which I worked with for just about 3 years while I worked at Scentsy. Since my recent transition to a new job at a different company, I have started to develop in Azure instead, and it’s been a learning journey. Although both platforms allow for cloud development and processing, they have quite a few notable differences in what is offered and how they offer it, which is what I’m going to cover in this post today. My goal for this list isn’t to have a technical or all-inclusive list of the differences, but more of a difference a developer might feel in their own work if they make the same switch that I have.

What’s in this post:

Azure seems simpler

Azure is simpler yet still robust. Sometimes I feel like AWS tries to overcomplicate their services in order to make them seem fancier or more cutting-edge. And it also seems like they split what could be one service into multiple just to increase their total service count. Azure combines multiple functions I was used to in AWS into a single service. An example of that is Azure DevOps, which combines your ticketing/user story system with your DevOps pipelines and your Git (or other) repos. In my past job, we used TeamCity and Octopus Deploy for the pipelines, Jira for the ticketing, and Bitbucket to store our code, so I was a little confused my first couple of weeks in my new role since everything seemed to only be in one location. But I now find it nice and easier to work with.

Azure has better cloud ETL development

In the Azure cloud platform, there is a service called Synapse Workspace or Synapse Studio, and a second service called Azure Data Factory, which both allow you to create ETL pipelines right in the cloud. AWS has Glue, but that really doesn’t seem to have the same feel or capabilities that either Synapse or Azure Data Factory (ADF) has in the Azure realm. I have already updated and created several pipelines in each of those services in Azure and I really enjoyed working with them because they were very intuitive to get working with as a newbie and I could do everything I needed for the ETL right in the cloud development workspace.

When I worked with Glue in the past, it definitely did have some limited capabilities for making drag-and-drop ETLs in the cloud, but the service seemed to have a lot of limits which would force you to start writing custom PySpark code to make the data move. While writing custom code is also possible with Synapse and ADF, they both are built with more robust built-in components that allow you to make your ETLs quickly without writing any more custom code than a few SQL queries. I have really been enjoying working in these new services instead of AWS’ Glue.

More on Azure Data Factory

Another reason why I have been enjoying working with Azure Data Factory (ADF) is because it seems to be a modern version of the SSIS I am already familiar with, and located in the cloud instead of on an ETL server and local developer box. Although the look of ADF isn’t exactly the same as SSIS, it still is the drag-and-drop ETL development tool I love working with. And since it’s developed by Microsoft, you get all the best features available in SSIS ETL development without having to work with the old buggy software. I’m sure as I keep working with ADF that I’ll find new frustrating bugs that I’ll need to work around, but my experience with it so far has been only positive.

Power Automate & Logic Apps

Two other tools that aren’t available in the AWS ecosystem and that don’t seem to have an analog in AWS are Power Automate and Logic Apps. While these tools are more aimed at people who are not developers, to allow them to automate some of their daily work, they are interesting and useful features for certain scenarios and I am enjoying learning about them and playing with them. One of the best parts about working with Azure services is that it’s fully integrated into the entire Microsoft ecosystem, so you can pull in other non-Azure Microsoft services to work with Azure and expand your horizons for development. I’m not sure yet that I would 100% recommend working with Power Automate or Logic Apps for task automation (I’m still not done learning it and working with it), but it at least is another option to fall back on in the Microsoft realm that isn’t available in AWS.

Copilot isn’t what they want it to be

While most of my experience with Azure so far is positive, there are a couple annoying things I’ve noticed that I think are worth sharing, although neither of them are so egregious that it would prevent me from recommending working with this platform.

The biggest negative about Azure for me so far is that Microsoft keeps trying to shove Copilot (their AI assistance tool which seems only slightly more advanced than Clippy) into every single product they offer even when it provides no benefit or actually detracts from your total productivity. The perfect example of this is the “New Designer” for Power Automate. For some unknown reason, Microsoft has decided that instead of allowing you to do a drag-and-drop interface for task components to build your automation flow, everyone should instead be required to interact with Copilot and have it build your components instead. That might be useful if you had already been working with Power Automate in the past so knew what capabilities and components it offered. But as someone totally new to this space who is trying to learn how to use the tool and has no idea what is currently possible to develop, it feels basically impossible to communicate with the AI in any meaningful way in order to build what I want. I don’t know what to ask it to create when I’ve never seen a list of tasks that are available. Luckily, for now it is possible to toggle off the “New Designer” and switch back to the old that allows you to add each individual component as you go and select those components from a list which gives you a short description of what each does. Maybe in the future I’ll be more open to using Copilot with everything I develop, but right now, as a new developer in Azure, it doesn’t work for me.

Unintuitive service naming

The only other nitpick I have about the Azure and Microsoft cloud ecosystem is that sometimes, the names they pick for their services don’t make sense, are confusing, or are the same thing as a totally different service. Microsoft doesn’t seem to be that great at naming things to make them understandable at a quick glance, but I suppose that can also be attributed to the desire of all cloud computing companies to make themselves look modern and cutting-edge.

The best example I can give of this phenomenon right now is that a data lake in Azure is built on what are called Storage Accounts, which is the blob storage service within Azure. It’s not as confusing to me now that I’ve been dealing with it for a month and a half, but that name doesn’t seem at all intuitive to me. Each time my colleagues directed me to go to the “data lake” I would get confused as to where I was supposed to navigate since the service I would click into was called Storage Accounts instead.

Summary

Although it felt like such a big switch in the beginning to move from an AWS shop to an Azure shop, I have already started to enjoy developing in Azure. It has so much to offer in terms of cloud ETL development and I can’t wait to keep learning and growing with these tools. I’ve already compiled so many things that I can’t wait to share, so I am hoping I will get those posts ready and posted soon so others can learn from my new Azure developer struggles.

Two Useful Keyboard Shortcuts for SSMS

Welcome to another coffee break post where I quickly write up something on my mind that can be written and read in less time than a coffee break takes.


This morning I was doing my normal work when I had a realization that I should share something I find super useful and use frequently use in SSMS that a lot of developers seem to not know about. They are small actions but they make your life easier when doing a lot of query editing in SSMS.

How to Minimize the Results Window

I have told many developers about this keyboard shortcut and they all appreciated it. I’m sure most people that frequently work in SSMS would like to be able to minimize and maximize the results window as needed in order to give themselves more screen real estate to work with while coding but still be able to see their query results as needed. But there is no minimize button for the results window of SSMS.

The only way that I know of to minimize and then maximize the results window in SSMS is to do CTRL + R. I use this keyboard shortcut every day at work while writing queries or updating existing queries.

How to Refresh the Intellisense

I have also had to tell many developers about updating the intellisense suggestions of SSMS since it will often trip them up if they don’t know how it works. First, you should understand that the intellisense offered by SSMS is only accurate as of the time you opened your query window or changed the connection for the query window (usually). If you’ve been working in the same query window for a while and have made DDL changes to any tables, functions, stored procedures, etc., intellisense is likely out of date and could tell you that a table or column you’re trying to reference doesn’t exist when you know it does.

If you ever run into this situation where it’s telling you something doesn’t exist but you know it does, use CTRL + SHIFT + R and the intellisense suggestions/corrections will be updated.

Bonus shortcut for Red-Gate SQL Prompt

Similar to the intellisense built in to SSMS, if you are using the SQL Prompt tool from Red-Gate, you can run into the same issue with the tool not recognizing that objects or columns exist when you know that they do. If you run into that issue and would like to update the suggestions list for SQL Prompt, use CTRL + SHIFT + D.

Getting SQL Prompt to Prompt on RDS Servers

This may seem like a ridiculous thing to need to write about, making the Red-Gate tool SQL Prompt generate prompts like it should, but I have been having a weird issue with it over the past couple months and have finally learned the solution. So of course I thought I should share it!

What is SQL Prompt?

SQL Prompt is a tool made by Red-Gate that works as a much cleaner, nicer, and more useful autocomplete feature for SQL Server Management Studio (SSMS). It is a plugin you install to SSMS that then seems to magically work to help you write queries faster. Not only does this tool autocomplete databases, schemas, tables, and column names for you in your queries, but it also provides a lot of other useful tools like a Snippets Manager, which allows you to use default and custom snippets to write code faster (e.g. writing “sf” then pressing Tab will type out “SELECT * FROM” for you so all you need to type is the table name you want to select from).

Every developer in my organization uses this tool heavily in our day-to-day operations while writing any SQL scripts because it makes writing queries so much faster. So when my SQL Prompt seemed to stop working after an update, I was getting really frustrated because it meant I had to write all of my SQL queries manually again. And when all you do all day is write SQL, that adds up to a significant hindrance to your work speed.

My Problem

The problem I was having with SQL Prompt was that when I connected to any of our RDS database instances, the tool would no longer do any prompting of schemas, tables, or columns which was making my coding life so much harder. Oddly, the snippets manager portion of the tool was still working fine, so at least I wasn’t needing to type out the queries I normally use the snippets shortcuts for. Also oddly, Prompt would work perfectly fine connecting to other databases that weren’t on RDS instances, it was only happening for RDS databases.

I dealt with this issue for months on our production server, since I figured it was due to the security settings or something else I wouldn’t be able to fix, and I don’t access prod servers very frequently, so when I did use them and the Prompt wasn’t working, it wasn’t as bothersome. But after I had to completely reset my developer computer and reinstalled SQL Prompt, I started having this same issue for our lower environment databases, that I work with every day, so Prompt not prompting was suddenly a big deal.

The Solution

I created a support ticket with Red-Gate since I’ve always had good luck with their support services. This time wasn’t any different. Within a couple hours of creating the ticket, I had an email from a support rep asking me if I had tried checking the “Trust Server Certificate” check box on the Connection Properties tab while connecting to the RDS servers. No, I had not done that because I did not know that was an option before that day.

I disconnected from the RDS server then reconnected, making sure to check that box before clicking “Connect”, and now I had SQL Prompt back up and working, providing prompts of schemas, tables, and columns just like I want it to. Yay!

I also logged onto our prod server to see if doing the same thing there would fix that issue, and it fixed Prompt there as well. I am so excited to be able to not type out every detail of every SQL query again!

I love quick fixes like this.

Why CFTs Take so Long to Delete

Welcome to another coffee break post where I quickly write up something on my mind that can be written and read in less time than a coffee break takes.

Background

Recently, I went through an AWS workshop for Lake Formation, a data lake management tool in AWS, and that workshop had me create many different Cloud Formation Templates (CFTs) to spin up services to use in the workshop. After I finished that, I then had to go through my development AWS account for work and clean up everything that had been created so we stopped paying for these services I no longer needed.

While attempting to delete the many CFTs I had used, I saw one that was seemingly stuck in the DELETE_IN_PROGRESS state for almost 20 minutes. I did not realize it would take so long to delete one CFT and was getting worried that it was actually stuck. So I started searching online to see if this has happened to others as well.

Why does the delete take so long?

I found this Reddit post of someone reporting the same thing, and it linked to a very informative answer to a similar question on Stack Overflow. I would recommend you go and read that detailed answer there for the best understanding of why CFTs sometimes take forever to delete.

The simple answer is that is just how it is. My CFT in question had set up a lot of Virtual Private Clouds (VPCs), Elastic Compute Cloud (EC2) instances, Elastic Network Interfaces (ENIs) as well as other resources, and some of those items simply take awhile to delete.

Even though I can’t speed up the deletion process for these big CFTs, at least now I know that in the future, should I need to delete any other large CFTs from my AWS account, I can expect it might take longer than I would anticipate to complete.

How to Get Public IPv4 DNS for AWS EC2 Instance

I have been trying to learn how to work with AWS Glue because it’s probably going to be a new ETL solution my organization uses as we migrate to Postgres in AWS. Part of learning how to use Glue is learning how to set up and use Postgres RDS instances so that I can move data between them with Glue.

Setting up the RDS instances was the easy part, since AWS makes that process go very smoothly. Even setting up the EC2 jump server to connect locally to my RDS instances seemed like it was easy as well, only a few options to select and then a new server was created for me.

The Problem

However, in my most recent attempt at creating all 3 of these servers (I have to regularly delete what I have while not using it to not incur additional charges), I kept running into an issue where my EC2 server was not being assigned an IPv4 Public DNS address, and without that value, I can’t connect to that server as a jump host on my local computer. That was a big problem for me.

I spent over a half hour trying to troubleshoot this problem, double-checking the VPC rules for DNS and everything I could think of, and none of it was working. I terminated and recreated the instance multiple times and that did not do the trick. Finally I found this Stack Overflow answer that was exactly what I needed, and the fix was super obvious but also hard to see at the same time.

The Solution was Simple

For some unknown reason, the settings that AWS defaulted to when I was creating new instances was to set “Auto-assign public IP” to “Disabled”, and I didn’t catch it at first because that section of the instance creation settings was in a non-editable state by default as well. If you run into this same issue, when you get to the “Network Settings” part of your instance creation dialog and “Auto-assign public IP” is set as Disabled and it looks like there’s no way to change that, click the edit button at the top right of that pane to change the default instance settings. Then Enable the option to assign a public IP address to the instance.

It’s that simple. I can’t believe it took me so long to figure out something so obvious! But that’s life in IT sometimes.

Extra Note

When you stop and then start your EC2 instance again, it will assign a new Public IPv4 DNS name to the instance. It took me longer than I would like to admit to figure this out. I kept having an issue each morning where my SSH tunnels to my RDS databases through this EC2 server would no longer work. After several weeks and trying many different things, I finally figured out that the Public IP address was changing each time I stopped my instance at the end of the work day and restarted it the following day, and that’s what was causing my tunnel to break.

Do DML Statements Work in Liquibase Changesets?

After finishing the blog post last week about how to work with Liquibase, I decided to find the answer to one of the outstanding questions I had about the tool, which was whether or not it allows you to put DML statements in your changelogs and changesets. I couldn’t find any documentation anywhere online about putting DMLs in changesets, so I had to figure it out myself. Finding the answer to this was much easier than I thought it would be since all it involved was adding a DML statement to a changelog, running the Liquibase update statement, and then seeing what happened.

So do DMLs work in Liquibase changesets?

Yes, they do. To prove it, I opened the existing changelog file that I created for last week’s tutorial and I added a new changeset.

Screenshot of text editor containing Liquibase changeset with DML statement to insert into a table

Then I opened the command prompt for Liquibase and ran the normal update statement to get my database aligned with the changelog file.

Screenshot of Liquibase command window showing successful execution of DML changeset

The update statement completed successfully, which I truly was not expecting. Then I had to go into the database to see if that DML statement was actually executed on the DB or not, and it was!

Screenshot of PGAdmin window showing SELECT statement results containing record inserted by DML changeset

I was very excited to see that, because it meant that if my team decided to switch to this tool, we could continue deploying DML scripts alongside any DDL scripts they may be associated with.

Summary

Today’s post is short and sweet. I wanted to see if the Liquibase tool had a key feature I was looking for it to have but couldn’t find documentation about. I was thrilled to see that it does work with DMLs. Such a small but important feature.

How to Set Up and Use Liquibase, Part 2

In last week’s post, I covered the initial setup steps you must follow when starting to work with Liquibase. In this week’s post, I will be finishing up my tutorial of getting started with Liquibase. If you haven’t yet downloaded and set up Liquibase on your computer, please review that post before reading this one.

What’s in this post:

Create the baseline changelog file for your database

Using the command “generate-changelog” with the CLI for Liquibase, we can create a SQL file containing queries that will regenerate all objects in your database. What database objects get scripted into this files depends on which license you have for Liquibase. If you have the open-source version of the tool, it will script out all non-programmable objects like tables, keys, etc. If you want or need to script out all of your programmable objects such as procedures and functions (plus other items), you will need to have the Pro version of the tool.

Either way, the command for creating the script is exactly the same.

liquibase generate-changelog --changelog-file=mydatabase-changelog.sql --overwrite-output-file=true

Let’s break this command down. The first two words are simple, you’re calling Liquibase and specifying you want it to run the generate-changelog command. The next part is the “changelog-file” argument that allows you to specify the file you want to write the new changelog to. The next argument, “overwrite-output-file” tells the tool if you want to overwrite that specified file if it already exists. In this case, I specified true for that argument because I want the tool to overwrite the example changesets in the file it created upon project creation with the actual queries for my database. After running this command, you should get a success message like the following.

And if you open that specified file now, it should contain the actual scripts to generate all of the objects in your database, each change separated into its own changeset. Each generated changeset will be defined with the username of the person who generated the file, as well as the tracking/version number for the set.

Now you are ready to start doing normal development and changes to your database because you have baselined your project.

Adding and tracking ongoing database changes

There are two methods for adding/tracking database changes with this tool: 1) add your scripts to the changelog file as changesets, then “update” the database with those changes, or 2) make your changes within the IDE for your database (ex: PGAdmin) then use the “generate-changelog” command to identify and script those changes.

Method 1: Adding Scripts to Changelog File

Open your changelog file and add a new line. On that line, you are going to add the required comment that lets Liquibase know you are starting a new changeset. This line looks like “– changeset author:versionNumber”. Example: “– changeset elahren:1.1”. Then, add a line below your changeset comment and add the DDL script you would like to run on your database. Once you have added all the changes you would like to your changelog file, save and close the file, then open the Liquibase command prompt to execute those changes on your database.

If you would like to preview the changes Liquibase will run on your database, you can run the command “liquibase update-sql” which will show you all the SQL that will be executed, which will include your queries as well as queries Liquibase will run to track what you’re applying. In the below screenshot, the commands with a green square are the ones I included in my changesets, and the commands with a blue square are the ones that Liquibase will run to track the changes.

If the preview looks correct, you can then run the command “liquibase update” which will apply all the previously viewed SQL queries to your database. You can verify the changes have been successfully applied by opening your database in your normal IDE (e.g. PGAdmin) and confirm the changes.

Method 2: Make Changes in your IDE

The process for making the changes in your IDE and then tracking those changes in Liquibase is almost exactly the same as the process we used to create the initial changelog file when setting up the project. It is as easy as making whatever database changes you want in your IDE and then opening the Liquibase CLI and running the “generate-changelog” command with either a new file name if you want to put it in a new changelog file, or use the same file name with the “--overwrite-output-file=true” argument.

If you are going to use the first option, writing to a new changelog file, it seems like you will then need to edit the file after creating it to remove any of the queries you didn’t create in your latest changes (since the command will try to recreate all objects in your database).

I’m not sure if this is the recommended workflow for tracking database changes, but it was a feature my team was hoping to get from the database change tracking tools we’ve been investigating, so I found a way to make it happen with Liquibase. If you want or need to have a “database-first” approach to change tracking (making changes directly to the database and then generating files to track that), instead of a “migration-first” type approach (making migration/change scripts and then applying that to your database), it appears that is technically possible with this tool.

Structuring your changelogs according to best practices

You can set up and structure your changelogs in any way that you would like, it’s your project, but Liquibase does have some ideas to help you stay organized. There are two different organization methods they recommend: object-oriented and release-oriented.

Object-oriented means you will create a different changelog file for each object or type of object being tracked in your database (e.g. one file for stored procedure changes, one file for table changes, etc.). I personally don’t like the idea of this organization method since it would mean you could be updating many files each time you make database changes, like if you’re updating procedures, tables, indexes, and views all for one release. However, having all the object types separated could also be a benefit, depending on how you normally complete your work.

Release-oriented means you make a new file for each release you make for your software/database. This method seems more familiar to me personally since it’s similar to the concept of migration scripts in Red-Gate’s SQL Change Automation or Flyway tools, where you can combine multiple database changes you’re making at once into a single file and deploy it all at once. This process could also work for organizations that use a more structured delivery system and not continuous delivery/agile development. That way you could put all of your changes for the week, month, or whatever development length into one file to associate with one particular release.

Whichever method you choose should work well if you set it up properly, the decision of which option to choose only depends on how you work and how you prefer to track that work.

Outstanding Questions

The first outstanding question I have about this tool right now is can you put DML scripts in your changelogs? That is something supported by Red-Gate’s SQL Change Automation and Flyway tools, which is what I’m used to. So far, I haven’t been able to figure out if that’s possible with Liquibase. Being able to deploy DML changes alongside a regular deployment really simplifies the process of some DMLs that you may need to run in your production environment, because it makes sure they go out with the deployment they are related to. An example of this is if you are adding a lookup type table (i.e. AccountTypes) and need to add the few records into that table after it’s created. Normally, you would need to run such a DML script manually after your deployment has completed. But SCA and Flyway allow you to put the DML in a deployable script that will automatically insert that data after the table is created. That of course can come with its own challenges, but it’s something I’ve really enjoyed with Red-Gate SQL Change Automation so I want it to be possible with Liquibase.

The second outstanding question I have about Liquibase is whether or not it can work with a secrets manager for database user passwords. How I set up my test project locally required me to put the password for the database user for Liquibase to be saved in cleartext in the properties file, which is not safe. For my purposes, it was fine since it’s a dummy database that doesn’t have any real data in it. But for production purposes, there is no way we would ever save a database user password in cleartext in a file. I haven’t had the chance to research this question more yet, so I’m not sure if the tool would work with a secrets manager or not.

Summary

When I first started working with Liquibase I was pretty frustrated with it since it was a totally new-to-me tool with documentation I didn’t find intuitive. But I kept working with it because I wanted to make it work for my organization and then just found it interesting to learn more about. I now feel fairly confident working with the tool in the ways my organization would need.

For being a tool with a completely free-to-use version, it seems like it has a good amount of features that many developers might need and could use for tracking and deploying changes to their databases. I can’t honestly say that I would prefer using this tool to Red-Gate’s SQL Change Automation or Flyway tools, which I currently work with, since they have a better use interface and seem to have more intuitive script creation processes. But Liquibase does seem like a useful tool that I could get used to working with given enough time. It’s worth a try to work with if your organization is working with a limited tool budget.