This is the fifth in my series of posts about working with Bicep, the declarative scripting language created by Microsoft as the modern facade for Azure Resource Manager templates. Today’s post is focusing on a small bit of information that may be important for some Azure environments.
For those of us who work in Azure and have Azure SQL Servers and Databases, we often want those resources to be available to other resources, such as applications, within the Azure environment. To grant that access through the portal, there is a simple checkbox on the Networking page of the Azure SQL Server that will allow that. But if you’re trying to declaratively create your Azure infrastructure with Bicep like I am, how are you meant to accomplish checking that same box? That is what this post will answer.
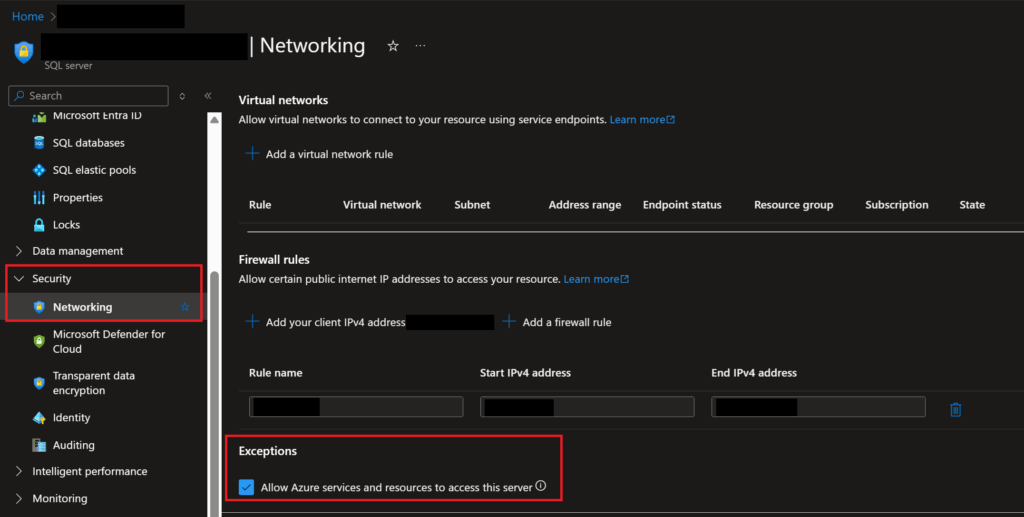
For those of you who may not be as familiar with what I was referencing above, what I am referring to is this checkbox that you find on the Networking page of an Azure SQL Server instance in the Azure Portal.
Screenshot showing the checkbox I am talking about, which allows other Azure resources to access the SQL Server resource
The purpose of this checkbox, as you can learn by hovering over the information icon at the end of the line of text for the checkbox, is to configure the firewall settings to allow inbound access from Azure resources. By default, this box is left unchecked.
Screenshot showing the information about the checkbox in the Portal screen
However, if you are in a situation where you have a separate application that is going to be accessing the server and database (which is fairly common), you will also likely need to ensure this networking rule is checked when creating new Azure SQL Servers.
How to check that box in a Bicep template
Understanding what the checkbox does
The heart of what that checkbox is doing in the background when it is checked is creating a firewall rule which indicates to Azure services if they are allowed to connect to the server and database or not. You can see what it’s doing by querying the system table which contains the list of server firewall rules, which I wrote about in a previous post.
When the box is checked, you can see a firewall rule for the server in the table sys.firewall_rules (run on the master database), called “AllowAllWindowsAzureIps” with start and end IP addresses both set to 0.0.0.0.
Screenshot of SSMS showing query that lists all server firewall rules
Conversely, if that box is not checked on the portal, you will not see a firewall rule in the table with that name or IP address range. Once you understand that the checkbox is setting a specific firewall rule for you in the background, it becomes simple to figure out how you can make that box get checked through a Bicep template.
Bicep setup to check the box
Since the checkbox in the portal is creating a simple firewall rule with a specific name and IP address, we can recreate that easily within a Bicep template by creating a firewallRule resource within the template and tying that to your Azure SQL Server with the parent attribute.
Create the sqlServer resource in the template
First, create the SQL Server resource so that we can tie the firewall rule resource to it. If you would like to see how to define such a resource to then create a firewall rule for, see last week’s post.
Create the firewallRules resource in the template
After you’ve create the Azure SQL Server resource in your script, the next step is to specify a second resource of the type firewallRules which we will use to check that box on the server’s networking page.
The important parts to note from that resource definition are the following:
name: 'AllowAllWindowsAzureIps': This specifies the name of the firewall rule that is going to be created. In this instance, the rule needs to have this specific name in order to check the settings box in the portal and allow the access
parent: sqlServer: This line is what tells the template that this firewall rule needs to be applied to the server we created in the same template previously, with the symbolic name of sqlServer.
endIpAddress: '0.0.0.0': This, along with the startIpAddress, must be set to all 0s, which is what Azure looks for when trying to see if another Azure resource has access to the server. This “range” is special, reserved for this situation.
startIpAddress: '0.0.0.0': This, along with the endIpAddress, must be set to all 0s, which is what Azure looks for when trying to see if another Azure resource has access to the server. This “range” is special, reserved for this situation.
Then you can also specify any and all Azure SQL Databases you want to be on your server in the template if you would like and then deploy the template. After the template has been deployed, navigate to your new server in the Azure Portal and review the networking settings to see that the “Allow Azure services and resources to access this server” box is successfully checked.
Summary
If you’ve been wondering how you can get the one box on the Azure SQL Server Networking page in the portal checked by using a Bicep template, it’s as simple as adding a firewall rule for the server with a start and end IP address of all 0s. This special firewall rule is used to indicate to Azure that a given resource is available to access through other Azure resources.
Let me know in the comments below if this tip helped you or if you have any questions regarding setting up firewall rules for an Azure SQL Server using Bicep.
Continuing on in my series about doing Infrastructure as Code (IaC) using Bicep templates in the Azure environment, today’s post will cover how to create an Azure SQL Server and Azure SQL Database with a deployable Bicep template. If you haven’t seen it yet, also check out my previous posts about creating an Infrastructure as a Service (IaaS) virtual machine with a Bicep template and using a Custom Script Extension with that type of template.
If you would like to see the Bicep template I will be covering in today’s post in full, instead of piecing it together from this post, you can find it on my GitHub.
What the template does
This template creates 3 different resources, which are the ones my team wants to spin up any time we have a new project of a certain type. The resources it creates are: Azure SQL Server, Azure SQL Database, and a Key Vault.
The Azure SQL Server and Azure SQL Database are the fully cloud, Platform as a Service (PaaS) resources for SQL Server. These resources make it very easy to create a new server and any number of databases on that server without having to manage the infrastructure yourself and to only pay for what you need to use.
The Key Vault is a resource type that allows you to store any secrets, certificates, or keys in a secure location which is accessible to other privileged resources in your subscription (like a pipeline executing code). This resource would be optional for others who are only looking to create the server and database, it’s just something I’ve included because I have it in my production template for my team.
In addition to those 3 resources, there are a few others created in my Bicep template that I will be covering in-depth in future posts to keep things shorter here, so you’ll only see those in my GitHub repo for now.
How to know what configurations to choose
When I first started writing this template, I had no idea what configuration values to choose. When looking at the Microsoft documentation for the resource type in Bicep, it seemed like there were endless possibilities for what I could choose to configure the resources. That was overwhelming to me at first. I then had the idea that I would compare the list of possible values in the documentation for the resource type to the settings of an existing resource with settings similar to what I wanted for my new machine.
That effort originally started with me looking at the normal portal view of the resource, but I didn’t stick with that for long. I quickly realized that the portal view of settings doesn’t show a lot of values that I was looking for. But I figured out that you can view all the setup information for a given resource in the portal in a JSON format, which is very similar to the Bicep formatting I was needing. I believe this JSON document is likely what would be used by Azure Resource Manager (ARM) to create the same resource, which is why it’s available for every resource in the portal.
To view the JSON version of the resource settings, navigate to the resource in the portal, then near the top right corner of the Overview page, you will have a link to “JSON View”.
Screenshot showing where you can find the JSON view of a resource definition in the Azure Portal
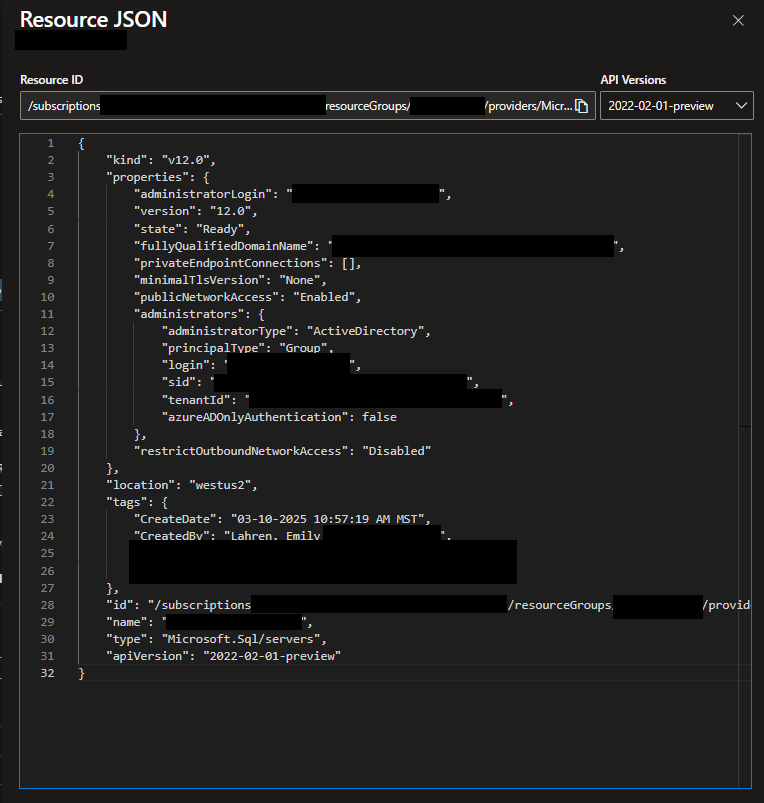
When you open that pane, you will see something like the following, with all pertinent details of the resource, which you can then use to help you create your Bicep template.
Screenshot showing the JSON definition for an Azure SQL Server resource
Creating the template
Parameters
When creating a new Bicep template, the first thing you’ll need to decide (apart from what specific resources you need to create) are what parameters you will need to input into the template, which will usually be fed in from a pipeline which deploys the template. For my template, I created the following parameters:
serverName (string): The name you want to give to the Azure SQL Server that the template is going to deploy. You may want to add a minLength and maxLength setting to this parameter is you are worried your template deployers are not going to choose names that are within the length requirements Azure requires.
databaseName (string): The name you want to give to the Azure SQL Database that the template is going to deploy. You may want to add a minLength and maxLength setting to this parameter is you are worried your template deployers are not going to choose names that are within the length requirements Azure requires.
keyVaultName (string): The name you want to give to the Azure Key Vault that the template is going to deploy.
location (string): The region you want the resources deployed in. If you are always going to want to use the same region, you can change this to a variable instead. I have set a default for this of “westus2”.
saLoginName (string): The login name that you want to have created for the system admin (SA) user for the SQL Server. When you create an Azure SQL Server resource, you are required to provide an SA, so I am setting that value by passing it in as a parameter to the template at runtime.
saLoginPassword (secure string): The password you want to give to the SA login the server will be created with.
Variables
For the three resources I’m discussing the creation of in this post, there are no variables needed.
Resource: Azure SQL Server
Once you have your parameters and variables defined for the template, the next step is to start defining the main resources you want to create. Depending on the settings and configurations you need for your own SQL Server, you may need to define this resource differently. In my template, I have the following definition for the Azure SQL Server resource:
For the name of the server, I pass in the parameter “serverName”. Then, under the properties object, I define the required elements of the resource, which are:
administratorLogin: set to the value of the parameter saLoginName
administratorLoginPassword: set to the value of the parameter saLoginPassword
publicNetworkAccess: I have set this to “enabled” so that we’re able to access this resource through the public internet, which is required for normal usage and adminstration of the server and databases after they’re created.
adminstrators: This is a more complicated setting that is its own object. This “administrator” setting is the Microsoft Entra Admin for the server, which is essentially an Entra user or group that becomes the super user of the server with complete control to do whatever they want on the server and databases on it. I set this to an Entra group my team uses for ourselves by setting the principalType to “Group” and then giving the name of the group for login, and then the ID value and tenant ID for our group. You can find the “sid” value as the Object ID value for the group or user in Entra in the Azure Portal. And you can also find your Tenant ID through the portal as well.
restrictOutboundNetworkAccess: I have set this to “disabled” because we want the server and databases on it to be able to send data outside of themselves so that we can use them like normal.
Resource: Azure SQL Database
Depending on the settings and configurations you need for your own SQL Database, you may need to define this resource differently. In my template, I have the following definition for the Azure SQL Database resource:
For a SQL Database resource definition in Bicep, it’s really important to specify the parent value so that Bicep and Azure Resource Manager (ARM) know what server the database should be deployed onto and that the server resource should be created before the database resource. For my template, I made sure to specify the “symbolic name” of the Azure SQL Server resource I created previously in the template, which is “sqlServer”. After specifying the parent, you will also need to specify the name of the resource, which I used a parameter for, and then the region the resource should be deployed in, which I also used a parameter for.
The next thing you’ll need to specify is the sku of the database, which is the type settings for the database which dictate price, performance, and storage. In this case, I have chosen to make a database in the General Purpose tier, which is a little cheaper, and then to give it 2 CPUs. I think the easiest way to find the specifications for this section is to review an existing resource in your environment and see what values it is set to, or refer to Microsoft documentation.
Once you’ve set up the sku information, you’ll then need to specify the general properties of the SQL Database through the properties object in the resource definition. For mine, I set the following:
collation: This is the standard collation type you want your database to be setup with. I have chosen the default for North America/US, which will use English and then be case-insensitive and accent-sensitive.
maxSizeBytes: This is the number of bytes you want to be able to store in your database. That number I have set equates to 34 GB approximately, which I believe is the default.
catalogCollation: Same as the normal collation listed above
zoneRedundant: I’ve chosen not to make my database zone redundant, because I want it to be as cheap as possible and won’t be severely impacted if the entire Availability Zone goes down.
licenseType: I chose “LicenseIncluded” which means we will pay for the license and database as we use it, we don’t have an external license key to provide
readScale: I elected to not have the database setup for scaling for reads
requestedBackupStorageRedundancy: I selected “Geo”, which means we will have some redundancy, but not much. This is the standard my team set for this type of scenario.
isLedgerOn: I do not want this to be a ledger database so I’ve set this value to “false”.
availabilityZone: I’ve set as “NoPreference”
Resource: Key Vault
While most of you probably aren’t here for learning how to create a Key Vault with a Bicep template, I thought I would include it just because I have it in my production template. As with every other type of resource, you may want to change the below definition to match your own needs.
Just like with the other resources defined above, I set the name of the resource and the region it should be deployed in using parameters. And similarly to the definition of the SQL Database resource, for the Key Vault definition I also needed to define a sku, which is the pricing model for the resource. I chose Standard, and I really don’t know what other options there may be since this is such a simple type of resource.
The tenantId value is the ID for my tenant resource, so the template knows where to deploy the Key Vault. For networkAcls, I chose to not setup any bypass and to “Allow” traffic by default. Then the rest of the values are ones that seem self-explanatory to me and I believe are set to the defaults for all Key Vaults.
Summary
Creating an Azure SQL Server and an Azure SQL Database through Bicep is a fairly quick and simple process, much simpler than defining an IaaS VM like in my previous posts. That is due to the fact that the SQL Server and SQL Database are both fully-cloud resources, they’re not something you are able to access the infrastructure for. Since Azure manages the infrastructure, it is much easier for them to create these resources from a template.
One of the easiest ways to duplicate SQL Server database objects from one database to another–such as in a situation where you want to copy the structure of a production database down to a development database to help with testing and development–is to create a file called a DACPAC from the database you want to copy. With SQL Server, there are two ways to copy a database without creating and restoring a full database backup: 1) Create a full copy of the database structure and data by exporting to a BACPAC file, or 2) Create a copy of only the database structure by exporting to a DACPAC file.
This post will cover how you can import a previously generated DACPAC file onto an Azure SQL Database to duplicate the structure of another database with little effort on your part. It specifically covers copying an existing Azure SQL Database to another Azure SQL Database. This process may work with on-prem or managed instances of SQL Server, but I haven’t tested that yet.
Have an Azure SQL Server or Database to load the DACPAC to
Note: The source and target databases can be on the same Azure SQL Server or on different ones.
What are DACPACs and BACPACS?
There have already been many blog posts written on the subject of the difference between DACPACs and BACPACs, so I will refrain from trying to duplicate that information. Essentially, a DACPAC is an export of the schema/structure of a database, including the database users and logins. A BACPAC is similar to the DACPAC except that it contains the data from the database as well. If you would like more detailed information about both of these types of files, I recommend reading this post from SQLShack.
Then if you’re like me and are now wondering what the difference is between a BACPAC file and a full database backup (BAK file), I found this resource on SQL Server Central that explained the difference well.
Why use a DACPAC?
As I mentioned in the introduction above, the primary use case for making and importing a DACPAC file of your database is to quickly copy all database objects–including tables, procedures, functions, and even users–to a new version of the database, such as when trying to create a new dev version of an existing production database. That was my exact use case and what triggered me to write this post. I got tired of manually copying tables, procedures, and functions from one database to another whenever we needed a new version of a database.
How to Create a DACPAC File
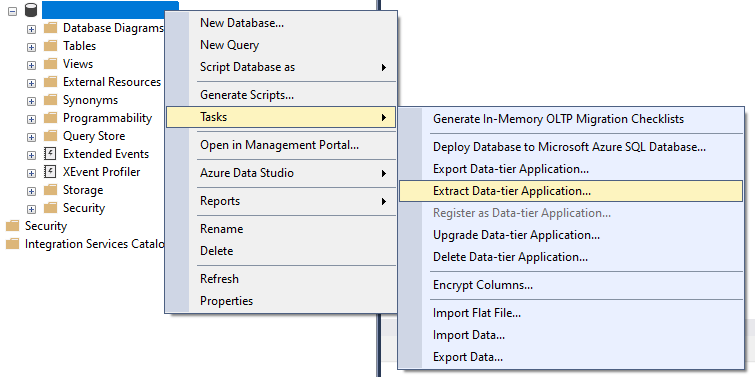
When you have a source database that you would like to copy over to a new database, without the data, you should create a DACPAC from SQL Server using a “Task” on the database. To do this, right-click on the database name in the Object Explorer, select “Tasks” then select “Extract Data-Tier Application”. This will open a wizard for you to create a DACPAC file of the selected database.
Choose to “Extract Data-tier Application” from the context menu of the Database in the Object Explorer
If instead, you click on “Export Data-Tier Application”, you will be brought to a wizard for creating a BACPAC file, which is not what we intend to do during this process, so make sure you choose the option to Extract a data-tier application.
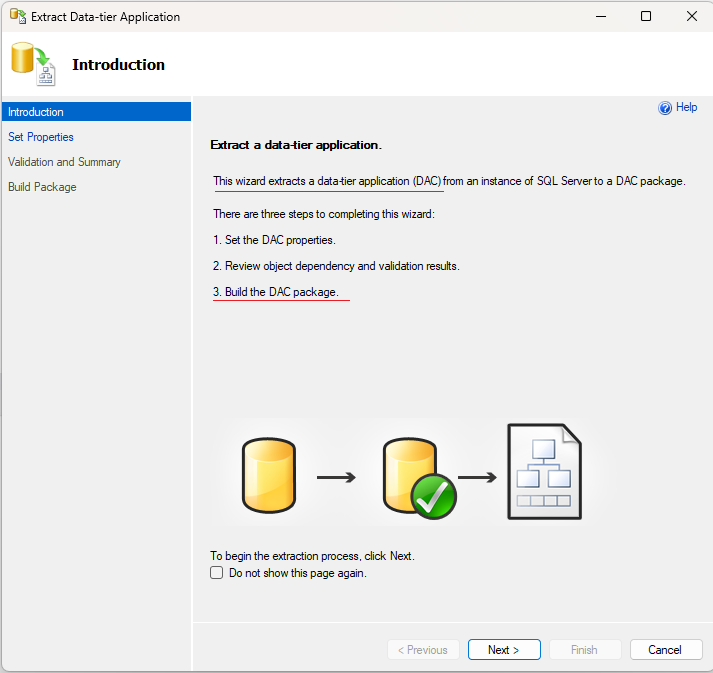
After selecting that option, you will see a screen like the following. Review the introduction page and make sure it refers to creating a DAC package (see screenshot below, underlined in red) and not a BAC package.
The introduction page of the “Extract Data-tier Application” wizard, confirm that it is going to extract to a DAC package, not a BACPAC.
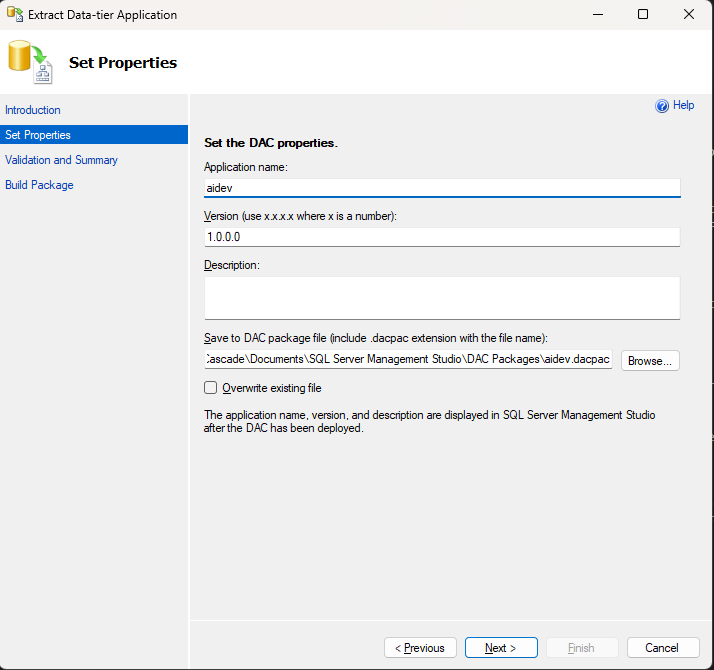
Step through the wizard, provide a name for the “Application” (database name), and choose where you want the file to be downloaded to on your local machine.
The DACPAC extraction properties page of the “Extract Data-tier Application” wizard
Once you have reviewed the settings for your file, click “Next” until the creation process starts. Once that has been completed, you will have successfully created a DACPAC file which is stored in the location that you chose.
Using a DACPAC to Format an Azure SQL Database
There are two different ways that you can deploy a DACPAC to an Azure SQL Server. The first way is to deploy the DACPAC to create a database, the second is to update an existing database with the DACPAC.
Overview of the Steps
Choose whether you want to create a new database with the DACPAC or update/format an existing database
If choosing to create a new database:
Right-click on the “Databases” folder in the Object Explorer of SSMS, choose “Deploy Data-tier Application”
Specify the DACPAC you want to use and the name of the database you want to create
Run the wizard which will create a database with default settings
If choosing to use an existing database, whether blank or already in use:
Right-click on the database, select “Tasks” then “Upgrade Data-tier application”
Specify the DACPAC file you want to use
Review the changes the wizard identifies between the DACPAC and the target database
Run the wizard which will update the target database with all changes necessary from the DACPAC
Deploying a New Azure SQL Database using a DACPAC
If you want to make your new Azure SQL Database on an existing Azure SQL Server and don’t want to do that through the portal, you can create a new database on the server by “deploying” a DACPAC to create a new database.
The main downside to this method of using a DACPAC is that the database will be created with the default setup, which for me is a General Purpose standard database with 2 vCores. That level of database may be pricy for some people, or it could be underperforming for others, depending on your needs. Due to that downside, that is not the method I chose to use my DACPAC with, but I still researched it so I could understand both ways. If you want to know how I used a DACPAC, skip down to the section for “upgrading” with a DACPAC below.
Deploying a Data-Tier Application
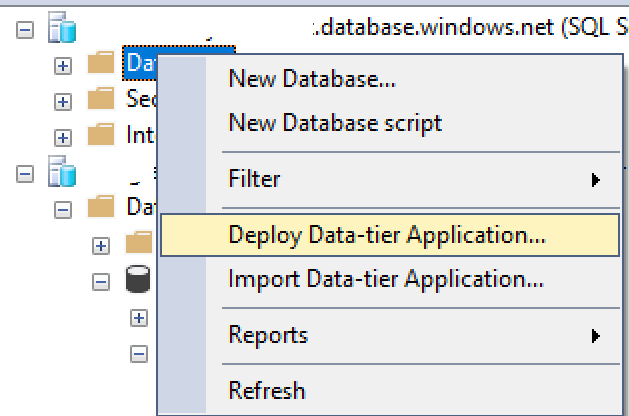
To create a new database from a DACPAC, you first need to connect to your target server through SSMS in the Object Explorer. Once you have connected, right-click on the “Databases” folder and choose “Deploy Data-Tier Application” from the list.
Choose to “Deploy Data-tier Application” from the context menu of the Databases folder in the Object Explorer of SSMS
This will open a wizard that is very similar to the one for “upgrading” a data-tier application (discussed below). On the overview page of the wizard, you can confirm that you are going to deploy a DACPAC and not a BACPAC.
The introduction page of the “Deploy Data-tier Application” wizard
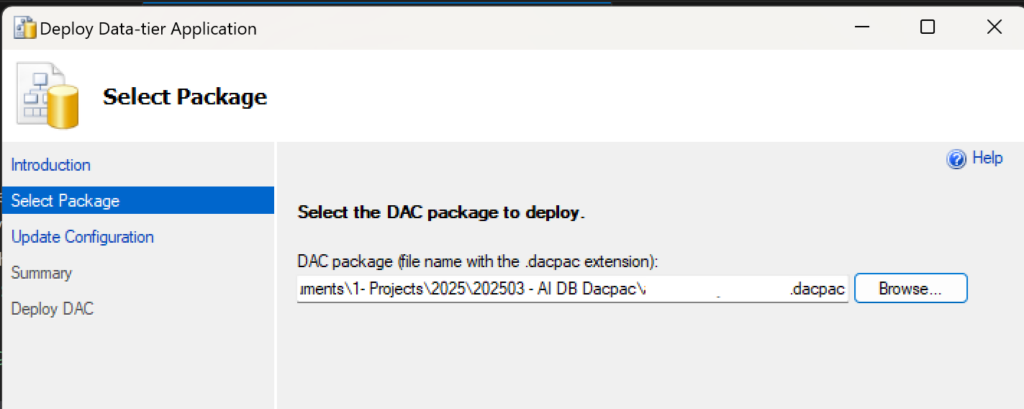
The first thing you will need to do in this wizard is to choose the DACPAC file you previously created.
The page of the “Deploy Data-tier Application” wizard where you choose the DACPAC file you want to deploy from
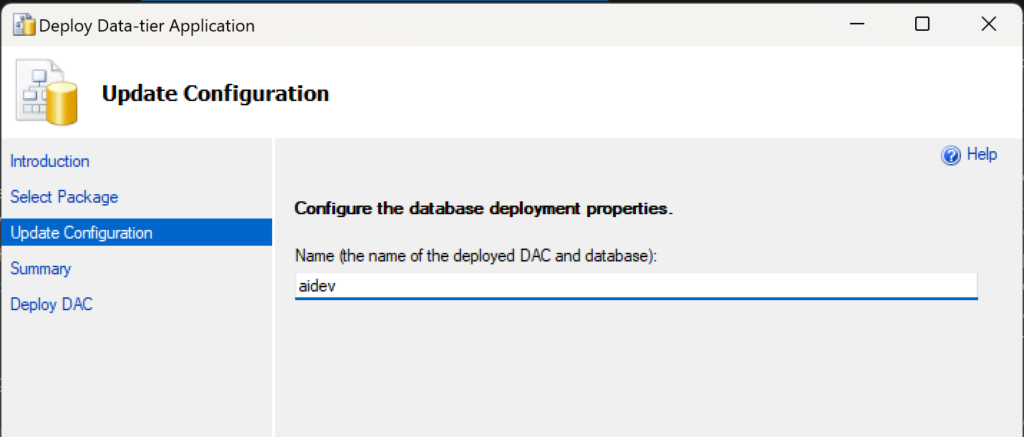
Click Next to move to the following page, where you will choose the name of the database you will deploy.
The page of the “Deploy Data-tier Application” wizard where you choose the name of the new database you want to deploy from the DACPAC
Click Next to move to the Summary page and review the process that the wizard is about to execute to ensure everything is set the way you want. Click Next again to deploy the DACPAC and create a new database from that file.
Once that process completes, you can close the wizard and then check on your database through the Object Explorer to see that you now have a new database with the same objects as the source database. At this point, you will also be able to see the newly created database in the Azure Portal under that SQL Server, where you can make any changes you would like to the default setup chosen by the deployment.
Updating or Formatting an Existing Azure SQL Database with a DACPAC
This method of “updating” an existing Azure SQL Database is helpful if you already have a database that you want to align with another, or if you have already created a blank database meeting your standards that you want to quickly deploy database objects to. In the previous section, the method of “Deploy a Data-Tier Application” creates a new database from the specified DACPAC, but that database is created with the default Azure SQL Database settings, which is “General Purpose: Standard-series (Gen5), 2 vCores”. That database setup is estimated to cost (in our setup) $373 per month.
If that default setup for a database doesn’t work for you or you don’t want to fix that after the database has been created, you can use this second method of “upgrading” your existing database with the DACPAC. Before you can complete this method, you first need to create a blank database on your Azure SQL Server, through whichever method you prefer. Or use any other existing Azure SQL Database that you are fine with overwriting with the DACPAC.
Upgrading a Data-Tier Application
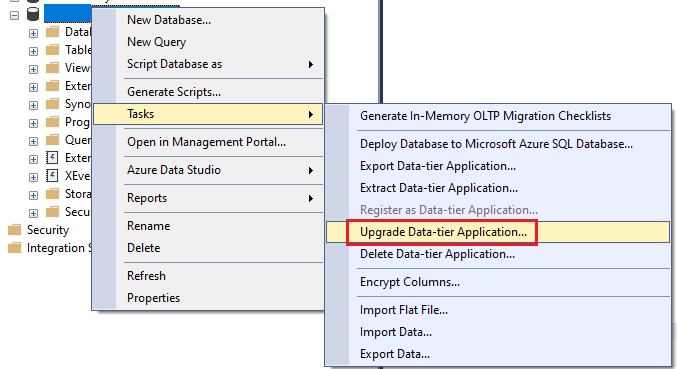
Connect to your target database in SSMS through the Object Explorer. When you are ready to import the source database objects onto this new database, right-click on the empty database then select “Tasks” then “Upgrade Data-tier Application”.
Choose to “Upgrade Data-tier Application” from the context menu of the existing database you want to deploy the DACPAC to
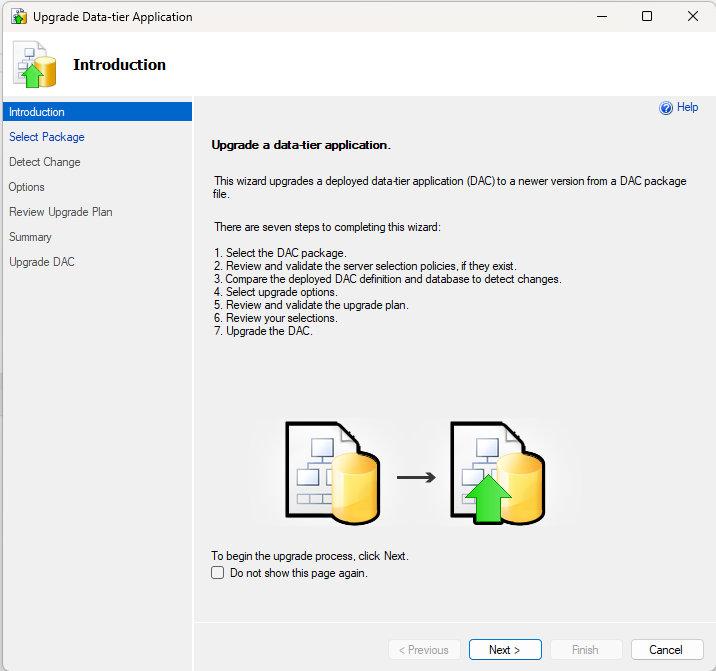
This will open another wizard that will walk you through the process of “upgrading” your chosen database with the DAC package of another database.
The introduction page of the “Upgrade Data-tier Application” wizard
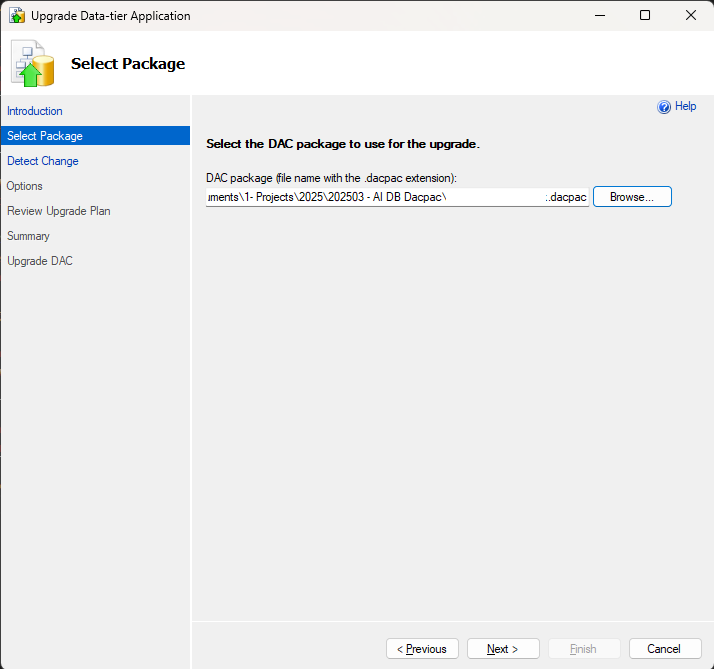
On the second page of the wizard, you will be prompted to select the DAC package you would like to use for the upgrade. Browse to the DACPAC file you created earlier, then click Next.
The page of the “Upgrade Data-tier Application” wizard where you choose the DACPAC file you want to deploy to the database
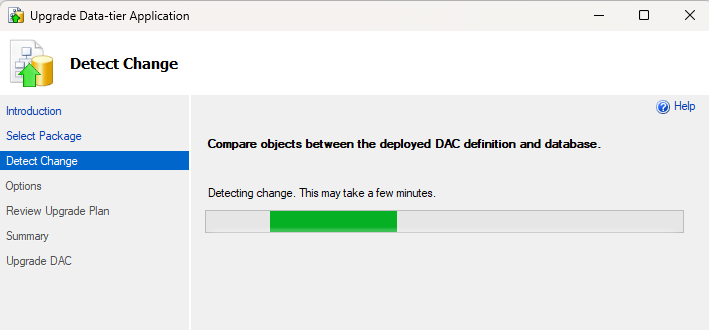
After you click Next, the system will start detecting changes between the target database and the DACPAC you selected, which may take a few minutes.
The page of the “Upgrade Data-tier Application” wizard where the wizard checks for differences between the DACPAC and the target database
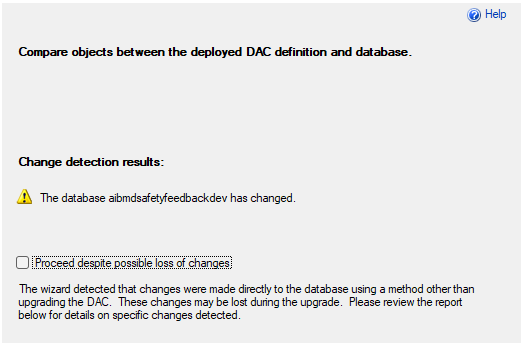
If you have already imported the DACPAC before or have anything on your target database that is different from the source, you will receive a warning like this:
The page of the “Upgrade Data-tier Application” wizard where you confirm that you are okay with proceeding despite the risk of data loss from deploying the DACPAC
I got that warning because I had already imported the DACPAC so I no longer had a blank database. In this situation, you are required to check the box that you’re okay with overwriting the existing structure by continuing. If it’s your first time attempting to import the DACPAC onto a blank database, you should instead receive a green check box on this page.
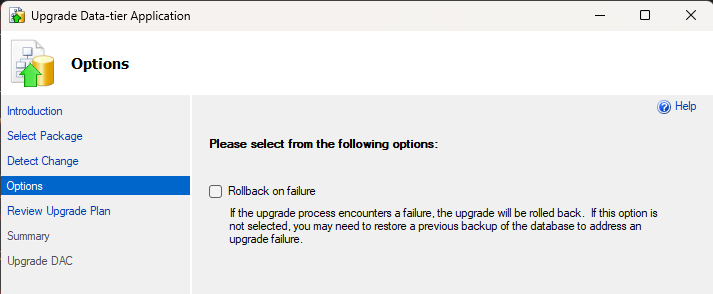
On the next page, choose whether or not you want to roll back in the event of a failure during the “upgrade”. I chose to not have it roll back since this was going to be a new dev database that I could tweak, fix, or simply recreate if something went wrong. You may want to choose differently.
The page of the “Upgrade Data-tier Application” wizard where you choose the rollback option you want the wizard to use when deploying the DACPAC
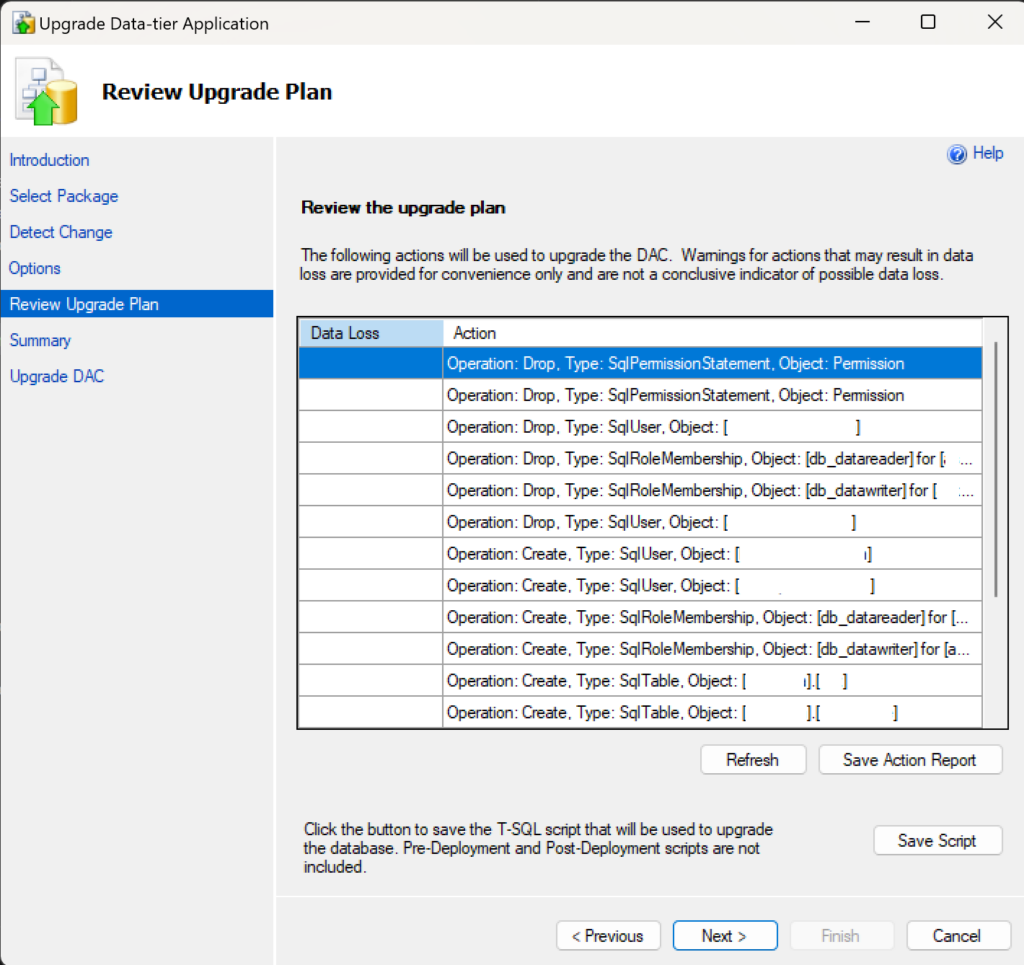
The final step will be for the system and you to review the “upgrade” plan. You will see a list of all changes that will be applied to the database on the “Review Upgrade Plan” page. If you’re happy with the proposed list of changes, click Next until the upgrade process starts and the DACPAC gets applied. Once that process completes, you can close the wizard and then check on your database through the Object Explorer to see that you now have database objects deployed to the database that you didn’t before.
The page of the “Upgrade Data-tier Application” wizard where you review all the changes that will be applied based on the DACPAC
Can’t I just import the DACPAC from the Azure Portal?
This was the first thing I tried when trying to import my DACPAC into an Azure SQL Server. I uploaded my DACPAC file to a storage account, then clicked “Import” on the SQL Server page in the Portal. This started a new deployment where the SQL Database was created but then the deployment of the DACPAC to the database failed so I was left with an empty database on my server. The error I received when the deployment failed was related to not specifying a BACPAC file for the import process, so it expects that file type instead of a DACPAC.
If you can figure out how to import a new database to a SQL Server using the Portal, I would love to hear about it in the comments below.
Summary
If you, like me, were confused about how you could import a DACPAC file into a database on an Azure SQL Server (because the Microsoft documentation for this isn’t great), I hope these instructions help you with your import. It is as simple as creating the DACPAC file and then using a wizard to “upgrade” or “deploy” your database using the DACPAC.