
If you are in a role similar to one I am in now, where there is heavy oversight into certain data the company owns due to federal regulations, you may get assigned a similar project where you need to automatically retrieve various ownership and access information about one or more databases in your Azure cloud environment. What I’ve found through my own process of completing such a project is that the documentation Microsoft offers for its Python SDKs is abysmally low, and there is often nothing helpful being offered about the class you are trying to work with. But I have finally figured it out with my own determination, trial, and effort so I decided I would share it with everyone so that hopefully others don’t have to go through the same amount of effort to figure out something that should be fairly easy to accomplish.
What’s In This Post
- The Task
- Necessary Python Modules
- Required Permissions
- Data Pieces You Will Need
- The Code
- Let’s break that down further
- Summary
The Task
Get a list of the “role assignments” for a SQL Server resource in the Azure Portal, specifically the Owner assignments. According to this Microsoft article, the “Owner” role “grants full access to manage all resources, including the ability to assign roles in Azure RBAC.” Since that is a lot of freedom, our auditors want to make sure they know who has such access so they can determine if those people should have access.
Necessary Python Modules
There are two modules that you will need to download and install in order to programmatically generate the list of “Owner” assignments on a resource in Azure. The first is from azure.identity import ClientSecretCredential, which is how we are going to create credentials to use with the Authorization Management client. The second is from azure.mgmt.authorization import AuthorizationManagementClient, which is the module that will allow us to query the Authorization API that Microsoft provides, so that we can get that list of role assignments for a particular resource in the cloud environment.
Required Permissions
In order for you to be able to query this data we are looking for, you will need to create an app registration that has been given the appropriate permissions on either the subscription or resource group level, depending on the security requirements of your organization. Lowest access is always preferable, but giving the permission at the subscription level would then allow your app registration to perform this same action on any and all resources you want with just one permission assignment. The permission you need to assign to your app registration at either the Resource Group or Subscription level is “API Management Service Reader Role”, which can be assigned under “Access Control (IAM)” for the Subscription or Resource Group.
Data Pieces You Will Need
There are several pieces of information you will need to know and feed in to your Python script to get it to retrieve the role assignments for a given resource.
- Tenant ID, Client ID, and Client Secret of the app registration you are using with your script
- These three items are used to generate the credential needed for the Authorization API using the Azure Identity ClientSecretCredential
- To keep these vital pieces of information secure, you can review my upcoming blog post about encrypting your IDs and keeping your secrets safe while still using them
- Subscription ID for the subscription your resource is in, even if you are getting the role assignments at the resource group or resource level (not Subscription level)
- Resource Group name for the group your resource is in
- Resource Namespace. This item is a bit more confusing to achieve since there really isn’t any clear information about what it means, at least in my own research. (If you can find a Microsoft document talking about this, please let me know!) What I found through my own trial and error is that this value, at least if the resource you’re getting the owners for is a SQL Server resource, will be
"Microsoft.Sql". I ultimately figured this out by looking at the full Resource ID for one of my SQL Server instances and seeing that value there. You can also use the Resource Explorer in the Azure portal and look in the “Providers” list to see that there are hundreds of different namespaces that can be used for getting the role assignments for any resource.- In this screenshot below, taken from the Properties page of my SQL Server resource, you can see the full ID for the resource, which includes
"Microsoft.Sql/servers"which is the namespace/resource type for this resource
- In this screenshot below, taken from the Properties page of my SQL Server resource, you can see the full ID for the resource, which includes

- Resource Type. Similarly to getting the resource namespace, it’s hard to find the official value that should be used for Resource Type when querying the Authorization Management API. But I figured it out from the Resource ID like I did the namespace. The Resource Type can also be found under the Resource Explorer “Providers” list, but just looking at that did not clarify for me what value I should be passing in. I once again found out through trial and error what value would work for this parameter.
- Resource Name. The name of the resource you want to get role assignments for. If you have a SQL Server called “prod_dta”, then you would pass that value in for this parameter.
- Optional: The ID value for the role type you are looking for, which in my case, was the Owner role. This is a standard ID that is assigned to the Owner role across your organization (or maybe it’s the same for all of Microsoft…). See subsection below for how to find this ID value.
Getting a Role ID Value
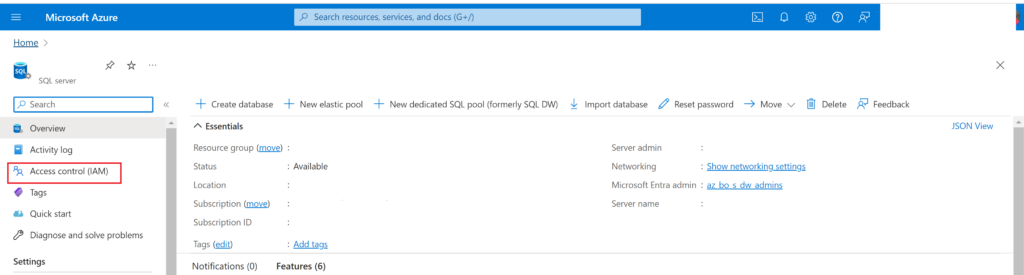
In the Azure portal, navigate to any resource and then go to the “Access Control (IAM)” page:
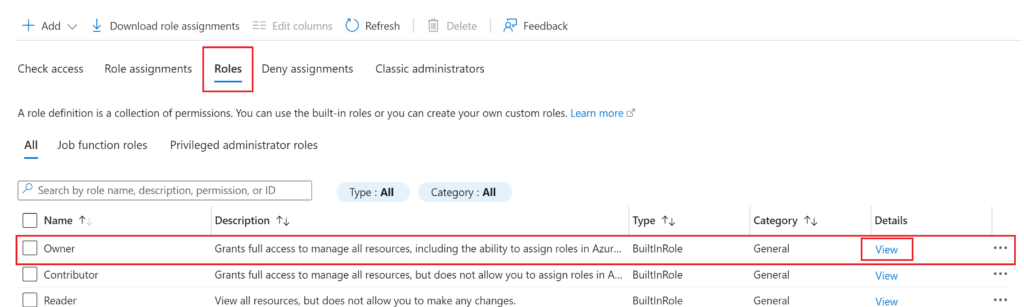
In the IAM page, click on the “Roles” tab then click on “View” for the Owner role (or whichever role you would like to get the ID for)
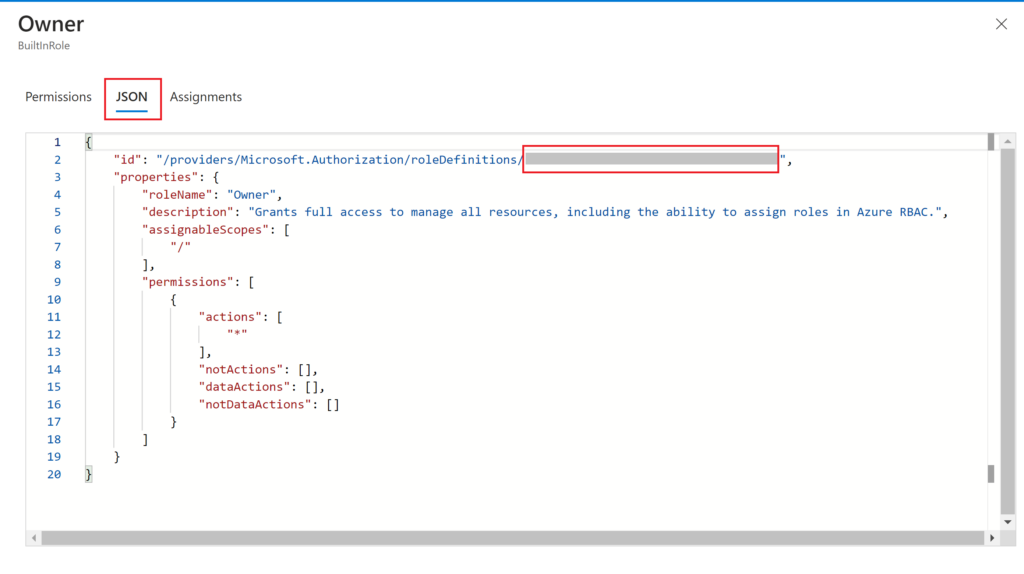
In the pane that opens with the details of the role, you want to click on the “JSON” tab, which is where you will find the ID you need. The full ID of the role is longer than just the GUID we are looking for, so make sure to only copy out the GUID from the end of the string (which is what’s covered in gray on the screenshot below). Save this ID for later.
The Code
Once you have figured out and gathered all the required pieces of data needed to get role assignments for a resource in Azure, the code for getting that data is fairly simple. Below is all of my code which I used to get just the people with Owner role assignments from a resource.
from azure.identity import ClientSecretCredential
from azure.mgmt.authorization import AuthorizationManagementClient
import json


def create_auth_management_client(tenantID, clientID, clientSecret, subscriptionID):
    credentials = ClientSecretCredential(tenant_id=tenantID, client_id=clientID, client_secret=clientSecret)
    authMgmtClient = AuthorizationManagementClient(credential=credentials, subscription_id=subscriptionID)


def list_resource_owners(authMgmtClient, serverName):
    resourceGroupName = "MyResourceGroup"
    resourceNamespace = "Microsoft.Sql"
    resourceType = "servers"
    resourceName = serverName
    ownerRoleDefID = "f865f414-b2bf-4993-8f94-51b055da4356"
    # This is a random GUID value that I replaced with the actual GUID for the Owner role in our system. Since I'm not sure if those are unique to organizations or not, I have taken out the actual value for this example.

    permissions = authMgmtClient.role_assignments.list_for_resource(resource_group_name=resourceGroupName, resource_provider_namespace=resourceNamespace, resource_type=resourceType, resource_name=resourceName)
    principalList = []

    for item in permissions:
        stringItem = str(item)
        if ownerRoleDefID in stringItem: #If the current item is for an Owner role
            # Replace single quotes with double quotes in string
            replacedStringItem = stringItem.replace("'","\"")

            # Replace None with "None"
            replacedStringItem = replacedStringItem.replace("None","\"None\"")

            # Get index at which to cut off the string
            stopIndex = replacedStringItem.find(", \"principal_type\"")

            # Substring the string item to stop after getting the princiapl id
            substring = replacedStringItem[0:stopIndex]

            # Add closing bracket to end of the substring
            substring = substring + '}'

            # Load the item into a JSON-format object
            jsonItem = json.loads(substring)

            # Get just the principal ID value from the JSON object
            principalID = jsonItem['principal_id']

            # Add the principal ID to the principalList object
            principalList.append(principalID)
    return principalList
Let’s break that down further
from azure.identity import ClientSecretCredential
from azure.mgmt.authorization import AuthorizationManagementClient
import json
The above code snippet shows the 3 libraries you need to import for this code to work.
- ClientSecretCredential from Azure.Identity: This module/library allows you to create a login credential for your Azure environment.
- AuthorizationManagementClient from azure.mgmt.authorization: This library is what gives you the modules, functions, and classes needed to interact with role assignments in Azure, which includes functions to create, update, and delete role assignments with your Python code. I only used the “get” functionality because I only wanted to retrieve assignments, not make new ones.
- JSON: I use this library to manipulate the data returned from the Auth Management API calls in a JSON format, which is easier to work with to retrieve the value associated with a particular key.
def create_auth_management_client(tenantID, clientID, clientSecret, subscriptionID):
    credentials = ClientSecretCredential(tenant_id=tenantID, client_id=clientID, client_secret=clientSecret)
    authMgmtClient = AuthorizationManagementClient(credential=credentials, subscription_id=subscriptionID)
This function, create_auth_management_client takes input of the Tenant ID, Client ID, and Client Secret of the app registration making the calls to Authorization Management, as well as the Subscription ID that the resource we want to get role assignments for is in, and uses the ClientSecretCredential function from the Microsoft library to generate such a credential. It then makes a client to interact with the Authorization Management API with Azure using that credential. The authMgmtClient object will be the object we call methods on to get the data we need.
We then come to the definition of the function list_resource_owners, which is where I pull the role assignment data from Azure, then parse the data returned into a usable format and pull out just the role assignments that contain the Owner role ID value. The beginning of the function first sets important data values for the Authorization Management Client to use; you could pass these in to your own function if you want instead of hard-coding the values within the function.
    resourceGroupName = "MyResourceGroup"
    resourceNamespace = "Microsoft.Sql"
    resourceType = "servers"
    resourceName = serverName  # Passed in as parameter to function
    ownerRoleDefID = "f865f414-b2bf-4993-8f94-51b055da4356" # Replace with correct value from your environment
After defining those important values, the code then finally makes a call to Authorization Management:
permissions = authMgmtClient.role_assignments.list_for_resource(resource_group_name=resourceGroupName, resource_provider_namespace=resourceNamespace, resource_type=resourceType, resource_name=resourceName)If you were to then print(permissions), you would get a very long string of role assignments for the given resource (but permissions is an Authorization Management object, not a true string). The results look something like this (except it would contain the GUIDs of all the objects, not the all-zero GUIDs I redacted with):
{'additional_properties': {}, 'id': '/providers/Microsoft.Management/managementGroups/00000000-0000-0000-0000-000000000000/providers/Microsoft.Authorization/roleAssignments/00000000-0000-0000-0000-000000000000', 'name': '00000000-0000-0000-0000-000000000000', 'type': 'Microsoft.Authorization/roleAssignments', 'scope': '/providers/Microsoft.Management/managementGroups/00000000-0000-0000-0000-000000000000', 'role_definition_id': '/subscriptions/00000000-0000-0000-0000-000000000000/providers/Microsoft.Authorization/roleDefinitions/00000000-0000-0000-0000-000000000000', 'principal_id': '00000000-0000-0000-0000-000000000000', 'principal_type': 'User', 'description': None, 'condition': "((!(ActionMatches{'Microsoft.Authorization/roleAssignments/write'})) OR (@Request[Microsoft.Authorization/roleAssignments:RoleDefinitionId] ForAnyOfAllValues:GuidNotEquals {00000000-0000-0000-0000-000000000000, 00000000-0000-0000-0000-000000000000, 00000000-0000-0000-0000-000000000000})) AND ((!(ActionMatches{'Microsoft.Authorization/roleAssignments/delete'})) OR (@Resource[Microsoft.Authorization/roleAssignments:RoleDefinitionId] ForAnyOfAllValues:GuidNotEquals {00000000-0000-0000-0000-000000000000, 00000000-0000-0000-0000-000000000000, 00000000-0000-0000-0000-000000000000}))", 'condition_version': '2.0', 'created_on': datetime.datetime(2024, 6, 14, 21, 30, 43, 130165, tzinfo=<isodate.tzinfo.Utc object at 0x0000020C0D71D490>), 'updated_on': datetime.datetime(2024, 6, 14, 21, 30, 43, 130165, tzinfo=<isodate.tzinfo.Utc object at 0x0000020C0D71D490>), 'created_by': '00000000-0000-0000-0000-000000000000', 'updated_by': '00000000-0000-0000-0000-000000000000', 'delegated_managed_identity_resource_id': None}You would have one of these sections of data for every single role assignment on the specified resource.
An important note is that there are several different classes you can call a list_for_resource function on from the authMgmtClient, but the only one that gets this data for the entire resource, and not just for the role assignments that apply to the caller, you need to use the role_assignments class. Here is a link to the Microsoft documentation, it honestly wasn’t that useful to me, but may be useful to you.
The final step of the processing of role assignments is to format it into something that is more useful, a JSON object, which is what the following section of code aims to do.
    principalList = []

    for item in permissions:
        stringItem = str(item)
        if ownerRoleDefID in stringItem: #If the current item is for an Owner role
            # Replace single quotes with double quotes in string
            replacedStringItem = stringItem.replace("'","\"")

            # Replace None with "None"
            replacedStringItem = replacedStringItem.replace("None","\"None\"")

            # Get index at which to cut off the string
            stopIndex = replacedStringItem.find(", \"principal_type\"")

            # Substring the string item to stop after getting the princiapl id
            substring = replacedStringItem[0:stopIndex]

            # Add closing bracket to end of the substring
            substring = substring + '}'

            # Load the item into a JSON-format object
            jsonItem = json.loads(substring)

            # Get just the principal ID value from the JSON object
            principalID = jsonItem['principal_id']

            # Add the principal ID to the principalList object
            principalList.append(principalID)
    return principalList
What that above code is doing is that for every item in the returned permissions object (each line like the example I showed above), formatting is going to be applied.
- The current item will be converted to a true string object using
str() - If the current item contains the ID of the owner role (which we retrieved earlier), then we will keep processing it. If it doesn’t contain that ID, then the item will be ignored and processing started on the next item in the object.
- The first formatting change is to replace any single-quote characters with double-quote characters, which is what JSON expects. Example:
'name': '00000000-0000-0000-0000-000000000000'will change to"name": "00000000-0000-0000-0000-000000000000" - The next formatting change is to replace any instances of
Nonewith"None", which also better fits JSON formatting. - Because of weird formatting that happens later in each line of the
permissionsobject, I opted to cut off the string after the final piece of data that I needed, which was the “principal_id” value. So the linestopIndex = replacedStringItem.find(", \"principal_type\"")is retrieving the character index at which the string “, principal_type” is found, so that I can cut off the string right before that value. - The next step of formatting is to perform a string slice on the current item to cut it off at the designated point. That means the above example data will now look like
{'additional_properties': {}, 'id': '/providers/Microsoft.Management/managementGroups/00000000-0000-0000-0000-000000000000/providers/Microsoft.Authorization/roleAssignments/00000000-0000-0000-0000-000000000000', 'name': '00000000-0000-0000-0000-000000000000', 'type': 'Microsoft.Authorization/roleAssignments', 'scope': '/providers/Microsoft.Management/managementGroups/00000000-0000-0000-0000-000000000000', 'role_definition_id': '/subscriptions/00000000-0000-0000-0000-000000000000/providers/Microsoft.Authorization/roleDefinitions/00000000-0000-0000-0000-000000000000', 'principal_id': '00000000-0000-0000-0000-000000000000' - Then to return that string to standard JSON formatting, we are going to append a closing curly bracket to the string
- After getting the string formatted nicely so that it can be a JSON object, I use
json.loads(substring)to create a true JSON object from that string - Once the string has been turned into a JSON object, I use standard JSON string extraction formatting (
principalID = jsonItem['principal_id']) to pull just the principal_id value out of the JSON object. If I had not gone this route, it would have been much more difficult to do string parsing to correctly get the value of the principal_id key. - The final step of this function is to add that retrieved principal_id value to the
principalListList and then return that List to the caller once all lines of thepermissionsobject have been extracted, formatted, and the principal_id values retrieved.
Summary
There isn’t much documentation and there aren’t many references online about how to retrieve role assignment data for a resource from Azure, so I hope this tutorial has been helpful to you. My goal for this post was to make it so that others did not have to go through all the trial and error I had to go through to figure this out. I think that once you get an example of the data that the API is expecting you to pass in, it becomes much easier to query not only SQL Server resources but also any other type of resources in Azure. Let me know in the comments below if you found this tutorial helpful or if you have any remaining questions or misunderstandings on the topic that you would like help with.