In last week’s post, I wrote about how I use the Fernet functions of Python’s cryptography library to encrypt and decrypt my “.env” files for projects. After finishing the post, I realized I should research the security and methodology of the Fernet algorithms since I am using them. In my research, I found this StackOverflow question that had some good answers about the type of encryption Fernet is using. Check it out to learn a little more about what Fernet is using.
Have you ever created a Python script that needed to pass secrets to an API or something else in order to work, and wondered how you can keep those secrets… well, secret while still using them as needed? Every programmer should know that storing passwords and other secrets in plain text in a code file is bad practice, but sometimes it doesn’t feel like there is another option that is easy to use and doesn’t take a ton of extra time to implement. I am here today to tell you that there is another option that helps you to secure your secrets while still being able to use them whenever needed without much hassle. I was the first person to use this methodology for scripts in my current team, and it has now become a team standard to use this method for storing, retrieving, and securing secrets in code.
The “.env” file is a configuration file that you can use to store any configuration settings you need for your program, including which environment the script is operating in, as well as a place to store sensitive information such as API keys and IDs. In my own Python projects, I use the “.env” file to store ID values associated with the App Registrations I’m using, but I do not store actual secrets in the file. While it is theoretically safe to store secrets in the “.env” file as long as you encrypt that file, my team has decided we would prefer to pull secrets from an Azure Key Vault when needed instead of storing it in any text file, even if that file is encrypted.
An example of what a “.env” file might contain is:
The values following the key names can be surrounded by quotation marks or not, it does not matter for this. I prefer to not put quotes around anything because I think it looks cleaner. But doing so or not does not affect how you interact with the values from this file.
There is a lot more information surrounding environment variables and how you can use them with your Python scripts than I can cover here. But if you would like to learn more, I felt like this article covered it well. Using .env Files for Environment Variables in Python Applications by Jake Witcher.
Python Cryptography Module
There is a Python library called “cryptography” that you can install and import into your projects, and this library aims to make the “recipe” layer of encryption easy for normal developers to use. This library also has a layer that it calls the “hazmat” layer, since the functions in that layer require more in-depth knowledge of how cryptography works. If you would like to read more about this library, you can check out the documentation here.
Since I do not claim to be an expert on cryptography in any sense, I chose to stick with the “recipe” layer of the cryptography library, using the standard Fernet cryptography functions. Starting to work with this symmetric encryption is extremely easy, it only requires the following steps.
Create a new encryption key: key = Fernet.generate(key)
Create a Fernet object using the previously created key, to encrypt and decrypt files: f = Fernet(key)
After you have created that object, you can encrypt and decrypt whatever you would like at will. You can encrypt variables within your code, or you can encrypt whole files.
How to Encrypt and Decrypt Files with Fernet
For my own Python coding, I have made it a standard to always include a script called “EnvEncryption.py”, where I have two functions that I call as needed to encrypt and decrypt files. Since I created the file for my very first project, I’ve since just been able to copy and past the script into each new project I write so I don’t have to rewrite the same code over and over. Below are my two cryptography functions.
Encryption Function
from cryptography.fernet import Fernet, InvalidToken
import sys

def encrypt(filename, key):
	try:
		f = Fernet(key)
		with open(filename, "rb") as file:
			file_data = file.read()
		encrypted_data = f.encrypt(file_data)
		with open(filename, "wb") as file:
			file.write(encrypted_data)
	except InvalidToken:
		errorMessage = "Token error has occurred while trying to encrypt the file \"" + filename + "'""
		errorLine = sys.exc_info()[2].tb_lineno
		print("Exception: " + errorType)
		print("Error Message: " + errorMessage)
		print("Error line: " + str(errorLine))
What the above code is doing is first creating the Fernet encryption object with f = Fernet(key). After creating that object from the key that was passed to the function, it will read the data from the specified file, saving it into the variable file_data. After getting that data into the variable, that data is then passed through the Fernet encrypt function using the custom key/Fernet object, and is stored in the encrypted_data variable. Once the data has been encrypted in that variable, it is then written back to the same file, thus making the file encrypted.
Decryption Function
def decrypt(filename, key):
	try:
		f = Fernet(key)
		with open(filename, "rb") as file:
			encrypted_data = file.read()
		decrypted_data = f.decrypt(encrypted_data)
		with open(filename, "wb") as file:
			file.write(decrypted_data)
	except InvalidToken:
		print("File not encrypted, cannot decrypt")
My decryption function is almost the same as the encryption function, just in reverse. The function takes a file and encryption key as input, then generates the Fernet encryption object from the key. The next step is to read the encrypted data from the file into a variable, then pass that data into the Fernet decrypt function and save the results to the variable decrypted_data. The function then opens the file again and writes the newly decrypted data into the file.
Creating the Key for the First Time
As you probably noticed from my code above, both the encrypt and decrypt functions take a “key” variable as required input for encrypting and decrypting the file, yet I didn’t say where that was coming from.
Each time I start a new project that will use this encryption and decryption method, I write a temporary script to generate a key for my functions to use, and then I save that key to an Azure Key Vault so I can access it later and pass the value into the script from a command line when the script is called. So if you were to run the above code as-is without generating your own key first, neither of the functions would work.
Before you begin using the above scripts, you need to run the following code to generate a key for yourself to use for encryption and decryption with your project.
Note: After you encrypt your file/data for the first time with the key you are about to generate, you MUST have the same key available to decrypt the data. If you lose the key, you will not be able to easily decrypt your file (unless you’re great at hacking :D). Make sure you save your key in a safe location for future reference after you encrypt your data.
Note: Direct quote from the documentation: “Generates a fresh fernet key. Keep this some place safe! If you lose it you’ll no longer be able to decrypt messages; if anyone else gains access to it, they’ll be able to decrypt all of your messages, and they’ll also be able forge arbitrary messages that will be authenticated and decrypted.”
key = Fernet.generate_key()
print(key)
That code snippet above will print something that looks like b'tWEVGCX-dvt9v-3MZTSehHMD2-2IpJChgit04QZaAy8='. The keys that are generated are of type byte, so when you print out to the console it lets you know the string is bytes by surrounding it with b''. To save that key somewhere safe, you don’t need the b'' part, just the characters within the quotes.
Now that you have this key, you can use it with the encryption and decryption functions as needed.
How to Access Secrets from Encrypted “.env” File
Once you’ve successfully encrypted your .env file, how are you supposed to use the data you stored within it when you need it? The answer is that you will need to decrypt your file whenever you need to pull data from it, then immediately encrypt the file again after you’ve pulled what you need from it. You want to keep the file decrypted for as little time as possible to prevent any possible sniffing of the data that’s in it. I know a good hacker will be able to get the data if they’re determined, but this model is assuming that you’re not in a high-risk or high-security system. If you are in such a scenario, I strongly suggest that you use stronger safety systems than what I have presented here.
An example of what this decryption/encryption format looks like is the following:
ee.decrypt(envFile, encryptionKey)
# Get the data from the file
ee.encrypt(envFile, encryptionKey)
For more information on how to extract key-value pairs from an .env file, please see next week’s post where I cover how I write my code to do that.
Summary
In this post, I covered all the details you need to know in order to start using an encrypted “.env” to store your environment/processing values that you want to keep more secure. The key to doing it well is to use the standard Python cryptography library and the Fernet functions. Make sure to always encrypt your file again as soon as possible after decrypting it and pulling the data you need from the file. Happy coding!
If you are in a role similar to one I am in now, where there is heavy oversight into certain data the company owns due to federal regulations, you may get assigned a similar project where you need to automatically retrieve various ownership and access information about one or more databases in your Azure cloud environment. What I’ve found through my own process of completing such a project is that the documentation Microsoft offers for its Python SDKs is abysmally low, and there is often nothing helpful being offered about the class you are trying to work with. But I have finally figured it out with my own determination, trial, and effort so I decided I would share it with everyone so that hopefully others don’t have to go through the same amount of effort to figure out something that should be fairly easy to accomplish.
Get a list of the “role assignments” for a SQL Server resource in the Azure Portal, specifically the Owner assignments. According to this Microsoft article, the “Owner” role “grants full access to manage all resources, including the ability to assign roles in Azure RBAC.” Since that is a lot of freedom, our auditors want to make sure they know who has such access so they can determine if those people should have access.
Necessary Python Modules
There are two modules that you will need to download and install in order to programmatically generate the list of “Owner” assignments on a resource in Azure. The first is from azure.identity import ClientSecretCredential, which is how we are going to create credentials to use with the Authorization Management client. The second is from azure.mgmt.authorization import AuthorizationManagementClient, which is the module that will allow us to query the Authorization API that Microsoft provides, so that we can get that list of role assignments for a particular resource in the cloud environment.
Required Permissions
In order for you to be able to query this data we are looking for, you will need to create an app registration that has been given the appropriate permissions on either the subscription or resource group level, depending on the security requirements of your organization. Lowest access is always preferable, but giving the permission at the subscription level would then allow your app registration to perform this same action on any and all resources you want with just one permission assignment. The permission you need to assign to your app registration at either the Resource Group or Subscription level is “API Management Service Reader Role”, which can be assigned under “Access Control (IAM)” for the Subscription or Resource Group.
Data Pieces You Will Need
There are several pieces of information you will need to know and feed in to your Python script to get it to retrieve the role assignments for a given resource.
Tenant ID, Client ID, and Client Secret of the app registration you are using with your script
These three items are used to generate the credential needed for the Authorization API using the Azure Identity ClientSecretCredential
To keep these vital pieces of information secure, you can review my upcoming blog post about encrypting your IDs and keeping your secrets safe while still using them
Subscription ID for the subscription your resource is in, even if you are getting the role assignments at the resource group or resource level (not Subscription level)
Resource Group name for the group your resource is in
Resource Namespace. This item is a bit more confusing to achieve since there really isn’t any clear information about what it means, at least in my own research. (If you can find a Microsoft document talking about this, please let me know!) What I found through my own trial and error is that this value, at least if the resource you’re getting the owners for is a SQL Server resource, will be "Microsoft.Sql". I ultimately figured this out by looking at the full Resource ID for one of my SQL Server instances and seeing that value there. You can also use the Resource Explorer in the Azure portal and look in the “Providers” list to see that there are hundreds of different namespaces that can be used for getting the role assignments for any resource.
In this screenshot below, taken from the Properties page of my SQL Server resource, you can see the full ID for the resource, which includes "Microsoft.Sql/servers" which is the namespace/resource type for this resource
Screenshot showing the full Resource ID for a SQL Server resource, which includes the Resource Namespace and the Resource Type
Resource Type. Similarly to getting the resource namespace, it’s hard to find the official value that should be used for Resource Type when querying the Authorization Management API. But I figured it out from the Resource ID like I did the namespace. The Resource Type can also be found under the Resource Explorer “Providers” list, but just looking at that did not clarify for me what value I should be passing in. I once again found out through trial and error what value would work for this parameter.
Resource Name. The name of the resource you want to get role assignments for. If you have a SQL Server called “prod_dta”, then you would pass that value in for this parameter.
Optional: The ID value for the role type you are looking for, which in my case, was the Owner role. This is a standard ID that is assigned to the Owner role across your organization (or maybe it’s the same for all of Microsoft…). See subsection below for how to find this ID value.
Getting a Role ID Value
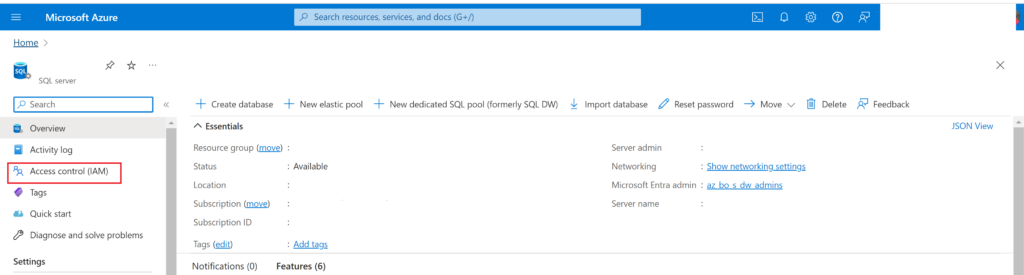
In the Azure portal, navigate to any resource and then go to the “Access Control (IAM)” page:
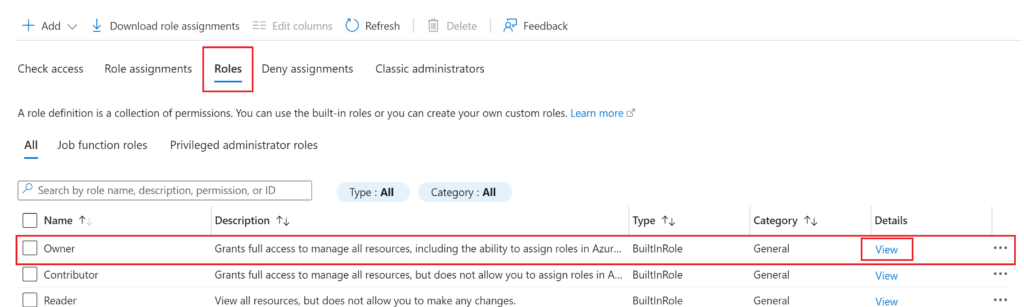
In the IAM page, click on the “Roles” tab then click on “View” for the Owner role (or whichever role you would like to get the ID for)
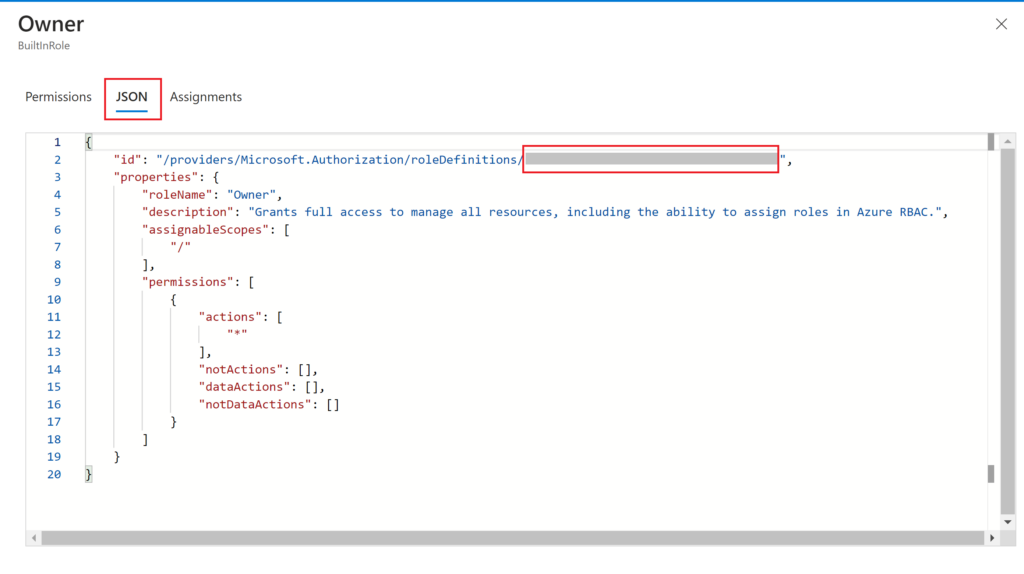
In the pane that opens with the details of the role, you want to click on the “JSON” tab, which is where you will find the ID you need. The full ID of the role is longer than just the GUID we are looking for, so make sure to only copy out the GUID from the end of the string (which is what’s covered in gray on the screenshot below). Save this ID for later.
The Code
Once you have figured out and gathered all the required pieces of data needed to get role assignments for a resource in Azure, the code for getting that data is fairly simple. Below is all of my code which I used to get just the people with Owner role assignments from a resource.
from azure.identity import ClientSecretCredential
from azure.mgmt.authorization import AuthorizationManagementClient
import json


def create_auth_management_client(tenantID, clientID, clientSecret, subscriptionID):
    credentials = ClientSecretCredential(tenant_id=tenantID, client_id=clientID, client_secret=clientSecret)
    authMgmtClient = AuthorizationManagementClient(credential=credentials, subscription_id=subscriptionID)


def list_resource_owners(authMgmtClient, serverName):
    resourceGroupName = "MyResourceGroup"
    resourceNamespace = "Microsoft.Sql"
    resourceType = "servers"
    resourceName = serverName
    ownerRoleDefID = "f865f414-b2bf-4993-8f94-51b055da4356"
    # This is a random GUID value that I replaced with the actual GUID for the Owner role in our system. Since I'm not sure if those are unique to organizations or not, I have taken out the actual value for this example.

    permissions = authMgmtClient.role_assignments.list_for_resource(resource_group_name=resourceGroupName, resource_provider_namespace=resourceNamespace, resource_type=resourceType, resource_name=resourceName)
    principalList = []

    for item in permissions:
        stringItem = str(item)
        if ownerRoleDefID in stringItem: #If the current item is for an Owner role
            # Replace single quotes with double quotes in string
            replacedStringItem = stringItem.replace("'","\"")

            # Replace None with "None"
            replacedStringItem = replacedStringItem.replace("None","\"None\"")

            # Get index at which to cut off the string
            stopIndex = replacedStringItem.find(", \"principal_type\"")

            # Substring the string item to stop after getting the princiapl id
            substring = replacedStringItem[0:stopIndex]

            # Add closing bracket to end of the substring
            substring = substring + '}'

            # Load the item into a JSON-format object
            jsonItem = json.loads(substring)

            # Get just the principal ID value from the JSON object
            principalID = jsonItem['principal_id']

            # Add the principal ID to the principalList object
            principalList.append(principalID)
    return principalList
Let’s break that down further
from azure.identity import ClientSecretCredential
from azure.mgmt.authorization import AuthorizationManagementClient
import json
The above code snippet shows the 3 libraries you need to import for this code to work.
ClientSecretCredential from Azure.Identity: This module/library allows you to create a login credential for your Azure environment.
AuthorizationManagementClient from azure.mgmt.authorization: This library is what gives you the modules, functions, and classes needed to interact with role assignments in Azure, which includes functions to create, update, and delete role assignments with your Python code. I only used the “get” functionality because I only wanted to retrieve assignments, not make new ones.
JSON: I use this library to manipulate the data returned from the Auth Management API calls in a JSON format, which is easier to work with to retrieve the value associated with a particular key.
This function, create_auth_management_client takes input of the Tenant ID, Client ID, and Client Secret of the app registration making the calls to Authorization Management, as well as the Subscription ID that the resource we want to get role assignments for is in, and uses the ClientSecretCredential function from the Microsoft library to generate such a credential. It then makes a client to interact with the Authorization Management API with Azure using that credential. The authMgmtClient object will be the object we call methods on to get the data we need.
We then come to the definition of the function list_resource_owners, which is where I pull the role assignment data from Azure, then parse the data returned into a usable format and pull out just the role assignments that contain the Owner role ID value. The beginning of the function first sets important data values for the Authorization Management Client to use; you could pass these in to your own function if you want instead of hard-coding the values within the function.
    resourceGroupName = "MyResourceGroup"
    resourceNamespace = "Microsoft.Sql"
    resourceType = "servers"
    resourceName = serverName  # Passed in as parameter to function
    ownerRoleDefID = "f865f414-b2bf-4993-8f94-51b055da4356" # Replace with correct value from your environment
After defining those important values, the code then finally makes a call to Authorization Management:
If you were to then print(permissions), you would get a very long string of role assignments for the given resource (but permissions is an Authorization Management object, not a true string). The results look something like this (except it would contain the GUIDs of all the objects, not the all-zero GUIDs I redacted with):
You would have one of these sections of data for every single role assignment on the specified resource.
An important note is that there are several different classes you can call a list_for_resource function on from the authMgmtClient, but the only one that gets this data for the entire resource, and not just for the role assignments that apply to the caller, you need to use the role_assignments class. Here is a link to the Microsoft documentation, it honestly wasn’t that useful to me, but may be useful to you.
The final step of the processing of role assignments is to format it into something that is more useful, a JSON object, which is what the following section of code aims to do.
    principalList = []

    for item in permissions:
        stringItem = str(item)
        if ownerRoleDefID in stringItem: #If the current item is for an Owner role
            # Replace single quotes with double quotes in string
            replacedStringItem = stringItem.replace("'","\"")

            # Replace None with "None"
            replacedStringItem = replacedStringItem.replace("None","\"None\"")

            # Get index at which to cut off the string
            stopIndex = replacedStringItem.find(", \"principal_type\"")

            # Substring the string item to stop after getting the princiapl id
            substring = replacedStringItem[0:stopIndex]

            # Add closing bracket to end of the substring
            substring = substring + '}'

            # Load the item into a JSON-format object
            jsonItem = json.loads(substring)

            # Get just the principal ID value from the JSON object
            principalID = jsonItem['principal_id']

            # Add the principal ID to the principalList object
            principalList.append(principalID)
    return principalList
What that above code is doing is that for every item in the returned permissions object (each line like the example I showed above), formatting is going to be applied.
The current item will be converted to a true string object using str()
If the current item contains the ID of the owner role (which we retrieved earlier), then we will keep processing it. If it doesn’t contain that ID, then the item will be ignored and processing started on the next item in the object.
The first formatting change is to replace any single-quote characters with double-quote characters, which is what JSON expects. Example: 'name': '00000000-0000-0000-0000-000000000000' will change to "name": "00000000-0000-0000-0000-000000000000"
The next formatting change is to replace any instances of None with "None", which also better fits JSON formatting.
Because of weird formatting that happens later in each line of the permissions object, I opted to cut off the string after the final piece of data that I needed, which was the “principal_id” value. So the line stopIndex = replacedStringItem.find(", \"principal_type\"") is retrieving the character index at which the string “, principal_type” is found, so that I can cut off the string right before that value.
The next step of formatting is to perform a string slice on the current item to cut it off at the designated point. That means the above example data will now look like {'additional_properties': {}, 'id': '/providers/Microsoft.Management/managementGroups/00000000-0000-0000-0000-000000000000/providers/Microsoft.Authorization/roleAssignments/00000000-0000-0000-0000-000000000000', 'name': '00000000-0000-0000-0000-000000000000', 'type': 'Microsoft.Authorization/roleAssignments', 'scope': '/providers/Microsoft.Management/managementGroups/00000000-0000-0000-0000-000000000000', 'role_definition_id': '/subscriptions/00000000-0000-0000-0000-000000000000/providers/Microsoft.Authorization/roleDefinitions/00000000-0000-0000-0000-000000000000', 'principal_id': '00000000-0000-0000-0000-000000000000'
Then to return that string to standard JSON formatting, we are going to append a closing curly bracket to the string
After getting the string formatted nicely so that it can be a JSON object, I use json.loads(substring) to create a true JSON object from that string
Once the string has been turned into a JSON object, I use standard JSON string extraction formatting (principalID = jsonItem['principal_id']) to pull just the principal_id value out of the JSON object. If I had not gone this route, it would have been much more difficult to do string parsing to correctly get the value of the principal_id key.
The final step of this function is to add that retrieved principal_id value to the principalList List and then return that List to the caller once all lines of the permissions object have been extracted, formatted, and the principal_id values retrieved.
Summary
There isn’t much documentation and there aren’t many references online about how to retrieve role assignment data for a resource from Azure, so I hope this tutorial has been helpful to you. My goal for this post was to make it so that others did not have to go through all the trial and error I had to go through to figure this out. I think that once you get an example of the data that the API is expecting you to pass in, it becomes much easier to query not only SQL Server resources but also any other type of resources in Azure. Let me know in the comments below if you found this tutorial helpful or if you have any remaining questions or misunderstandings on the topic that you would like help with.
As many of you probably already know, my cloud development career started in AWS, which I worked with for just about 3 years while I worked at Scentsy. Since my recent transition to a new job at a different company, I have started to develop in Azure instead, and it’s been a learning journey. Although both platforms allow for cloud development and processing, they have quite a few notable differences in what is offered and how they offer it, which is what I’m going to cover in this post today. My goal for this list isn’t to have a technical or all-inclusive list of the differences, but more of a difference a developer might feel in their own work if they make the same switch that I have.
Azure is simpler yet still robust. Sometimes I feel like AWS tries to overcomplicate their services in order to make them seem fancier or more cutting-edge. And it also seems like they split what could be one service into multiple just to increase their total service count. Azure combines multiple functions I was used to in AWS into a single service. An example of that is Azure DevOps, which combines your ticketing/user story system with your DevOps pipelines and your Git (or other) repos. In my past job, we used TeamCity and Octopus Deploy for the pipelines, Jira for the ticketing, and Bitbucket to store our code, so I was a little confused my first couple of weeks in my new role since everything seemed to only be in one location. But I now find it nice and easier to work with.
Azure has better cloud ETL development
In the Azure cloud platform, there is a service called Synapse Workspace or Synapse Studio, and a second service called Azure Data Factory, which both allow you to create ETL pipelines right in the cloud. AWS has Glue, but that really doesn’t seem to have the same feel or capabilities that either Synapse or Azure Data Factory (ADF) has in the Azure realm. I have already updated and created several pipelines in each of those services in Azure and I really enjoyed working with them because they were very intuitive to get working with as a newbie and I could do everything I needed for the ETL right in the cloud development workspace.
When I worked with Glue in the past, it definitely did have some limited capabilities for making drag-and-drop ETLs in the cloud, but the service seemed to have a lot of limits which would force you to start writing custom PySpark code to make the data move. While writing custom code is also possible with Synapse and ADF, they both are built with more robust built-in components that allow you to make your ETLs quickly without writing any more custom code than a few SQL queries. I have really been enjoying working in these new services instead of AWS’ Glue.
More on Azure Data Factory
Another reason why I have been enjoying working with Azure Data Factory (ADF) is because it seems to be a modern version of the SSIS I am already familiar with, and located in the cloud instead of on an ETL server and local developer box. Although the look of ADF isn’t exactly the same as SSIS, it still is the drag-and-drop ETL development tool I love working with. And since it’s developed by Microsoft, you get all the best features available in SSIS ETL development without having to work with the old buggy software. I’m sure as I keep working with ADF that I’ll find new frustrating bugs that I’ll need to work around, but my experience with it so far has been only positive.
Power Automate & Logic Apps
Two other tools that aren’t available in the AWS ecosystem and that don’t seem to have an analog in AWS are Power Automate and Logic Apps. While these tools are more aimed at people who are not developers, to allow them to automate some of their daily work, they are interesting and useful features for certain scenarios and I am enjoying learning about them and playing with them. One of the best parts about working with Azure services is that it’s fully integrated into the entire Microsoft ecosystem, so you can pull in other non-Azure Microsoft services to work with Azure and expand your horizons for development. I’m not sure yet that I would 100% recommend working with Power Automate or Logic Apps for task automation (I’m still not done learning it and working with it), but it at least is another option to fall back on in the Microsoft realm that isn’t available in AWS.
Copilot isn’t what they want it to be
While most of my experience with Azure so far is positive, there are a couple annoying things I’ve noticed that I think are worth sharing, although neither of them are so egregious that it would prevent me from recommending working with this platform.
The biggest negative about Azure for me so far is that Microsoft keeps trying to shove Copilot (their AI assistance tool which seems only slightly more advanced than Clippy) into every single product they offer even when it provides no benefit or actually detracts from your total productivity. The perfect example of this is the “New Designer” for Power Automate. For some unknown reason, Microsoft has decided that instead of allowing you to do a drag-and-drop interface for task components to build your automation flow, everyone should instead be required to interact with Copilot and have it build your components instead. That might be useful if you had already been working with Power Automate in the past so knew what capabilities and components it offered. But as someone totally new to this space who is trying to learn how to use the tool and has no idea what is currently possible to develop, it feels basically impossible to communicate with the AI in any meaningful way in order to build what I want. I don’t know what to ask it to create when I’ve never seen a list of tasks that are available. Luckily, for now it is possible to toggle off the “New Designer” and switch back to the old that allows you to add each individual component as you go and select those components from a list which gives you a short description of what each does. Maybe in the future I’ll be more open to using Copilot with everything I develop, but right now, as a new developer in Azure, it doesn’t work for me.
Unintuitive service naming
The only other nitpick I have about the Azure and Microsoft cloud ecosystem is that sometimes, the names they pick for their services don’t make sense, are confusing, or are the same thing as a totally different service. Microsoft doesn’t seem to be that great at naming things to make them understandable at a quick glance, but I suppose that can also be attributed to the desire of all cloud computing companies to make themselves look modern and cutting-edge.
The best example I can give of this phenomenon right now is that a data lake in Azure is built on what are called Storage Accounts, which is the blob storage service within Azure. It’s not as confusing to me now that I’ve been dealing with it for a month and a half, but that name doesn’t seem at all intuitive to me. Each time my colleagues directed me to go to the “data lake” I would get confused as to where I was supposed to navigate since the service I would click into was called Storage Accounts instead.
Summary
Although it felt like such a big switch in the beginning to move from an AWS shop to an Azure shop, I have already started to enjoy developing in Azure. It has so much to offer in terms of cloud ETL development and I can’t wait to keep learning and growing with these tools. I’ve already compiled so many things that I can’t wait to share, so I am hoping I will get those posts ready and posted soon so others can learn from my new Azure developer struggles.
Now that I am almost two months into my new job, I am finally feeling ready to get back into posting regularly about the technical work I’m doing during my day job. In the next few weeks, you can expect a general post about Azure versus AWS development since I’ve worked with both now, as well as more technical posts about how to do things in Python, Azure, Power Automate, and other tools that I had to struggle through personally due to limited content about them online. My goal is to always try to make development easier for others, and I hope these upcoming posts will bring value to others who may also be struggling to accomplish the same things with their own work.
Welcome to another coffee break post where I quickly write up something on my mind that can be written and read in less time than a coffee break takes.
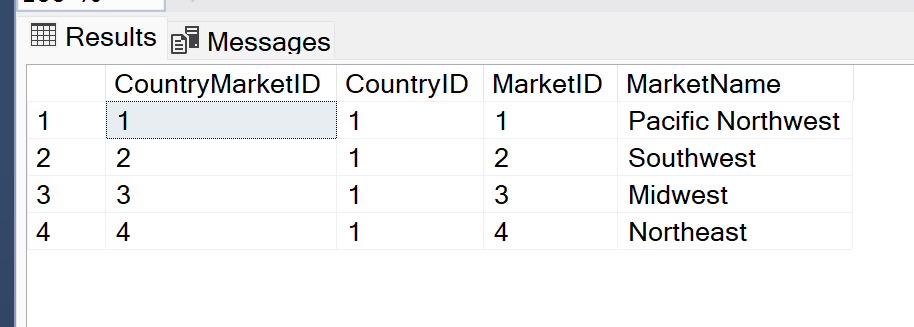
Several months ago I ran into a situation where I needed to update the records in one table based on values in a related reference table. To do this update, I was going to need to run an existing stored procedure once for every record in the reference table, which I believe contained information about countries and markets within those countries. The reference table looked something like this:
The stored procedure I needed to run had input parameters for CountryID and MarketID as well as several other things that aren’t important for this post. When I was originally looking at this task I needed to complete, I was not looking forward to running the stored procedure manually dozens of times, one for each combination of Country and Market. But I knew there must be a better way. I’m a programmer, I can find a way to automate this tediousness.
A practical use for a cursor
If you’ve developed SQL code for any length of time, you’ve probably heard an older DBA or database developer tell you to never use cursors! I know that I personally have been reminded of that many times, so I had never even considered using one or tried to use one. But when I was staring down the barrel of updating two values in a procedure execution call, running it, waiting for several minutes for the procedure to complete, then doing it all over again, for dozens of times, I knew I had to give a cursor a try.
I of course had to Google how to write a cursor, since I had never done that before, but was quickly able to write a script I would need. The cursor was created to loop over every record retrieved from the reference table using a query I wrote, and injected each of the CountryID and MarketID values into the input parameters of the stored procedure. This easily automated the tedious manual work that I would have needed to do myself, and it did it in a lot less time since it wasn’t a user having to slowly update each relevant value each time they needed to change.
Summary
Maybe cursors aren’t quite the devil I always believed them to be. I know they can certainly cause performance issues on databases when they’re written into stored procedures and ran regularly, turning what should be set-based work into row-based work, but I have learned that there is at least one fantastic use. And this use will make my life easier going forward any time I need to run one stored procedure a lot of times with different input values.
Sources
Here is the main StackOverflow answer I used to help me write my own query: https://stackoverflow.com/a/2077967. And you can see, the first comment of this answer is literally calling cursors evil, which I find amusing.
If you know me personally or follow me on LinkedIn, then you know that several weeks ago I made the decision to leave my friends and colleagues at Scentsy to take a new role at Boise Cascade. I made this decision for a lot of different reasons, but the main one being that I felt like I needed more of a challenge and wanted to get back into development work rather than focusing on project organization and management.
I am just about through my third week in my new role and it has been a scary, tiring, interesting, and even a bit fun, experience. Starting any new job comes with some new stress as I adjust to the environment and coworkers, and while I’m not completely out of the adjustment phase yet, I am already becoming more comfortable in this role so thought I should come here and give an update.
Previously, this blog has been heavily focused on cloud development with AWS since that is what I was developing in daily at Scentsy. But with my new role, I am drinking from a firehose to start learning cloud development in Azure, so my posts will be switching to focus on that platform instead. As of right now, I have no plans to do any personal development projects in AWS to be able to continue content in that space. I am really excited to be learning about Azure though, and am equally excited to start sharing what I learn about it here on my blog, since it seems like the Azure documentation is just as hard to understand, interpret and use as the AWS documentation is. So I will have plenty of my own learnings to share.
In my new role, I am also jumping into the deep end with scripting in Python which I am loving (but of course having issues with just like any other platform), so I will be starting to share some of my learnings about that space as well. Plus, there’s always a possibility I’ll be learning some other new technology because of how diverse my new role is, so my content going forward might be a lot more diverse than it was in the past.
It may take a few more weeks for me to get into the swing of things enough at my new job to feel like I have something worth posting about here, so I hope you’ll stick around and give the new content a read once it comes out. And as always, if there is anything in particular you would like me to write about, let me know in the comments and I will try to get to it!
So far in my career, I have achieved three different certifications from AWS for different aspects of their cloud development platform. I passed all three of the exams, one beginner, one intermediate, and one advanced, all on the first try. While I’m usually pretty good at learning new things and taking tests, two of the tests left me questioning whether or not I had actually passed or not when I left the testing center, but I did end up passing each of them. Many of my colleagues have asked me how I prepared for the exams, as they are also beginning to work on similar certifications, so I thought I would also share my process here to help others outside of my organization.
This is the easiest of the certifications I have achieved
The content of this exam is general knowledge of most of the services available in the AWS cloud
You will not need to have any great depth of knowledge of any particular service to pass this exam
Certified Solutions Architect – Associate
This was the middle ground in terms of difficulty of the exams I’ve taken
Very focused on the cost and design of systems across a broad range of services in AWS
Focus on the “Well Architected Framework”
More of an architecture-level exam (not development level)
Certified Database Specialty
This was the most difficult of the exams I’ve taken, simply due to the deep level of knowledge I needed to have for each of the database services available in AWS
Focused somewhat on the design of databases in different services of AWS, but mostly focused on the best way to implement different use cases for the various database services
More of a development-level exam rather than architecture-level
My level of knowledge before starting courses for each exam
Certified Cloud Practitioner: absolutely no knowledge of anything with AWS before starting a course to learn and prepare for this exam.
Certified Solutions Architect: I had more general AWS knowledge before starting to learn and study for this exam due to what I had already learned for the previous exam, but I still hadn’t done any actual development work myself in the AWS platform.
Certified Database Specialty: In addition to the knowledge I had gained from studying for the two previous exams, I had finally started to play around in the AWS console personally, so I had a tiny bit of AWS database development before starting a course for the exam.
While it’s best to actually develop in the AWS cloud before trying to take an exam, it isn’t required in any sense. Preparing for the exams is actually a great way to learn more in depth about all the AWS services so you can start working with them yourself.
How long I learned and studied before taking the certification exams
Certified Cloud Practitioner: 2-3 months
Certified Solutions Architect: 4 months
At the time I was learning and preparing for this exam, I had quite a bit of free time during my average work day so I spent many hours each week preparing for this exam
If you only have a couple hours available each week to prepare for this exam, you will likely need more than 4 months to learn and prepare for the exam
Certified Database Specialty: 4-6 months
I did not have as much dedicated time during my work weeks to focus on this exam, so it took me longer to prepare (although I can’t remember now exactly how many months I prepared for it)
If you only have a couple hours available each week to prepare for this exam, you will likely need closer to 6 months or more to learn and prepare for the exam
How I use the ACloudGuru learning platform
ACloudGuru is a learning platform specifically aimed at helping developers learn how to use various cloud technologies, including AWS. They seem to have a course designed for every possible AWS certification you would want to achieve.
In all honesty, I’m not sure I would personally seek out using this platform again for any future certifications if I had to pay for it myself. My work pays for every developer to have a license to the platform, and it’s a great jumping off point for learning enough about AWS to pass the certification exams, but it certainly has flaws. But if you have the opportunity to work with these courses, they do a good enough job to get you 90% of the way to what you need to prepare for the AWS certification exams, so they’re certainly not a bad option.
Pros of ACloudGuru
It offers a unified, full course experience to cover most topics you will need to know to pass an AWS certification exam
You can watch the videos at your own pace and come back to any video whenever you need to
Each video and section of a course will offer some links to read for further information, which can be helpful to find the AWS documentation you need to read
Each section of the course has a review quiz to test your knowledge as you go, which can help you remember things better
There is at least one practice exam provided to cover all of the course’s content at the end of the course. You can take this exam as many times as you would like, and the questions are not always the same or in the same order (so you can’t just pass by memorizing which answer to select–A, B, C, or D).
Cons of ACloudGuru
I found that the videos often focused on things that weren’t that important for the exam and would somehow cram the most important details into one or two sentences that I would then have to fully unpack myself.
Need to supplement the course teachings with additional reading of relevant AWS white papers or other documentation online
The course content isn’t updated as frequently as the exams seem to be updated, so I ended up covering a lot of content in the course that was never covered in my exam, and also didn’t cover some exam topics nearly enough with the courses.
The editing of the videos wasn’t the best in the Database Specialty course, which I find disappointing for a platform that I’m sure costs a lot of money. There were many videos where it seemed like things were kept in that should have been edited out (like actual bloopers, not just irrelevant content).
Practice exam questions aren’t written in the same manner as the actual exams which might lead people to believe that the actual exams will be easier than they are.
The course definitely doesn’t spoon feed you everything for the exam, you have to be willing to do your own additional research and experimentation to be fully prepared
How I used the AWS white papers to learn more
As I mentioned in the section above, in addition to going through the ACloudGuru courses online, I also read a lot of documentation and white papers from AWS to feel like I truly had a sense of how each service operates.
My approach for learning was to watch each video in the courses from ACloudGuru, making sure to take thorough notes of what was covered in each video. Then after I had completed each video, I would review any documentation linked for that topic (there was usually at least one document per video, but not all videos have links to AWS documentation for further reading). If there were topics covered in the video that I felt weren’t covered well enough or that I was still confused about, and those topics didn’t have documentation linked to them in the course, I would seek out AWS and other documentation to learn more about the topic. And would also then take notes on those documents.
Although reading documentation is never the most interesting thing you could be doing with your day, doing it really does pay off when it comes to taking the exam, so you should try to read the AWS white papers and documentation for each service when possible during your studying journey. And make sure to take good notes. For the two tougher exams, I filled 1/2 – 3/4 of a composition notebook with notes for each. There was a lot of content to cover for each exam and I made sure to take thorough notes.
Additional tools I used to help myself study
After I made my way through the entire ACloudGuru course for each certification exam and had read enough AWS documentation to fill my head for a long time, I would then try my best to synthesize and recapture my notes in a useful way in order to do my final studying. For all three of the exams I have taken, I used note review and study skills that I used in college.
Custom practice tests to help review notes
I feel like this is one of the nerdiest things I can admit to, but I swear it works so I’ve done it for all 3 of the exams I’ve taken. After my notes were completed, I went through them again, by chapter of the ACloudGuru course, and wrote my own practice exams to test myself with as a first pass. Doing this does take a lot of time and paper, but I personally think it’s worth it.
To make these personal tests based on my notes, I would essentially turn the most important bullet points into questions that I could then answer. So, for example, say that I have a note that says “Redshift is used for data warehousing and data analytics, not OLTP”, I would then turn that into the question “Which AWS service can be used for data warehousing and analytics but isn’t suited for OLTP data?”. I would develop these custom tests using a Word document and would then print it out and go through all the questions I made for myself, trying to use my memory and not my notes whenever possible for the best recall and memorization.
Flash cards for quick and repetitive review of high-level ideas
A high school and college classic study tip, creating and using my own flash cards really helped me burn the necessary knowledge into my brain before each exam. And I created literally hundreds of flash cards for each exam. Sorry, trees, but the numerous flash cards really helped me so it was worth the use of so much paper.
While the thought of creating and reviewing hundreds of flash cards may seem daunting, I hardly ever tried to work through all of them at once. Instead, I made, grouped, and reviewed flash cards by topic or section of the ACloudGuru course and only ever really reviewed on section of cards at a time.
My best tip for getting the most out of flash cards is to remove from your review stack anything that you can answer immediately upon seeing the card, and keeping the cards that took you a while to remember the answer to or that you couldn’t answer at all to review again later. Keep reviewing the problematic topics over and over until they are no longer problems.
What practice exams I used to prepare
While each ACloudGuru course does include a practice exam to help you test yourself on the course’s contents, I personally do not think that those practice exams are useful in preparing for the exam, outside of general recall of the topics that could be on the exam.
What was the most useful part of my study routine for each of the AWS certification exams was to take practice exams through Udemy/Tutorials Dojo. I don’t know how those folks have done it, but their practice exams are extremely similar to the actual AWS exams. The wording of their questions and answers are basically the same as the real exam, which I found to be the most helpful thing to use for studying, since it prepares you for the verbose formatting of the AWS exam questions. In comparison, the practice exams from ACloudGuru have very different formatting and wording, which, in my opinion, isn’t useful for preparing for the real exams.
You can get the Tutorials Dojo exams through their website directly or through Udemy, but you will have to pay. However, the price is reasonable and well worth it (make sure you wait for a sale on Udemy to get the “course” for ~$16 instead of the list price of $80+). The price is especially reasonable if you’re in a situation like I am where I would have to repay my company the multi-hundred-dollar cost of the exam if I failed. Pay the little bit of money and retake the practice exams until you get 70% or higher on them repeatedly. Also make sure to review the correct answers and explanations for those answers on questions you get wrong, because those explanations to be super helpful.
Conclusion
Overall, it does take quite a bit of time and effort to fully prepare yourself to take one of the AWS certification exams, but it is all totally doable and the exams are not impossible to pass. Just make sure you do your due diligence in studying before signing up to take the exams. If I can pass them, you can pass them.
This post is going to really deviate from my normal content, except for the fact that I am still writing about technology. My husband and I recently purchased our first house, which was a new build. Because of that, Google and every other map service of course did not know that our house exists, and that was becoming annoying while trying to help other people navigate to our new address.
I did a lot of googling and reading of support forum answers trying to find out how to add my new address to Google Maps, but nothing that I found online was possible when I went into the app. A lot of the suggestions seemed to be really outdated for the Google Maps UI. I eventually figured out how to add it myself through poking around the app, so I thought I would share how I did it in hopes of helping someone else who was struggling to find help with other online resources.
These instructions cover how to add an address to Google Maps using the iPhone app, I’m hoping it would work for the Android version as well, or even on a browser, but I’m not sure since I haven’t been able to try with either of those options.
Quick Overview
Open the Google Maps app
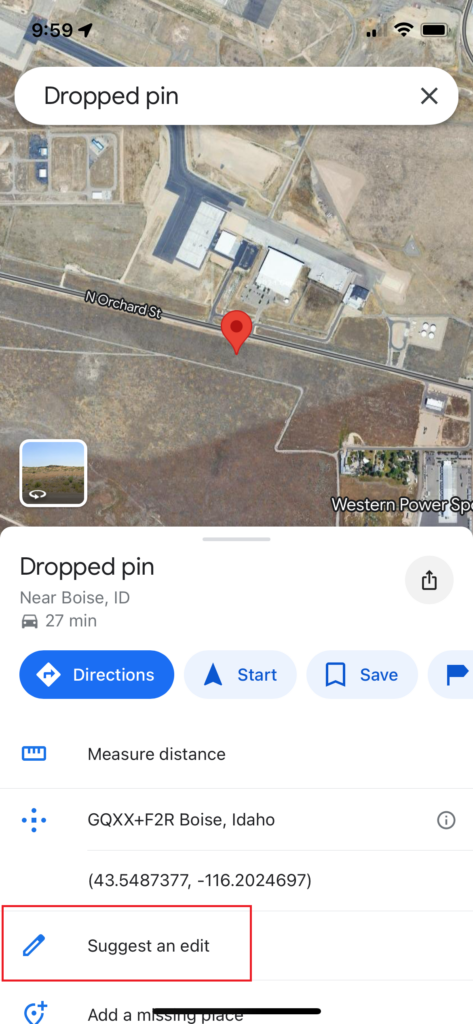
Press and hold on the location of the address you want to add to drop a pin
In the menu that opens when you drop a pin, select “Suggest an Edit”
In the next menu, select “Fix an Address”
Confirm the location you are adding using the map on the next screen. Move the map if needed. Then click “Next”.
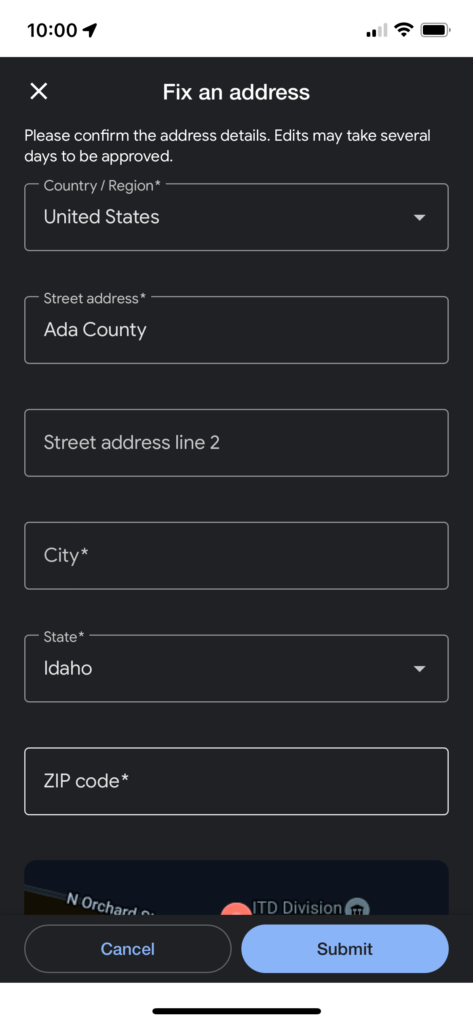
Enter your new address information in the fields provided and then hit “Submit” when ready to add it.
Open Google Maps and add pin where your address is
In the iPhone app, you can press and hold on the map in Google Maps to drop a pin, and that is what you want to start with. That will bring up a menu on the bottom half of the screen, choose “Suggest an Edit”.
Select the option to “Fix an Address”
In the menu that is brought up after you select “Suggest an Edit”, choose the option to “Fix an Address” (although technically the address doesn’t exist yet).
Confirm the location of the pin is where your location is supposed to be
After selecting to “Fix an Address”, the app will bring up a map again for you to confirm the location of the address you are fixing/adding. You will need to drag the map around until the pin in the center of the screen is where you would like the address to be. When I was adding my address, I put the pin on top of my current location while at home to make sure I put it in the right spot.
Enter your new address information
The very last thing you will need to do is to enter your address correctly into the fields you see in the final screen. Double-check to make sure you don’t have any typos or any other mistakes, then click “Submit”. After you submit the address information, the suggested edit apparently goes through some sort of review process at Google, but you should get your address added to the map within a few days of submitting.
Welcome to another coffee break post where I quickly write up something on my mind that can be written and read in less time than a coffee break takes.
This morning I was doing my normal work when I had a realization that I should share something I find super useful and use frequently use in SSMS that a lot of developers seem to not know about. They are small actions but they make your life easier when doing a lot of query editing in SSMS.
How to Minimize the Results Window
I have told many developers about this keyboard shortcut and they all appreciated it. I’m sure most people that frequently work in SSMS would like to be able to minimize and maximize the results window as needed in order to give themselves more screen real estate to work with while coding but still be able to see their query results as needed. But there is no minimize button for the results window of SSMS.
The only way that I know of to minimize and then maximize the results window in SSMS is to do CTRL + R. I use this keyboard shortcut every day at work while writing queries or updating existing queries.
How to Refresh the Intellisense
I have also had to tell many developers about updating the intellisense suggestions of SSMS since it will often trip them up if they don’t know how it works. First, you should understand that the intellisense offered by SSMS is only accurate as of the time you opened your query window or changed the connection for the query window (usually). If you’ve been working in the same query window for a while and have made DDL changes to any tables, functions, stored procedures, etc., intellisense is likely out of date and could tell you that a table or column you’re trying to reference doesn’t exist when you know it does.
If you ever run into this situation where it’s telling you something doesn’t exist but you know it does, use CTRL + SHIFT + R and the intellisense suggestions/corrections will be updated.
Bonus shortcut for Red-Gate SQL Prompt
Similar to the intellisense built in to SSMS, if you are using the SQL Prompt tool from Red-Gate, you can run into the same issue with the tool not recognizing that objects or columns exist when you know that they do. If you run into that issue and would like to update the suggestions list for SQL Prompt, use CTRL + SHIFT + D.