I have done more database creation in the past couple weeks than I had done in the previous year combined, all because my team is working on making several different AI chat bots for our business users and we are being very agile about our development process. At first we had separate Azure SQL Databases for each chat bot to use for its backend, but then I decided it would be more prudent, cost effective, and easier to manage if we combined the three related bots into a single database. This meant that I needed to move data from three disparate databases into one single database, and I wanted to do it easily without any extra tools.
How I decided to move the data between the databases was to quickly export to a flat file then import that flat file onto the new database–since I only had a few hundred rows to move from each source database. As far as I am aware, this should work with all modern types of SQL Server (on-prem, IaaS, Azure SQL Database). Read on to learn how to follow the same process I did.
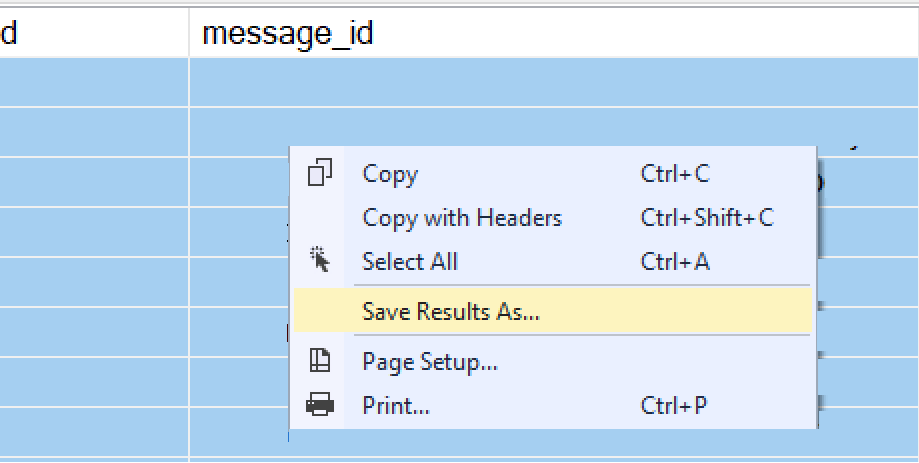
On your source database in SSMS, run a SELECT query to retrieve all the data you want to copy over to your target database. Once you have your result set, select all records, right-click on them, then choose “Save Results As…” from the menu.
You can export your query results using “Save Results As…” from the right-click dialog
That will open the normal “Save As” dialog, and you can choose where to save your results. Save the file to your computer.
Once the file has been saved, I recommend opening the CSV using Notepad++ or similar tool to review the formatting of the data. There were a few times when I went through this process that the columns names did not get exported to the flat file, and instead the columns were generically named “Column1”, “Column2”, and so on (see final screenshot below for what this would look like when trying to import). Chances are that you won’t run into this issue, but it doesn’t hurt to check. If for some reason your file doesn’t have the correct column names that you expect, simply export the query results to a file again and it should fix the issue.
Importing the data to the target
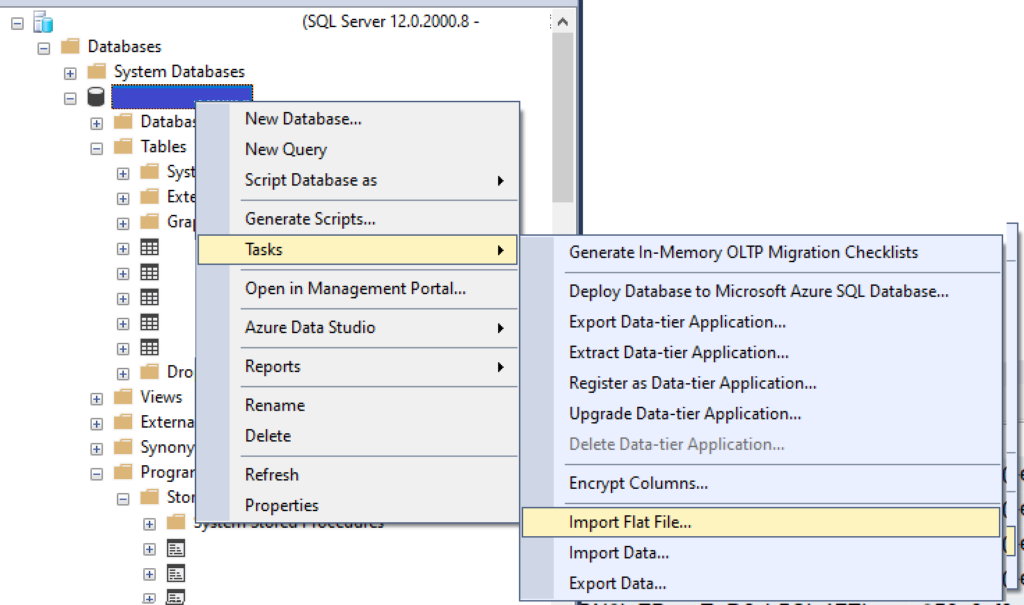
To import the data onto your target database, connect to it in SSMS as well, right-click on the database name in the Object Explorer, then choose “Tasks” > “Import Flat File”. This will open a wizard to help you import the data.
Import a flat file using the Task “Import Flat File”, which will open a wizard tool for you
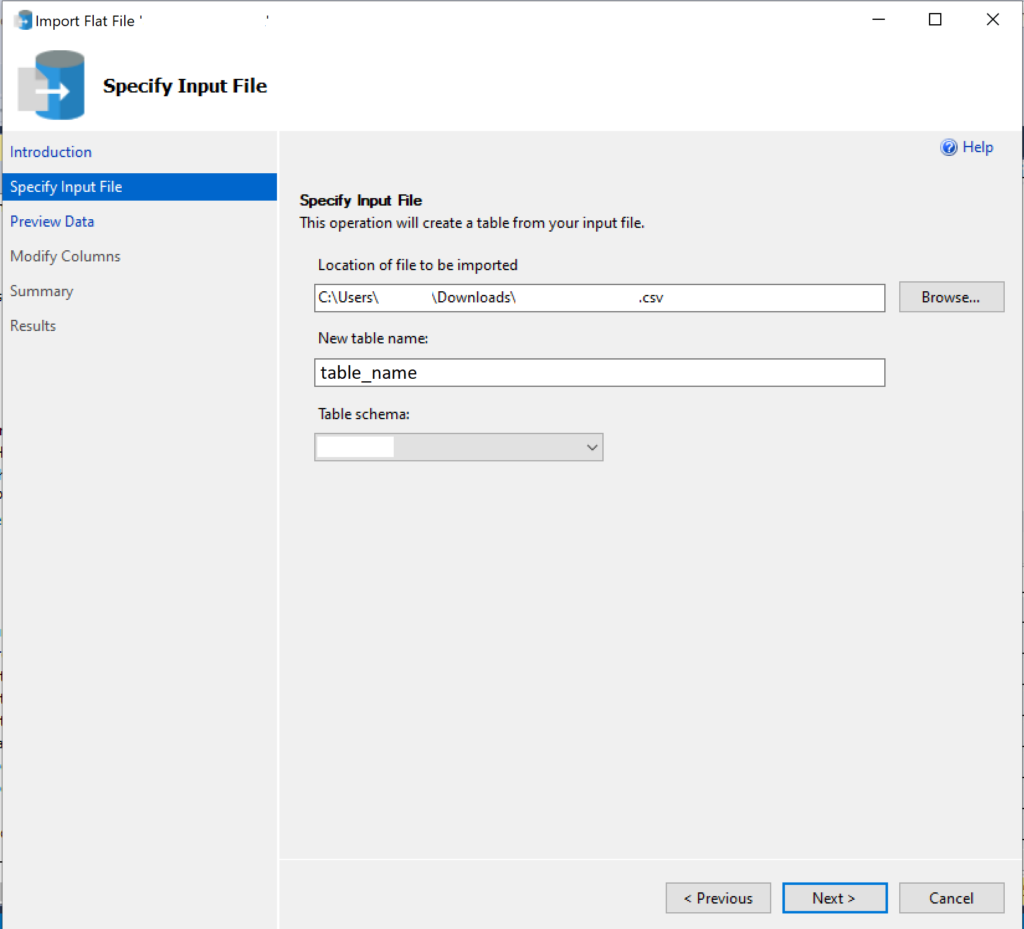
In the dialog that opens, browse to the file that you previously exported from the other database. Once you select that file, a table name is generated that the data will be imported to. You can change the name of that table if you wish. Also, choose the schema that table will go into. This process creates a new table from the imported data, so make sure you don’t use an existing table name.
Specify the CSV file you created during the export process and the name of the new table you want to load the data into
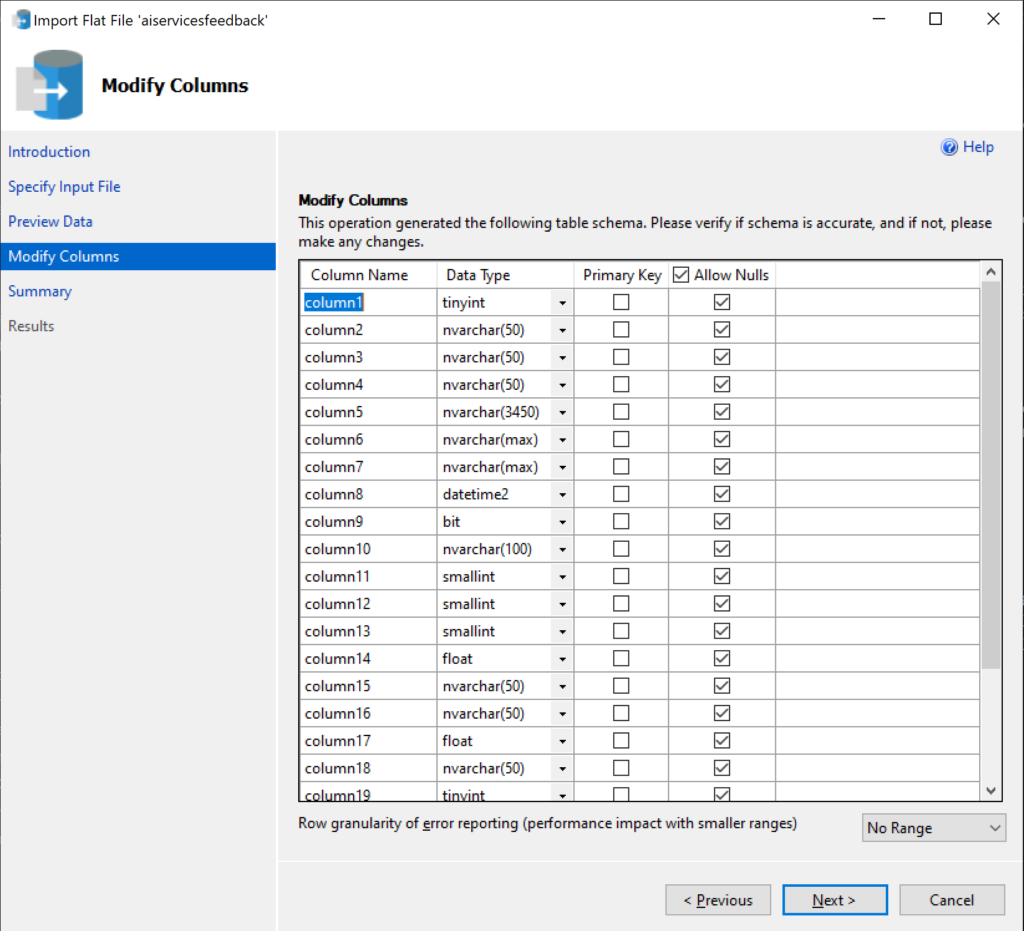
Click “Next” to move to the next page, where you can preview the data that will be imported. If the data looks good to you, click “Next” to move to the “Modify Columns” page where you can change some settings on the table columns if you would like. I chose to “Allow Nulls” for all columns, just to make things easier for myself in this import process. I plan on deleting this table after I copy the data from it into the final target table, so it doesn’t matter to me if every column allows nulls.
This screenshot shows you what can happen if the export process goes a little wonky–the column names from the source may not be put into the CSV file and thus only show as generic names in the Import wizard. From this menu, though, you can modify the properties of the columns in the new table that is going to be created for the import.
Keep clicking “Next” to move through the rest of the pages, review the process before you opt to import, then import the data. Once the import wizard has completed its work, you will now have a new table in your database, essentially a staging table.
To get the data from your staging table into the final target table in your database, you can use an INSERT INTO tablename SELECT... query. This step also allows you to modify the data before moving it into the target table if you need to. In my case, I needed to add an extra column to the data that the source table didn’t have but the target requires, so I hard-coded the value for that column into my SELECT statement so it would be added to the final table.
Cleanup
After you have moved your data into its final destination, make sure to clean up the temporary new table that you created during the import wizard process, to keep things as neat as possible in your database.
Summary
Using this method to copy data between two Azure SQL Databases may be considered a bit lazy, but I truly think it’s the most efficient way to get data from point A to point B. Sure, I could have made a pipeline or used some other system to move the data around, but I only had a few hundred records to copy over so this method worked great for me. Let me know if this method saved you time as well!
This morning I received a question from a colleague about how to set up a new linked service for an on-prem server to use that as a data source for a pipeline. As part of my review of our current pipelines setup to make sure I was answering properly, I needed to find an example pipeline where we were already doing that. I had a linked service and associated data source doing exactly what I needed to share with this other person, but then I got to wondering if that data source was even used anywhere and set out to find out. As per usual though, Google betrayed me and wasn’t giving me anything related to the question I was asking, so I had to figure out the answer for myself. Which is why I am now sharing with you the simple way you can see what pipelines are using which data sources, and thus linked services, in your Synapse Analytics workspace.
Seeing the Data Sources associated with a Linked Service
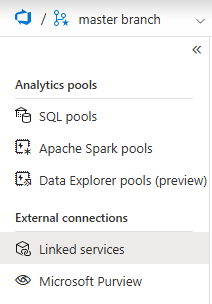
In Azure Synapse Analytics studio, it is very easy to figure out what data sources have been created using a given Linked Service. To view this information, you go to the “Manage” page in the workspace, then select the page for “Linked Services”.
Open the Manage page to view Linked ServicesOpen the Linked Services page under Manage to view all Linked Services in the workspace
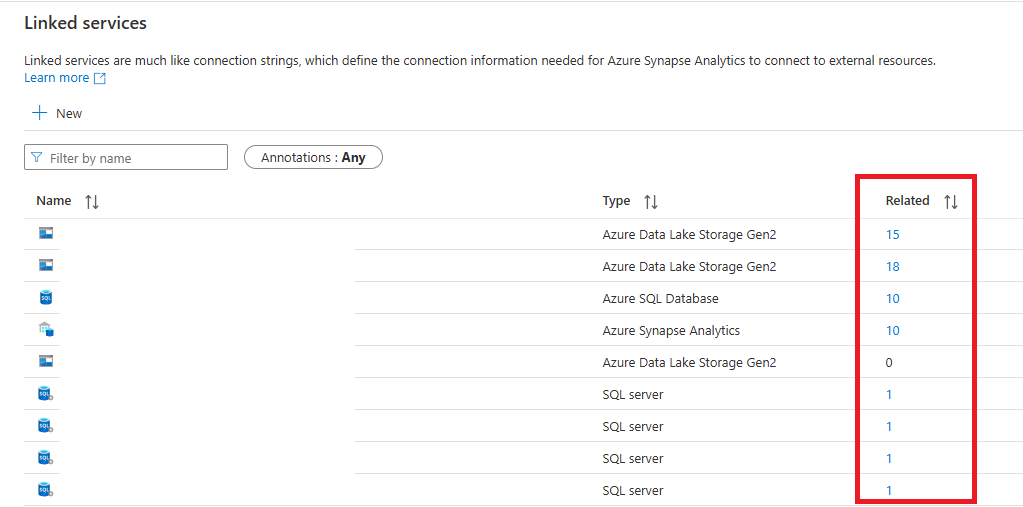
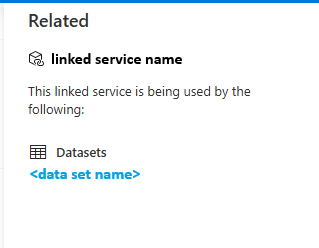
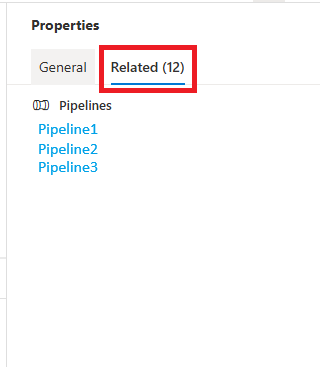
Once you are on the Linked Services tab, there is a column in the list of services called “Related” which lists the number of related data sources for each Linked Service. If you click on the number, it will open a new pane of information telling you which data sources are created using that Linked Service.
Click on the linked numbers in the Related column of the Linked Services list to see data sources using the Linked serviceWhen clicking on the linked numbers in the Related column, you will see this Related pane.
In that “Related” pane, the names of any related data sources will be links, so you can click on those to take you to the data source editor for that specific data source within the workspace.
Seeing which pipelines use a Data Source
Once you navigate to the Data Source editor, you are then able to view which pipelines are using that data source. To view that information, you simply need to click on the “Properties” icon in the top right corner of the Data Source editor tab.
The Properties pane for the Data Source can be accessed from the top right corner of the Studio window.
Once you have the Properties pane opened, click the “Related” tab to view the list of any pipelines that are using the data source.
In the Properties pane for the Data Source, all related pipelines can be found on the Related tab
If there are no pipelines using the data source, you will instead see this on the “Related” tab.
If there are no pipelines using the Data Source, you will see “No items to show”
Summary
I wish I had looked for this information sooner, because I think it could have saved me some time while working with Synapse pipelines. Viewing the Data Sources related to a Linked Service and then what pipelines are using a given Data Source is simple to accomplish and helpful for seeing the relationships between items in your Synapse workspace.
Once again I am sharing a quick tip that will potentially speed up your work process, this time by using Azure Storage Explorer for moving database backup files between servers. This process saved me so much time this past weekend while completing a server migration, which is why I wanted to cover it with a quick post.
Azure Storage Explorer is a desktop application that helps you manage your Azure Blob Storage and Azure Data Lake storage. Before this past weekend, the only purpose that I had used it for was to propagate Access Control Lists (ACLs) for storage accounts, which is also a very helpful task it can accomplish. However, what I want to focus on for this post is how you can also use this tool to very quickly transfer files between servers, as long as those servers have access to the internet.
Moving files with Azure Storage Explorer
If you are ever in a situation where you are migrating a database from one server to another using the backup/restore method, and that backup file is very large even after being compressed, you may want to try this method of moving the file between your servers. This of course only works if you use Azure as your cloud provider.
With previous database migrations, I tried different methods of moving my file between the servers, and even have an old post discussing this. But this past weekend, I was doing the production migration for a database and the file was larger than previous ones I had moved between servers, even after creating the backup in a compressed format. My first transfer method that I tried was to drop the file onto a network drive and then copy it to the destination server from that share drive on the destination server. While that worked, it was pretty slow, taking about 30 minutes to complete. That would have been… fine… if I hadn’t run into issues with the backup which forced me to generate a new backup file that needed to be copied over as well. Since I didn’t want to force the rest of the upgrade team to wait for that again, I started trying a new method.
While that slow copy was in progress, I quickly download Azure Storage Explorer (ASE) onto the source server and uploaded my backup file to a storage account in our Azure subscription. And to my surprise, the upload of the 15 GB file took just about a minute or two if I recall correctly. No matter what specific amount of time it took, using ASE was significantly faster, and it didn’t cause a browser memory issue like when I attempted to upload the same file to the same storage account manually through the Azure portal. Because for some reason, even though I got the manual upload to a storage account to work in the past, I have now been having issues with my browser, both Chrome and Firefox, crashing out part way through the upload. So this new, faster transfer method is a huge win for me!
Then I also quickly downloaded and installed ASE onto the target server, and the download of the file from the storage account through the application was just as fast as the upload was. I had my database backup copied over to the new server in the same amount of time that the progress of the network drive copy only reached 20% done. So I gratefully cancelled that copy process. I was happy about the speed of ASE and I am sure my colleagues were happy they didn’t have to wait on the database part of the upgrade even longer.
Why is this so much faster?
Given how much faster the upload and download for my file went using Azure Storage Explorer compared to every other method, I really want to know how it manages to achieve that. Unfortunately, it seems that the information about why and how it manages to be so fast is limited. Part of the speed obviously came from our own network speed, but some of it certainly comes from something special with the tool since trying to upload manually through the portal proved to be super slow, and would then crash out in the browser.
From the few resources I’ve found online (listed in the References section below), it seems that the performance of ASE comes from how it uses the azcopy tool to speed up and also parallelize the file transfers and use multiple cores from the host machine to do so. Whatever makes it work so quickly, I am very happy that it exists and will likely be using this method of copying files between servers going forward. Downloading and installing ASE, then using it to upload and download files, is still much faster than trying to move big files any other way.
Summary
If you need to move a large file between two servers in your Azure cloud environment, I highly recommend using Azure Storage Explorer to drop that file onto a storage account, which will complete very quickly as long as your internet speed is normal, and then download that file using ASE as well, which will be equally as fast. There are other methods of copying files between servers that I’ve discussed before, but this is now going to be my preferred method.
This is going to be a short and slightly random post, but this information is something I learned this week that was entirely opposite of what I thought it was so I wanted to share.
When you work with Notepad++, a free and very nice notepad application for Windows, you have the ability to create a lot of new files and leave them unsaved without losing them when closing the app or even restarting your computer. I never really knew how the app managed that and hadn’t thought much about it, but I figured that since I had never officially saved the files to my hard drive, that the information in the files wasn’t saved onto my hard drive and were thus safer from external access than a stored file would be.
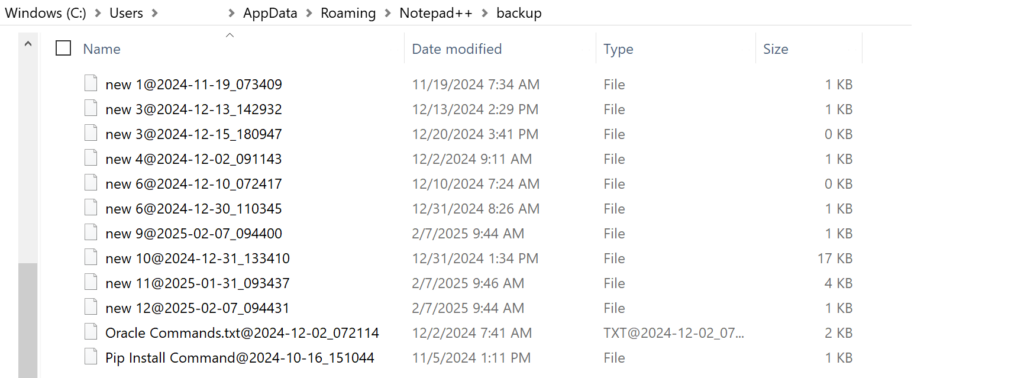
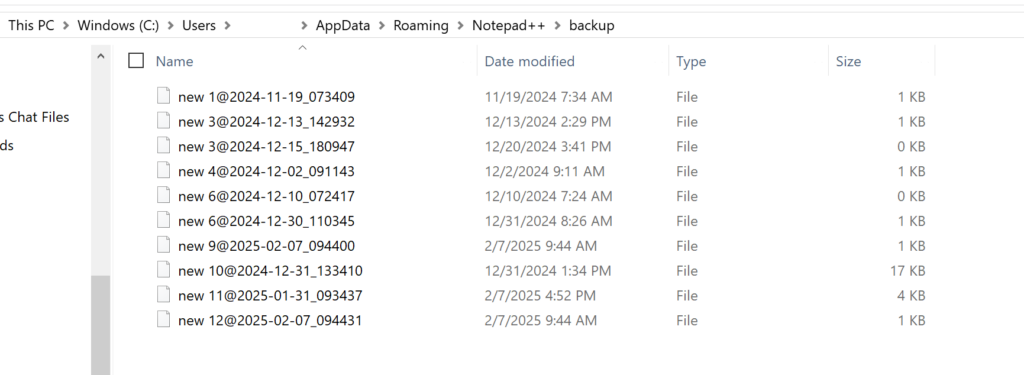
However, this week I learned that I was totally wrong and that the way Notepad++ keeps your “unsaved” files ready for you to use again after being closed is to keep a “backup” saved onto your hard drive. For me, these files were saved in this location: C:\Users\username\AppData\Roaming\Notepad++\backup
This is what I currently have backed up there, which lines up with what I see in the actual application, plus backups of files I closed today which are kept just in case I want them, I guess.
And then if you end up saving the files, like for me I had unsaved changes in the two actually-named files which I then saved, the “backup” files will disappear.
I think this is actually a neat feature since it could save you if you accidentally close an important file that you didn’t mean to. But it isn’t some cool loophole for keeping important secret things easily at hand but secure like I kind of assumed. I’m not saying I put secrets into these temp files, but if I was, I definitely wouldn’t be doing it anymore. 😀 Always keep your secrets locked up in key vaults or password tools! The one I’ve started using is Bitwarden and it seems pretty nice and easy to use so far.
Summary
Notepad++ doesn’t use magic to keep your unsaved files available for you to use after closing the app or restarting your computer; it is saving those files in a backup location on your computer. And if you close a file you didn’t intend to before you saved it, you can get that file back from this backup location before you restart your computer.
The other day I needed to verify that some IaaS (infrastructure as a service) SQL Servers (“SQL Server on Azure VMs” as Microsoft puts it) I created for a project a couple months ago were setup exactly as we want them to be before we move them to production in their upcoming upgrade. There were several things I needed to check to ensure the servers match our team’s standards, and one of them was double-checking to ensure that Entra ID authentication is enabled for the servers. I knew that we had worked through all the required steps on the Azure portal to enable that type of authentication, but wanted to validate to make sure I could login to the server with that authentication type. However, what I discovered is that I could not login with my Entra ID account despite Entra being enabled for the server. This was really confusing to me so I set out to figure out why it wasn’t behaving the way I thought it should be and why I could log in with Windows Authentication but not Entra MFA.
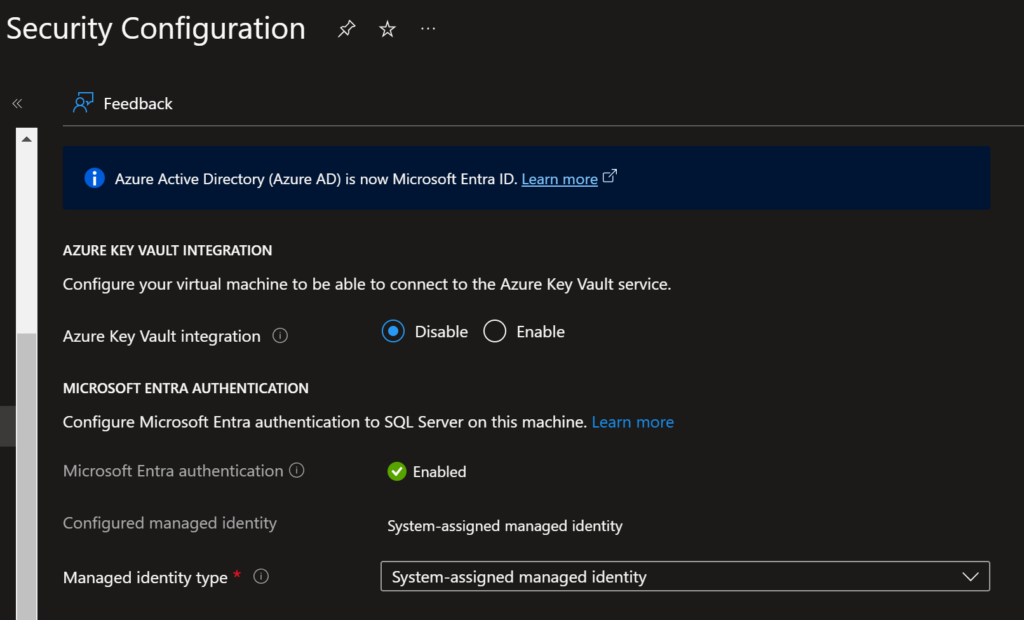
When I originally set up my servers a couple months ago at this point, I know that I fully went through the process in this Microsoft document to add Entra authentication to the SQL Server. But since it had been a couple months, I reviewed everything in the settings for the server and confirmed that it all should be set up to allow me to authenticate with my Entra user when connecting to the server through SSMS. This is what the security configuration page looked like for each of my servers, and it shows that Microsoft Entra Authentication is Enabled.
Based on that information, I thought that I should be able to login with Entra, yet I still couldn’t. The only way I could connect to the server was to use Windows Authentication. So what was the problem then?
What my problem was and how I solved it
The next step of my troubleshooting process was to login to the server and look at the groups I added for my team so that we can be the admins on the server. For some reason, we have two different groups so I needed to review both of them. What I found when reviewing the logins for our groups is that both were created using the FROM WINDOWS statement, since I had directly copied the logins from the old versions of our servers which were created before Entra authentication was possible for IaaS servers.
That was the problem! The logins for our groups, which are now in Entra ID and we want to use Entra auth to login with, were created as Windows logins which is why I could only login with Windows authentication. Makes a lot of sense.
To resolve this problem and make it so that I can login to the server with Entra instead, I had to drop and recreate the logins using the parameter FROM EXTERNAL PROVIDER, like this.
Once I made that change, I was then able to login to the server with Entra MFA authentication like I originally wanted. And since I had made multiple servers with this same issue, I had to go and make the same changes on those as well. Super easy to overlook when migrating logins from an older server to a new, but also super easy to fix.
How to tell at a glance if a login is Windows or Entra
There is a super quick way to tell at a glance on your server if a group login is an Entra based group or a Windows authentication based group, and that is to see what kind of icon is given to the login in the Object Explorer list. The icon for the Entra group looks the same as a single user icon, whereas the icon for the Windows group looks like multiple people in front of a server.
Summary
If you run into a situation where you enabled Entra ID authentication on your IaaS SQL Server instance in Azure yet you still can’t login to the server with Entra authentication, you may want to check to see what type of authentication your login was created with. If you want to be able to login through a user or group with Entra ID, you need to make sure that the login was created with the phrase FROM EXTERNAL PROVIDER instead of FROM WINDOWS.
Quick side note
This form of Entra authentication with IaaS servers in Azure is only available for SQL Server 2022. If you have older versions of SQL Server installed on Azure VMs, you will still need to use Windows authentication for your logins.
Before the holidays, I had the pleasure of doing the most recent round of patching for our production Oracle databases, to apply the patches that were released in late November. Similarly to how a lot of things behave unexpectedly in the IT world, I had different results of the patching in production compared to what happened in our test environments when I applied the same patches there first a few weeks before production. During the application of the patches in test, we had absolutely no issues, the patches applied seamlessly and it was super easy, although time consuming. Then in production, late at night on a Thursday evening when I should have been in bed already, the patches seemed to have been applied without issue again, except this time, my application developer teammates could not get their apps to connect to the database again once it came up.
When my app dev teammate tried to reconnect his app to the newly patched server, he received an error similar to the following:
ORA-12514: TNS:listener does not currently know of service requested in connect descriptor
Thankfully my teammate used to deal with Oracle databases directly himself so he could help me run commands to troubleshoot what the app was encountering. We were quickly able to see that things weren’t right, but also we weren’t quite sure how to fix them.
Helpful Commands
The following commands were ones that helped us figure out what was wrong with the database after it had been patched. I ran these through a terminal connection to the node using PowerShell.
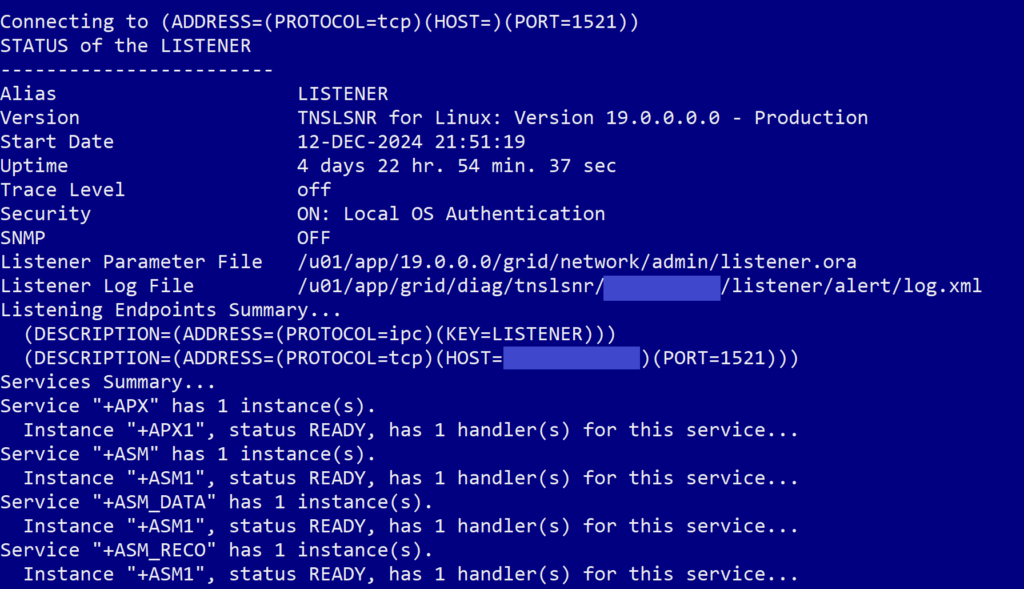
lsnrctl status
This command checks the current status of the listeners available on the system. When we ran the command, we got an output that looked like this, with status for a listener related to ASM but none of our container databases or pluggable databases:
What we expected we would see was a whole list of listeners for our database and the pluggable databases on it, like this:
ps -ef | grep LIST
Will list out any file or directory on your server node that contains ‘LIST’, we used it to see what listeners may be on the node
How We Fixed the Problem
After running the lsnrctl status command I mentioned above and seeing that there were no listeners that it knew of for the whole database or the pluggable databases on it, we knew that there was clearly something wrong with how the listeners for the DBs came up (or rather didn’t) when the server patched. The first solution we attempted was a classic–reboot the machine to see if that would force the listener to come up how it should have. This did not resolve the problem for us, we still didn’t have a listener for the database.
To figure out the real solution, we of course hopped on Google, and I found this StackOverflow answer that mentioned the person had to update their tnsnames.ora file on the server to include the missing listener, and once they did that it fixed the issue.
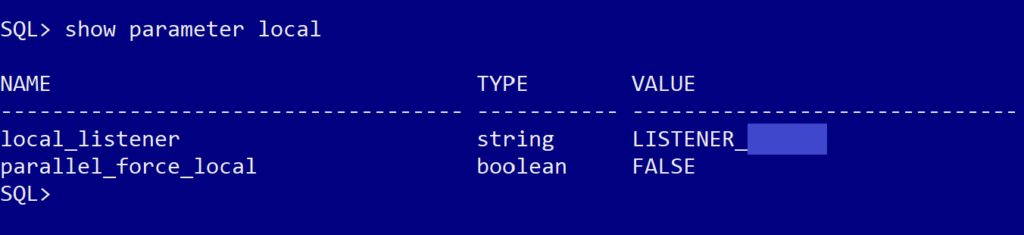
Since my teammate had no other ideas to try, we opened the tnsnames.ora file on our server to see if there were any entries in it for the listener of the server we were on. Unfortunately, there was not an entry for the listener that should exist on the server, just listeners for other servers that we connect to. Based on the StackOverflow solution, we decided that we would manually enter the connection entry for the listener. But first we had to figure out what the correct name would be. To do that, we ran this command:
# Start a sqlplus session
sqlplus / as sysdba

# Run command to see the name of the listener that the database system is expecting
show parameter local
That gave us the following output:
Based on that output above, the server was looking for a listener called “LISTENER_dbname”, so now we knew what to enter into the tnsnames file (with a little assistance from looking at what was in the same file but on the test server, so we could get the formatting correct).
Step by Step Solution to Update TNSNames.ora
Navigate to the tnsnames.ora file location on the server: cd /u01/app/oracle/product/19.0.0.0/dbhome_1/network/admin
Create a backup of the tnsnames file just in case you mess something up and need to revert: cp -p tnsnames.ora tnsnamesbak.bak— that is cp -p <source file> <new file name>
Open the file using the “vi” editor: vi tnsnames.ora (If you’re like me and not great with vi, use this cheat sheet I found online to help you use the editor)
Navigate to the end of the file (SHIFT + G)
Press I to enter the Insert mode
Copy the text to setup your local listener into the file, making sure there are no leading spaces or extra spaces anywhere
The LISTENER_DBNAME is what we retrieved above with the show parameter local command, the HOST is the hostname of your instance which you can find in the console if you don’t know it already
Save the file
Press ESC to exit Insert Mode
SHIFT + ; to enter Command Mode so we can save and quit
wq then Enter to write and quit
Now we must register the newly added listener with the system so it knows what to use. Enter a sqlplus session and run the following commands:
alter system register;: This command will register current settings at the container database level
alter session set container=<PDBName>;: Change your session into your first pluggable database
alter system register;: This command will now register current settings at the pluggable database level. Repeat this step and the previous one to register settings for each pluggable database on your system
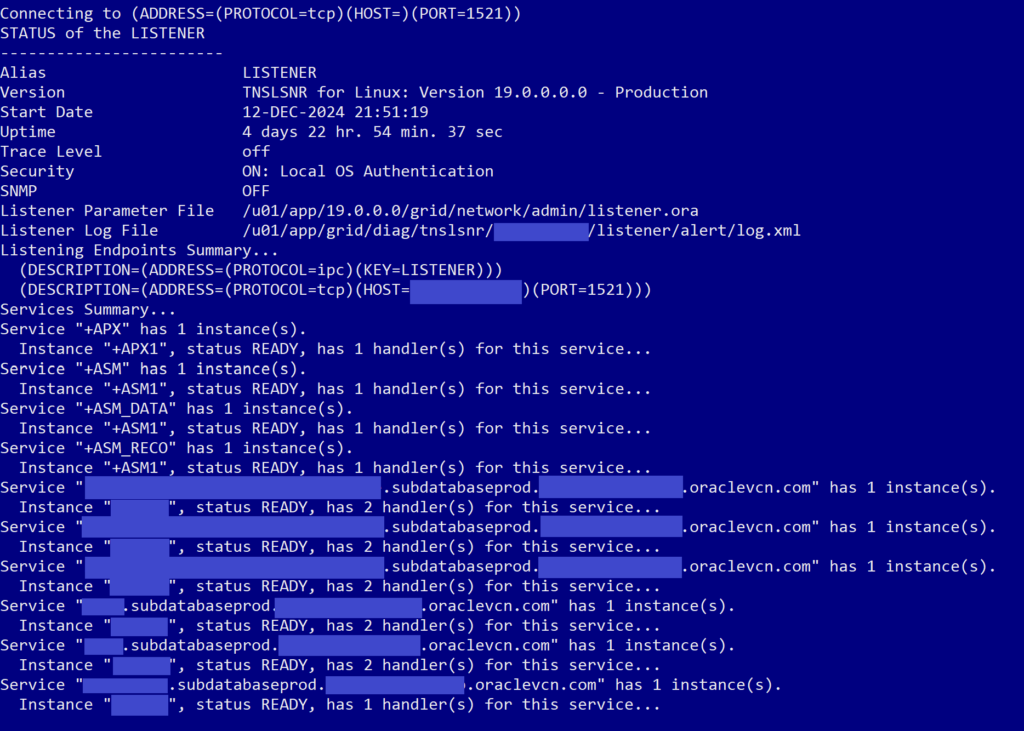
To validate that the change fixed the problem, run the lsnrctl status command again and see that you should now have multiple lines below the ASM listener lines, one for each container database and one for each pluggable database. Like this:
After we completed all the above steps, my app dev was able to connect his app to the database again and we were able to wrap up our very late working session. And thankfully I documented this all the day after, because we then had to patch a different production database on the weekend and ran into the exact same issue, and I was able to fix it in just a couple minutes this time. I don’t understand why test went flawlessly and then production had issues with the exact same patch, but such is life in the technology realm. Nothing ever behaves like you really want it to.
Summary
If you run into the error on your Oracle system that indicates the listener isn’t working or isn’t present, you should be able to follow the detailed steps I outlined above to get your database back in working order.
Did you run into something like this with the most recent Oracle database patches? If so, I would love to hear about your experiences down in the comments below.
During server upgrades and migration projects, you will likely run into the task or issue where you need to transfer the server logins from the previous to the new server. For non-SQL authenticated users, this is simple. But if your source server happens to have more than a handful of SQL Authentication users or you don’t have access to the passwords of those users, it would normally be very difficult to transfer those logins to the new server.
I recently setup three new test environments based on a current production environment, and there were literally dozens of SQL Authentication users on the production server that needed to be copied to the new environments. I didn’t have access to the passwords of any of those users so I couldn’t just recreate them manually. That is where two non-standard Microsoft stored procedures come in very handy to help migrate all these users.
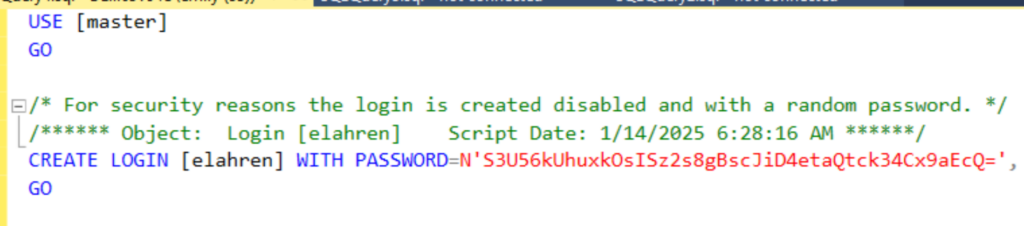
If you haven’t ever been challenged with this task before, copying SQL Authentication users from one server to another, you may not know why this can be a challenge, so I’ll describe that first. The problem with copying logins between servers is that unless you know the password of the account, just scripting out the login as a CREATE script will not give you the script that will recreate the login exactly how it is on the original server. For good reason, when you right-click on a login and opt to script it as a CREATE statement, SQL Server will generate the script but the password it puts in the script is a randomly generated string that isn’t what the true password is. So if you took that script and ran it on your new server, the login would be created, just with a different password than the login originally had, which could cause a lot of problems for whatever or whoever is using that login. (Side note: I don’t know if I’ve see this before, but when I scripted out my test login on my personal computer to demonstrate for this post, SSMS automatically added a comment saying the password is random, which is a helpful note there.)
The Helpful Stored Procedures
Given the above context of why transferring these logins isn’t as simple as scripting them on the source server and then running those scripts on the destination, how then are we supposed to accurately copy those logins to a new server? While there are some StackOverflow answers online that essentially provide a homegrown method of achieving the same goal, they all seemed overly complicated to me so I didn’t want to attempt them. And thankfully I found the Microsoft approved method online that very easily does all the required work for you.
To create the stored procedures that accurately script out all your SQL Authentication logins without generating any security issues or wrong password problems, go to this Microsoft document page. On that page, you’ll want to scroll down a bit until you see “Method 2” in the bulleted list, which is where you find the scripts to create the helpful stored procedures.
Note: For your own safety, please review the code before you run the script to ensure you know exactly what it’s doing and that it won’t cause issues for your specific system.
Copy the scripts from the web page into your SSMS new query window and then execute on the master database of the server you wish to copy logins from.
The script as it exists on the Microsoft website starts with the USE master command, but this will not work if you are trying to run the script on an Azure SQL Database, which no longer allows the USE statement to switch database contexts. If you are running the query on such a database, you will need to remove that top line and make sure yourself that you are running the command on the master database.
Scripting the Logins
Once you have executed the Microsoft script, there will now be two new stored procedures on your master database: dbo.sp_hexadecimal and dbo.sp_help_revlogin. The first one is used by the second, and you will only be executing the second procedure manually.
When you are ready to generate scripts to recreate all the logins on your server, you can execute the stored procedure dbo.sp_help_revlogin on the master database. Doing that will return data in the “Messages” tab of the results window with all necessary CREATE statements, including encrypted/hashed passwords, for your logins.
EXEC dbo.sp_help_revlogin
Reviewing the output further, I can see that the SQL Authentication users I have on my server have a “password” value displayed, which I can assure you is not the actual password I set for my users. Instead, the password value you see in the script is a securely hashed version of the password stored in the depths of the server security settings. The script has included the HASHED keyword at the end of the password which will notify the new server we are going to run this on that the password should be handled as the hashed value it is so the server doesn’t literally set the login password to the provided value.
Creating the New Logins
Copy the output presented in the “Messages” tab of your query window into a new query window with a connection to the server you want to add the logins to. Now to create all your logins from the original server, all you need to do is to execute the script. It’s as simple as that! You have now copied all your logins, including any login-level permissions they were assigned on the original server, added to your new server.
Summary
Copying SQL Authentication logins from one server to another doesn’t have to be a difficult or time-consuming process involving looking up old saved passwords or writing your own script to maybe fully copy the logins. Instead of trying to write a homegrown solution yourself, save yourself the time and effort and use the two stored procedures that Microsoft already wrote and shared to do the work for you.
This may seem crazy to some of you, but so far in my career I have been able to successfully avoid learning how to use the PIVOT feature of queries in SQL. Every example I ever came upon in code someone else wrote, I was able to get the gist of what was happening in the code without truly understanding what the query was doing. Until this week when I decided enough was enough and that writing a PIVOT query was going to be the easiest way to get the data I needed to check my work on project I am developing. This post won’t go into too much detail about writing complicated PIVOT queries, because the one I wrote wasn’t that complicated, all things considered. I mostly want to celebrate and share that I finally learned how to do something that I thought was going to be more difficult than it was.
The reason why I decided I needed to finally learn how to write a PIVOT query is that I am working on duplicating and automating a manual system a business user does every quarter to project sales data using a very complicated Excel spreadsheet. As I’m working on turning this spreadsheet into an automated system with SQL and Python (since we have the same data in a database just waiting to be used), I am constantly checking my queries and results against the source of truth that is the Excel spreadsheet.
This morning, I was tired of essentially having to PIVOT my data manually or in my head to check my work, so set about learning the PIVOT query structure.
The data in the spreadsheet looked something like this:
State
County
2020
2021
2022
2023
2024
ID
Ada
1000
1283
1476
1923
4657
ID
Canyon
54
55
65
76
87
ID
Boise
54
55
65
76
87
ID
Valley
54
55
65
76
87
But when I was querying the data from the database, the results of my SQL queries were looking more like this:
State
County
Year
Sales
ID
Ada
2020
1000
ID
Ada
2021
1283
ID
Ada
2022
1476
ID
Ada
2023
1923
ID
Ada
2024
4657
If it was actually that few rows of data, it wouldn’t be a problem, but I was needing to compare the data coming from my queries against what was in a spreadsheet that had over 3000 lines (there are so many more counties in the US than I ever would have guessed…). And I wanted to do the comparison using Excel so that I didn’t have to manually compare the spreadsheet data against my own, row-by-row. So in comes the pivot query to make my data look more like the data in the spreadsheet.
Writing the PIVOT Query
Learning how to write the query was more challenging than I expected because it seems like in the top results and examples online, even in the Microsoft docs, the queries are written in a confusing and non-intuitive way so I couldn’t figure out how to manipulate them to fit my own needs. The exception to this was this wonderful YouTube video by BeardedDev, which finally helped me figure out how to write my first pivot query that was actually what I needed it to be.
His video was so much more helpful than the written tutorials and docs that I looked through because he started out with the outline of what the query should contain, showed the general query he was starting with that he wanted to convert, then walked through step by step how to switch the original query into a PIVOTed query. I highly recommend watching that video. I don’t even want to try to explain it in my own words because he did it so well.
In the end, this ended up being the query I wrote which is exactly what I needed to make the formatting of my queries match what was already in the spreadsheet from the business user.
SELECT
[State], [County], [2020], [2021], [2022], [2023], [2024]
FROM
(
	select [State], [County], YEAR, Sales
	from dbo.HistoricSales
) AS Src
PIVOT
(
	SUM(Sales)
	FOR [YEAR] IN ([2020], [2021], [2022], [2023], [2024])
) AS Pvt
order by [State], [County]
Summary
Writing a PIVOT query in SQL isn’t super difficult if you are given the right examples and instructions. I highly recommend checking out BeardedDev’s video that I linked above for learning how to write a PIVOT query the easy way. That video is what finally helped me understand that type of query after working with SQL for over 6 years and not being able to understand it.
To keep resources secure in the Azure cloud environment, there are usually multiple levels of security that must be cleared for someone to be able to access a resource. For Azure SQL Databases, for example, the user who is trying to access the database must have access granted for their user account on the database but they also need to be given access for their IP address through the network firewall rules for the server or database resource.
I usually only need to add or update a single user’s firewall rule at a time when our business users get their IP addressed updated sporadically, but I had a situation last week where I needed to add over 40 firewall rules to an Azure SQL Server resource for a new database I imported on the server. I did not want to manually add that many firewall rules one at a time through the Azure Portal because that sounded tedious, boring, and like too many mouse clicks, so I instead figured out how to do it the fastest way possible–running a T-SQL script directly on the server or database through SQL Server Management Studio (SSMS).
Note: This would also work through Azure Data Studio or your chosen SQL Server IDE, I simply prefer to use SSMS so use that as a reference in comparison to completing the same actions directly through the Azure
According to this Microsoft document, it should be possible to grant firewall rule access for a user to a single database on a logical Azure SQL Server resource. In my experience in Azure so far, we’ve only ever granted firewall access at the server level instead, since that is acceptable for our business use-cases. But since it’s possible to set the same firewall rules at the database level according to Microsoft, I added how to do that to this post, as well as the server-level rules which I will be creating for my use case.
T-SQL for Creating Firewall Rules
Did you know it was possible to create both database-level and server-level firewall rules for an Azure SQL Database through SSMS using T-SQL commands? I didn’t before I started this project request last week. Going forward, I will likely use the T-SQL route through SSMS when needing to make multiple firewall rules instead of using the Azure portal, to save myself time, effort, and mouse clicks.
Create a Server-Level Firewall Rule
To create new firewall rules at the server level, you can connect to your Azure SQL Server through SSMS and run the following command on the master database.
/* EXECUTE sp_set_firewall_rule N'<Rule Name>','<Start IP Address>','<End IP address>'; */
EXECUTE sp_set_firewall_rule N'Example DB Rule','0.0.0.4','0.0.0.4';
When you run that command, you are executing a built-in stored procedure that exists on the master database that will insert a new record for a server-level firewall rule into the table sys.firewall_rules, creating the server level firewall rule that will allow access through the specific IP address or IP address range. In the example above, I have the same value for both the Start IP Address and End IP Address parameters, but you can just as easily set that to a range of addresses, like 10.0.5.0 for the start and 10.0.5.255 as the end. I usually prefer to do that for a user’s IP address since our systems can change the last value fairly regularly, but since my current task was to grant access for servers, I set the start and end values to the same single IP address since I’m not expecting them to change frequently.
Create a Database-Level Firewall Rule
If instead of granting access to all databases on the server through a server-level firewall rule you would prefer to grant access to only a single database on your Azure SQL Server instance, you can do that as well. The T-SQL command to create a database-level firewall rule is the following. Notice how it’s very similar to the server-level command above, but with “database” specified in the stored procedure name.
/* EXECUTE sp_set_database_firewall_rule N'<Rule Name>','<Start IP Address>','<End IP address>'; */
EXECUTE sp_set_database_firewall_rule N'Example DB Rule','0.0.0.4','0.0.0.4';
The parameters that are required to run this database stored procedure are the same as what’s required for the server-level procedure, so you can either specify the same Start and End IP address values to allow access through a single address, or you can specify different values for the two to give access to a range of addresses. This procedure inserts records into the system table sys.database_firewall_rules on the database you ran the command on.
Speeding up the Creation of Execution Scripts
Knowing the above commands is helpful, and even works if you only have one or two firewall rules to add, but I promised I would tell you the fastest way possible to add 40+ firewall rules to a server, so how do I do that? How do I save myself the trouble of writing the above procedure execution commands 40+ times or copy/pasting/updating the line over and over again?
The trick I use is to generate my SQL queries in Excel, since Excel has the ability to concatenate strings and then to use the same formula across however many rows you have to generate the same concatenated string using multiple distinct values. I use this Excel trick quite frequently, whenever I need to generate the same type of SQL query/command multiple times based on specific values.
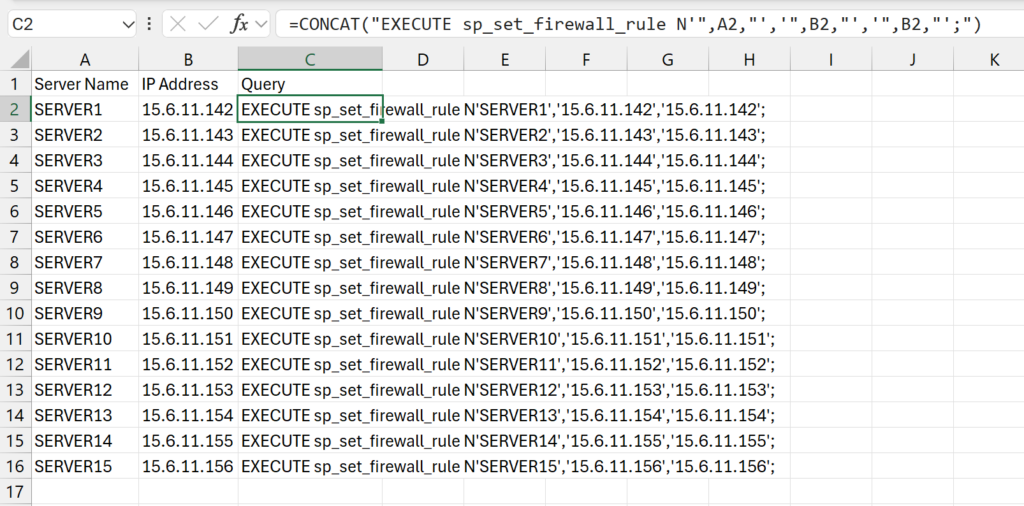
In this use case, I was provided a list of the names of the servers that needed inbound firewall access to my Azure SQL Database along with the IP addresses they would be using. I copied that information into two columns in Excel then wrote a formula in a third column to generate the SQL command that I needed to run to make a firewall rule for that particular server and IP address.
Here is an example of how I accomplish this type of task in Excel:
In Column A of the spreadsheet, I copied in the list of the server names I was provided. I am going to set the name of the firewall rule for each to the name of the server that is being given access. Column B then has the IP address that the server will be connecting through.
Note: all server names and IP addresses were made up for this example.
Then in Column C, I use the CONCAT function of Excel to generate the SQL query that I want, which I will then be able to copy to the database and execute to generate the firewall rule. The following is the full formula I used to generate the SQL command:
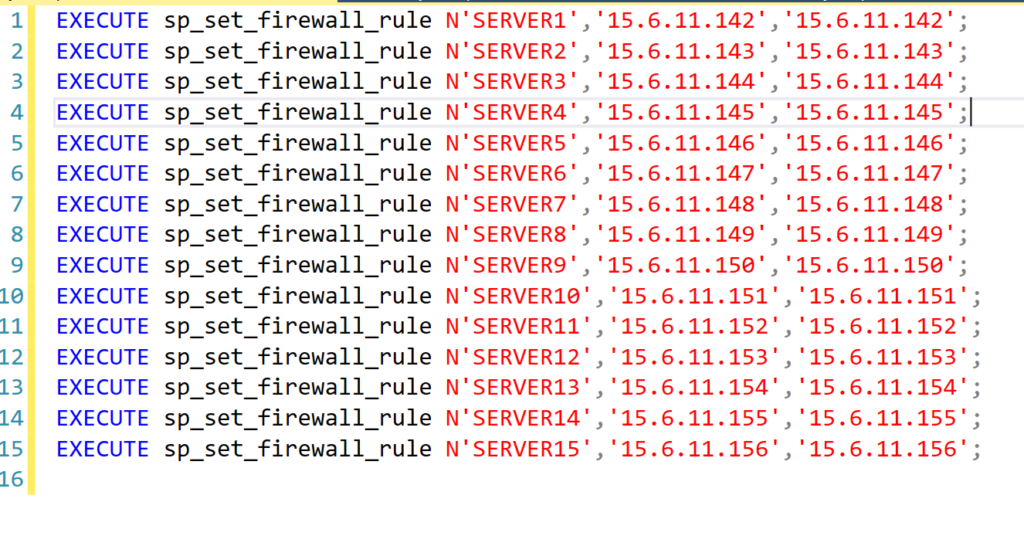
After I’ve successfully made the command as I want it for the first server in the list, I then copy that same formula down the column for every row to generate the same command for each server and IP address combination. Once all the queries have been created, I copy the entire Column C into an SSMS query window:
I then just have to click Execute and all the commands run, creating all the new firewall rules I needed in just a couple seconds. Believe me, this method of using Excel will save you a lot of time copying and pasting and updating IP addresses in the queries.
View existing Server-Level Firewall Rules Through SSMS
If you would like to review the list of server-level firewall rules that currently exist on your server, you can do so by running the following query on the master database of your Azure SQL Server instance.
select id, [name], start_ip_address, end_ip_address, create_date, modify_date
from sys.firewall_rules
order by id
This list will directly correspond to the list of values that you would see under “Networking” for your Azure SQL Server instance in the Azure portal.
View existing Database-Level Firewall Rules Through SSMS
If you would like to review the list of database-level firewall rules that currently exist on your database, you can do so by running the following query on the database you would like to see the firewall rules for.
select id, [name], start_ip_address, end_ip_address, create_date, modify_date
from sys.database_firewall_rules
As far as I am aware, there is no way to view this same list of details from the Azure portal, so this should be the source of truth for database-level firewall rules for an Azure SQL Database.
How to Delete Firewall Rules Through SSMS
Similarly to how there is a more efficient way to create multiple firewall rules through T-SQL queries in SSMS, you can also quickly delete a lot of firewall rules at once through SSMS using a delete procedure. I haven’t yet had to delete a large number of firewall rules at once, but you can follow the same process I outlined above for adding them, but use the deletion procedure instead.
Delete Server-Level Firewall Rules
The T-SQL command you can use to delete a specified server-level firewall rule through SSMS is:
EXEC sp_delete_firewall_rule N'SERVER1';
When deleting a rule, you only need to provide the name of the firewall rule you would like to delete.
Delete Database-Level Firewall Rules
The T-SQL command you can use to delete a specified database-level firewall rule through SSMS is:
EXEC sp_delete_database_firewall_rule N'SERVER1';
When deleting a rule, you only need to provide the name of the firewall rule you would like to delete.
Summary
In this post, I outlined the full process I used to generate 40+ server-level firewall rules on my Azure SQL Server instance as requested. Before starting on this task I had no idea that it was possible to generate these firewall rules through a T-SQL command in SSMS, I only knew about adding them through the Azure portal manually. But like every good programmer, I knew there had to be a better and faster way and I was correct. I hope this post helps save you a little time as well the next time you need to add more than a couple firewall rules to your server.
This is going to be a super quick post because I only want to share a short query that I’ve developed for myself to be able to see what schema-level permissions have been assigned to users on an Azure SQL Server. If you didn’t see my previous post about my least favorite things about Azure, you should check that out because it includes other queries I’ve been using to identify what permissions have been granted on a server or database.
The Query
My query I use for getting a list of all schema-level permissions on a database uses the sys.database_principals, sys.database_permissions, and sys.schemas views.
SELECT DISTINCT pr.principal_id, pr.[name], pr.[type_desc],
    pr.[authentication_type_desc], pe.[state_desc], pe.[permission_name], pe.class_desc, s.[name]
FROM sys.database_principals AS pr
INNER JOIN sys.database_permissions AS pe
    ON pe.grantee_principal_id = pr.principal_id
INNER JOIN sys.schemas as s
	on s.schema_id = pe.major_id
ORDER BY pr.name;
As you can see, the query is very short but it provides the most useful and relevant information for schema-level permissions on a database. It provides just enough information without being overly complicated or giving you more than you need. This query tells me what users have been given what type of permissions for every schema in my database.