If you’ve been following along in my series on using Bicep templates to deploy database-related resources in Azure, you may have seen my template for creating Azure SQL Servers and Databases on GitHub which contains a section for defining role assignments. I haven’t yet covered the specifics of that type of resource in a post, so I will be going over that today to simplify the information you need to know to assign particular Role-Based Access Control (RBAC) roles to resources you’re creating in Bicep templates. Because why would you want to manually add roles to a resource that you’re automatically deploying? (You don’t!)
What’s in this post
What the template does
The template I am pulling the role assignment section from creates an Azure SQL Server, Azure SQL Database, and then a Key Vault, and you can learn more about that in my previous post. What I didn’t cover previously though, is that in my actual use case, I need to then give my team admin rights on the Key Vault after it’s created so that we have the permissions needed to add secrets to the Key Vault.
The Full Template
If you would like to see the Bicep template I will be covering in today’s post in full, instead of piecing it together from this post, you can find it on my GitHub.
Assigning RBAC Roles to Resources with Bicep
The process of creating role assignments on Azure resources using Bicep templates is relatively simple. The only data you need to supply to create such role assignments are the Object ID of the group or user you want to assign the role to and the ID for the specific role you want to assign. The hardest part of that is to find the ID of the role assignment in the Azure portal.
Get the Object ID for the user or group
To get to the Object ID value for the user or group to which you want to assign a role, navigate to Entra ID in the Azure Portal, then search for and select the user or group from the dropdown list. When you open the user/group, you will find the Object ID value to copy into your template.
Finding the ID for the Role Assignment
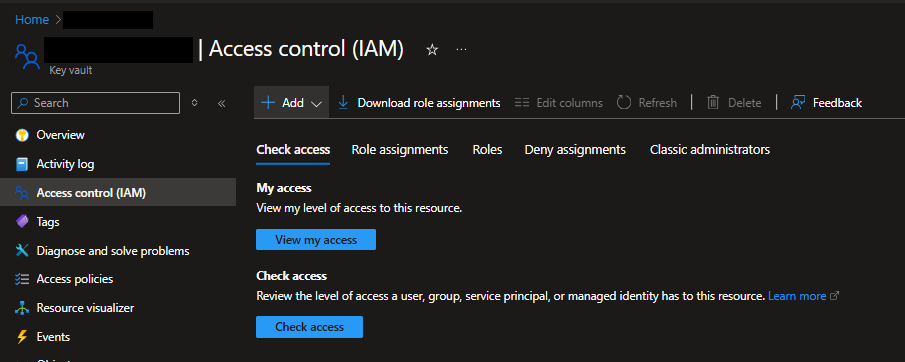
The easiest way to figure out the ID value of the role assignment you want to give to a user or group is to go to the type of resource that will get the assignment, in this case a Key Vault, go to the IAM page of the resource in the portal, and then view role assignments and view the JSON for the needed assignment. If you know of a better way, please let me know in the comments below!
First, navigate to an existing Key Vault in your Azure environment and go to the “Access control (IAM)” page.
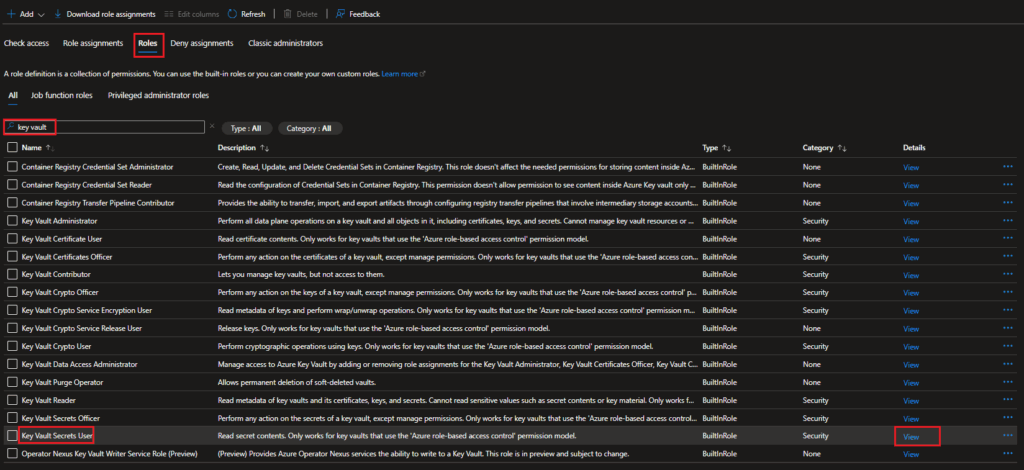
Then, click on the “Roles” tab. On that page, search for “key vault”, or whatever keyword will help you find the role you’re looking for. Once you’ve found the role you want to add through your Bicep template, click on the “View” link for the role under the “Details” column.
When you click on “View”, it will open another pane with details about the role. In that pane, select the “JSON” tab and then copy out the GUID value from the end of the string for “id” in the JSON description.
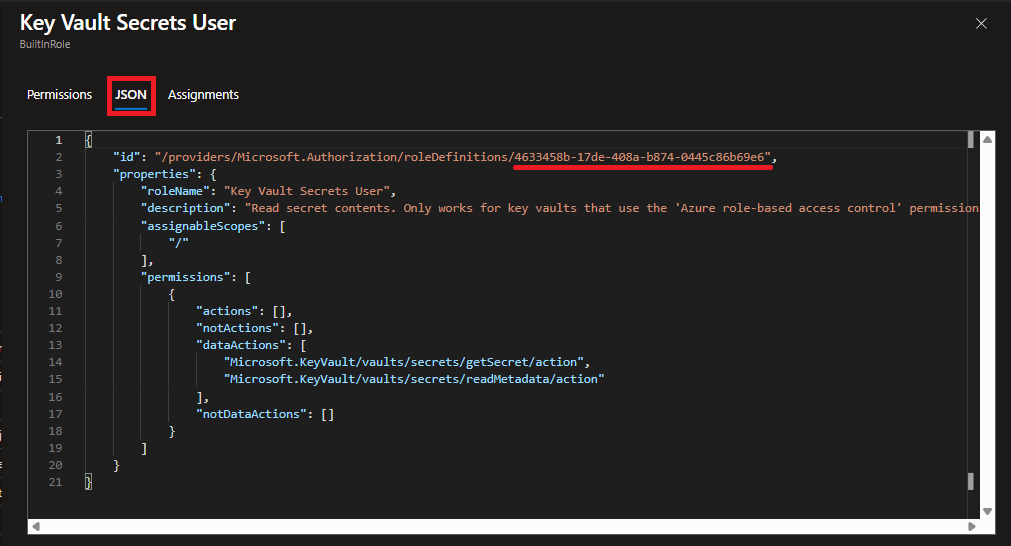
That is the value you will need to put into your template, so keep that handy.
Creating the roleAssignment resource
The short definition to assign a role to a user or group via Bicep is like the following:
var roleDefIDKVAdmin = '00482a5a-887f-4fb3-b363-3b7fe8e74483' /* The role ID for "Key Vault Administrator" */
var admin_entra_group = '0000-0000-0000-0000' /* Object ID for our Entra group */
var roleAssignmentName = guid(admin_entra_group, roleDefIDKVAdmin, resourceGroup().id)

resource roleAssignment 'Microsoft.Authorization/roleAssignments@2022-04-01'= {
  name: roleAssignmentName
  properties: {
    principalId: admin_entra_group
    roleDefinitionId:resourceId('Microsoft.Authorization/roleDefinitions', roleDefIDKVAdmin)
  }
}
Variables
I have 3 variables in my template that simplify the process of specifying the settings for the roleAssignment resource.
roleDefIDKVAdmin: The ID value I retrieved from the Azure Portal for the role I want to assignadmin_entra_group: The Object ID for the Entra group I am assigning the role toroleAssignmentName: A value I generate to give to the roleAssignment resource based on the other two variables. Important to note: the part “resourceGroup().id” is what ties the role assignment to the key vault, because I am granting the role assignment at the resource group level. If you want to apply the role assignment to a single resource, you would dosymbolicName.idinstead.
Resource definition
Once you have the 2 values retrieved as I specified above, you simply need to pass the variables into the correct locations of the resource definition. The name of the resource is given the name from variable roleAssignmentName. The principalID is the user or group the role should be given to, which is provided through variable admin_entra_group. And finally, the roleDefinitionID which we provide by using the resourceId function in Bicep, which retrieves the actual ID value for a role given the ID value we retrieved manually from the portal. We are required by Bicep formatting to use this function instead of simply passing in that value ourselves.
Summary
Once you retrieve the ID of the user or group you want to give a role assignment to, get the ID for the specific role assignment you want to give, then tie those together with the Bicep template, it’s very simple to set up the resource definition to assign that role to that group when the template deploys.