
Continuing on in my series about doing Infrastructure as Code (IaC) using Bicep templates in the Azure environment, today’s post will cover how to create an Azure SQL Server and Azure SQL Database with a deployable Bicep template. If you haven’t seen it yet, also check out my previous posts about creating an Infrastructure as a Service (IaaS) virtual machine with a Bicep template and using a Custom Script Extension with that type of template.
What’s in this post
- The Full Template
- What the template does
- How to know what configurations to choose
- Creating the template
- Summary
The Full Template
If you would like to see the Bicep template I will be covering in today’s post in full, instead of piecing it together from this post, you can find it on my GitHub.
What the template does
This template creates 3 different resources, which are the ones my team wants to spin up any time we have a new project of a certain type. The resources it creates are: Azure SQL Server, Azure SQL Database, and a Key Vault.
The Azure SQL Server and Azure SQL Database are the fully cloud, Platform as a Service (PaaS) resources for SQL Server. These resources make it very easy to create a new server and any number of databases on that server without having to manage the infrastructure yourself and to only pay for what you need to use.
The Key Vault is a resource type that allows you to store any secrets, certificates, or keys in a secure location which is accessible to other privileged resources in your subscription (like a pipeline executing code). This resource would be optional for others who are only looking to create the server and database, it’s just something I’ve included because I have it in my production template for my team.
In addition to those 3 resources, there are a few others created in my Bicep template that I will be covering in-depth in future posts to keep things shorter here, so you’ll only see those in my GitHub repo for now.
How to know what configurations to choose
When I first started writing this template, I had no idea what configuration values to choose. When looking at the Microsoft documentation for the resource type in Bicep, it seemed like there were endless possibilities for what I could choose to configure the resources. That was overwhelming to me at first. I then had the idea that I would compare the list of possible values in the documentation for the resource type to the settings of an existing resource with settings similar to what I wanted for my new machine.
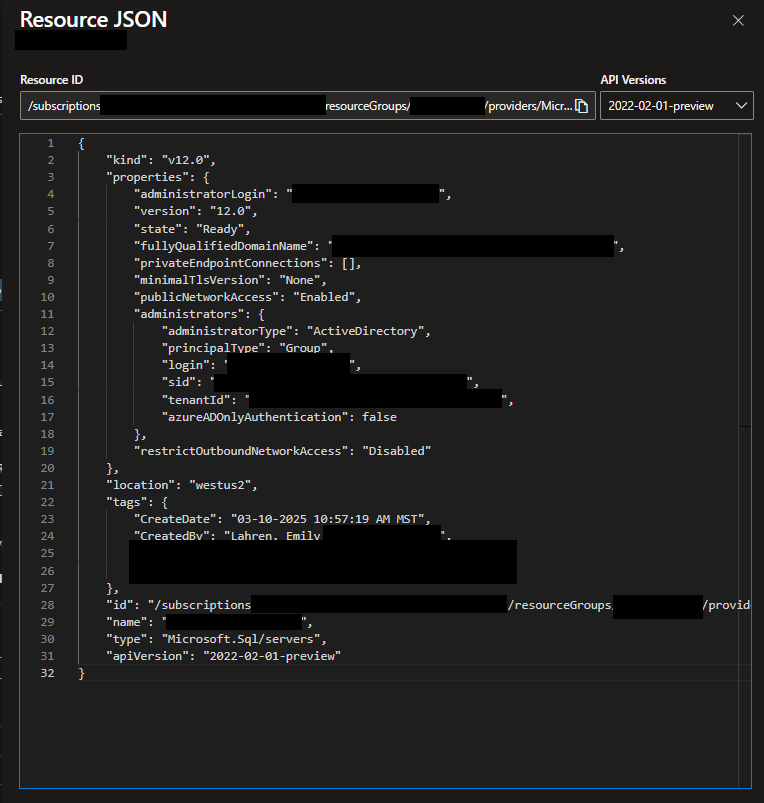
That effort originally started with me looking at the normal portal view of the resource, but I didn’t stick with that for long. I quickly realized that the portal view of settings doesn’t show a lot of values that I was looking for. But I figured out that you can view all the setup information for a given resource in the portal in a JSON format, which is very similar to the Bicep formatting I was needing. I believe this JSON document is likely what would be used by Azure Resource Manager (ARM) to create the same resource, which is why it’s available for every resource in the portal.
To view the JSON version of the resource settings, navigate to the resource in the portal, then near the top right corner of the Overview page, you will have a link to “JSON View”.

When you open that pane, you will see something like the following, with all pertinent details of the resource, which you can then use to help you create your Bicep template.
Creating the template
Parameters
When creating a new Bicep template, the first thing you’ll need to decide (apart from what specific resources you need to create) are what parameters you will need to input into the template, which will usually be fed in from a pipeline which deploys the template. For my template, I created the following parameters:
- serverName (string): The name you want to give to the Azure SQL Server that the template is going to deploy. You may want to add a
minLengthandmaxLengthsetting to this parameter is you are worried your template deployers are not going to choose names that are within the length requirements Azure requires. - databaseName (string): The name you want to give to the Azure SQL Database that the template is going to deploy. You may want to add a
minLengthandmaxLengthsetting to this parameter is you are worried your template deployers are not going to choose names that are within the length requirements Azure requires. - keyVaultName (string): The name you want to give to the Azure Key Vault that the template is going to deploy.
- location (string): The region you want the resources deployed in. If you are always going to want to use the same region, you can change this to a variable instead. I have set a default for this of “westus2”.
- saLoginName (string): The login name that you want to have created for the system admin (SA) user for the SQL Server. When you create an Azure SQL Server resource, you are required to provide an SA, so I am setting that value by passing it in as a parameter to the template at runtime.
- saLoginPassword (secure string): The password you want to give to the SA login the server will be created with.
Variables
For the three resources I’m discussing the creation of in this post, there are no variables needed.
Resource: Azure SQL Server
Once you have your parameters and variables defined for the template, the next step is to start defining the main resources you want to create. Depending on the settings and configurations you need for your own SQL Server, you may need to define this resource differently. In my template, I have the following definition for the Azure SQL Server resource:
resource sqlServer 'Microsoft.Sql/servers@2022-02-01-preview' = {
  name: serverName
  location: location
  properties:{
    administratorLogin:saLoginName
    administratorLoginPassword:saLoginPassword
    publicNetworkAccess:'Enabled'
    administrators:{
      administratorType:'ActiveDirectory'
      principalType:'Group'
      login:'our_entra_admin_group'
      sid:'0000000-0000-00000-000000-000-000000'
      tenantId:'0000000-0000-00000-000000-000-000000'
      azureADOnlyAuthentication:false
    }
    restrictOutboundNetworkAccess:'Disabled'
  }
}
For the name of the server, I pass in the parameter “serverName”. Then, under the properties object, I define the required elements of the resource, which are:
administratorLogin: set to the value of the parameter saLoginNameadministratorLoginPassword: set to the value of the parameter saLoginPasswordpublicNetworkAccess: I have set this to “enabled” so that we’re able to access this resource through the public internet, which is required for normal usage and adminstration of the server and databases after they’re created.adminstrators: This is a more complicated setting that is its own object. This “administrator” setting is the Microsoft Entra Admin for the server, which is essentially an Entra user or group that becomes the super user of the server with complete control to do whatever they want on the server and databases on it. I set this to an Entra group my team uses for ourselves by setting theprincipalTypeto “Group” and then giving the name of the group forlogin, and then the ID value and tenant ID for our group. You can find the “sid” value as the Object ID value for the group or user in Entra in the Azure Portal. And you can also find your Tenant ID through the portal as well.restrictOutboundNetworkAccess: I have set this to “disabled” because we want the server and databases on it to be able to send data outside of themselves so that we can use them like normal.
Resource: Azure SQL Database
Depending on the settings and configurations you need for your own SQL Database, you may need to define this resource differently. In my template, I have the following definition for the Azure SQL Database resource:
resource sqlDatabase 'Microsoft.Sql/servers/databases@2022-11-01-preview' = {
  parent:sqlServer
  name: databaseName
  location: location
  sku:{
    name:'GP_Gen5'
    tier:'GeneralPurpose'
    family:'Gen5'
    capacity:2
  }
  properties:{
    collation:'SQL_Latin1_General_CP1_CI_AS'
    maxSizeBytes:34359738368
    catalogCollation:'SQL_Latin1_General_CP1_CI_AS'
    zoneRedundant:false
    licenseType:'LicenseIncluded'
    readScale:'Disabled'
    requestedBackupStorageRedundancy:'Geo'
    isLedgerOn:false
    availabilityZone:'NoPreference'
  }
}
For a SQL Database resource definition in Bicep, it’s really important to specify the parent value so that Bicep and Azure Resource Manager (ARM) know what server the database should be deployed onto and that the server resource should be created before the database resource. For my template, I made sure to specify the “symbolic name” of the Azure SQL Server resource I created previously in the template, which is “sqlServer”. After specifying the parent, you will also need to specify the name of the resource, which I used a parameter for, and then the region the resource should be deployed in, which I also used a parameter for.
The next thing you’ll need to specify is the sku of the database, which is the type settings for the database which dictate price, performance, and storage. In this case, I have chosen to make a database in the General Purpose tier, which is a little cheaper, and then to give it 2 CPUs. I think the easiest way to find the specifications for this section is to review an existing resource in your environment and see what values it is set to, or refer to Microsoft documentation.
Once you’ve set up the sku information, you’ll then need to specify the general properties of the SQL Database through the properties object in the resource definition. For mine, I set the following:
collation: This is the standard collation type you want your database to be setup with. I have chosen the default for North America/US, which will use English and then be case-insensitive and accent-sensitive.maxSizeBytes: This is the number of bytes you want to be able to store in your database. That number I have set equates to 34 GB approximately, which I believe is the default.catalogCollation: Same as the normal collation listed abovezoneRedundant: I’ve chosen not to make my database zone redundant, because I want it to be as cheap as possible and won’t be severely impacted if the entire Availability Zone goes down.licenseType: I chose “LicenseIncluded” which means we will pay for the license and database as we use it, we don’t have an external license key to providereadScale: I elected to not have the database setup for scaling for readsrequestedBackupStorageRedundancy: I selected “Geo”, which means we will have some redundancy, but not much. This is the standard my team set for this type of scenario.isLedgerOn: I do not want this to be a ledger database so I’ve set this value to “false”.availabilityZone: I’ve set as “NoPreference”
Resource: Key Vault
While most of you probably aren’t here for learning how to create a Key Vault with a Bicep template, I thought I would include it just because I have it in my production template. As with every other type of resource, you may want to change the below definition to match your own needs.
resource keyVault 'Microsoft.KeyVault/vaults@2024-04-01-preview'= {
  name: keyVaultName
  location: location
  properties: {
    sku: {
      name: 'standard'
      family: 'A'
    }
    tenantId:'0000000-0000-00000-000000-000-000000'
    networkAcls: {
      bypass:'None'
      defaultAction:'Allow'
    }
    enabledForDeployment:false
    enabledForDiskEncryption:false
    enabledForTemplateDeployment:false
    enableSoftDelete:true
    softDeleteRetentionInDays:90
    enableRbacAuthorization:true
  }
}
Just like with the other resources defined above, I set the name of the resource and the region it should be deployed in using parameters. And similarly to the definition of the SQL Database resource, for the Key Vault definition I also needed to define a sku, which is the pricing model for the resource. I chose Standard, and I really don’t know what other options there may be since this is such a simple type of resource.
The tenantId value is the ID for my tenant resource, so the template knows where to deploy the Key Vault. For networkAcls, I chose to not setup any bypass and to “Allow” traffic by default. Then the rest of the values are ones that seem self-explanatory to me and I believe are set to the defaults for all Key Vaults.
Summary
Creating an Azure SQL Server and an Azure SQL Database through Bicep is a fairly quick and simple process, much simpler than defining an IaaS VM like in my previous posts. That is due to the fact that the SQL Server and SQL Database are both fully-cloud resources, they’re not something you are able to access the infrastructure for. Since Azure manages the infrastructure, it is much easier for them to create these resources from a template.