Have you been in a situation where you were working with the Azure CLI Bash terminal and then something went wrong with the image used to persist your data across sessions and your workspace seemingly got corrupted? I have had that happen to me recently, and I think it was because I updated my computer from Windows 10 to Windows 11, so Azure thought my computer changed and that corrupted the image.
I tried a couple of things to fix the situation so I could start working in the CLI space again to do my work, but I couldn’t fix the problems and errors I was getting. Then I set about figuring out how to clear the whole thing and start again. Thankfully, I only had two files on the virtual workspace, which I backed up on my local computer and in a repo anyway, so resetting the whole thing didn’t have negative effects for me. Continue reading to learn how I successfully reset my Azure CLI virtual workspace so I could get working again.
What’s in this post
When you might reset your workspace
Before updating my computer to Windows 11, I had been successfully reusing the same Azure cloud terminal virtual workspace for several weeks while learning to work with Bicep and testing a template repeatedly. I only encountered issues with the Azure CLI Bash terminal after the computer upgrade, and I am guessing it’s due to Azure considering my computer as a different machine after the update. I guessed that based on this StackOverflow answer which discusses how you cannot share virtual disks between different Virtual Machines (VMs) or else you can get corruption issues.
Even though that StackOverflow thread is referencing a disk issue for Virtual Machines and their disks, it seems like the same issue can happen when you try to use the same Azure account and its virtual CLI environment on two different computers, based on my experience. And this StackExchange answer says that a similar Linux error indicates a file system corruption.
I knew I had an issue when I used the Azure CLI Bash terminal for the first time with my updated computer. Immediately upon getting into that virtual environment and trying to check on my saved Bicep template there, I received the error:
azure cli cannot access 'main.bicep': Structure needs cleaningI tried deleting the file so I could recreate it but got the same error when trying to do that. It seemed like I was stuck and really just needed to restart the whole thing and try again. The StackExchange answer referenced above said to unmount the corrupted file system disk and run a Linux command, but I knew that I couldn’t do that for this virtual environment, so I needed to figure something else out to get things working again.
How I reset my Azure CLI Bash workspace
Note: Please be cautious when following these steps as what you’re about to do may not be possible to undo.
Since you are not able to manipulate the file system in the Azure CLI virtual environment and unmount a disk like you could if you got this error on your own machine, you have to fix the error above in another way.
Trying a simpler fix first
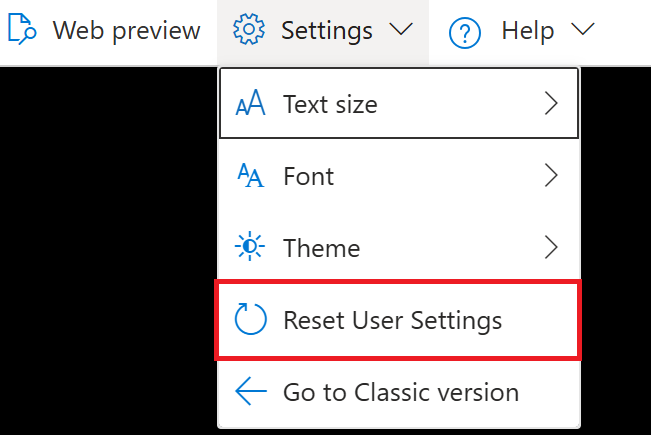
There is one way you may be able to fix your environment that is less harsh than what I had to do, which is to choose the option in the Cloud Shell in the Azure Portal to “Reset User Settings”. This action, according to the Microsoft documentation, deletes your data from the shell by terminating the current session and unmounting the linked storage account. To do this reset, select the dropdown in the Shell window in the portal for “Settings”, then click “Reset User Settings”.

After completing that step, you will need to start a new Cloud Shell/CLI session, which may or may not fix the error you are seeing. In my case, doing this step did not fix the issue because the actual issue was with the image being used to regenerate my virtual environment. Continue on to the next sections if you continue to have the same error after resetting your user settings.
Identify the Storage Account for your virtual environment
The first step in doing the full reset of your workspace after getting the above error is to identify the storage account your environment data is persisted to. In my case, it is in a storage account called “azcliemily” with a file share called “azcliemilyfs”. I’m not sure if I created this storage account a while ago and have just forgotten about that or if the system created one for me when I set up my CLI workspace for the first time. The naming for your storage account and file share is likely different.
The easiest way to determine where your files are stored for your CLI sessions is to open the Azure CLI from within the Azure portal.

When that opens, if you are here because you are having the same error I was, everything in the shell/CLI should already be set up for you and you should see something like this.

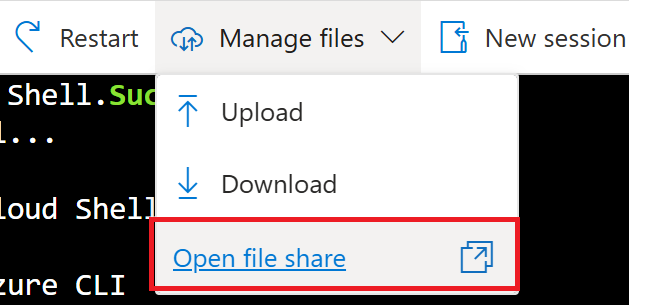
To view the file location for your workspace, click the dropdown for “Manage Files” at the top of the shell window, then select “Open file share” which will open a new tab.

The file share page will look something like this:

Delete the image file used for your virtual environment
Note: Please be cautious when following these steps as what you’re about to do may not be possible to undo.
If the above “Reset User Settings” step didn’t work, like it didn’t for me, you may need to completely delete the machine image that Azure has created and is using for your virtual environment in the CLI. The error I got seems to indicate that there is corruption within the disk, so the only way for me to get rid of the corruption and access my files again is to delete the disk image being used so Azure is forced to make a new one when I start my next session.
The consequence of proceeding with this method is that you will lose anything and everything that you had stored in your CLI virtual environment. For me, this was only two test files, but it could be a lot more for you.
If you are going to proceed with the following steps, please save off everything from your virtual environment that you don’t want to lose.Once you are sure you are ready to proceed at your own risk, navigate to the file share location we identified in the above section, then go into the folder “.cloudconsole”. In this folder, you will see a file with the type “.img”, which is a disk/machine image, the one that Azure uses to spin up disks on the backend for you when you open a new Cloud Shell/Terminal session. For my session, the file was named “acc_username.img”.

If you haven’t done so already, please first open a Cloud Shell in the portal and choose “Reset User Settings” before moving on to the next step so that this file share/storage account is unmounted from your Cloud Shell session.
Once you have done that reset, delete the .img file from the file share. This step may be irreversible so proceed with caution!
After you have deleted that image file, you can open a new terminal session with the Azure CLI or use the Cloud Shell from the Portal and then work through the normal steps of setting up a new virtual environment. When you choose to persist your files between sessions, Azure will create a new machine image to use to store those files, which should no longer have the corruption you were seeing previously.
Summary
If you run into what appears to be disk corruption issues with the Azure CLI virtual workspace, like if you are working with Bicep deployments or anything else through the CLI and are saving files between sessions, I highly recommend starting completely fresh with your environment if you can. It doesn’t take very long to do an entire reset of the virtual environment and it easily fixes errors that indicate disk corruption which occurred for whatever reason (like if you upgrade your computer’s OS so Azure thinks you’re trying to use the same session from two different computers).
Let me know in the comments below if this solution worked for you!

