Month: March 2025 (page 1 of 1)

How to Reset the Azure CLI Virtual Environment

Have you been in a situation where you were working with the Azure CLI Bash terminal and then something went wrong with the image used to persist your data across sessions and your workspace seemingly got corrupted? I have had that happen to me recently, and I think it was because I updated my computer from Windows 10 to Windows 11, so Azure thought my computer changed and that corrupted the image.

I tried a couple of things to fix the situation so I could start working in the CLI space again to do my work, but I couldn’t fix the problems and errors I was getting. Then I set about figuring out how to clear the whole thing and start again. Thankfully, I only had two files on the virtual workspace, which I backed up on my local computer and in a repo anyway, so resetting the whole thing didn’t have negative effects for me. Continue reading to learn how I successfully reset my Azure CLI virtual workspace so I could get working again.

What’s in this post

When you might reset your workspace

Before updating my computer to Windows 11, I had been successfully reusing the same Azure cloud terminal virtual workspace for several weeks while learning to work with Bicep and testing a template repeatedly. I only encountered issues with the Azure CLI Bash terminal after the computer upgrade, and I am guessing it’s due to Azure considering my computer as a different machine after the update. I guessed that based on this StackOverflow answer which discusses how you cannot share virtual disks between different Virtual Machines (VMs) or else you can get corruption issues.

Even though that StackOverflow thread is referencing a disk issue for Virtual Machines and their disks, it seems like the same issue can happen when you try to use the same Azure account and its virtual CLI environment on two different computers, based on my experience. And this StackExchange answer says that a similar Linux error indicates a file system corruption.

I knew I had an issue when I used the Azure CLI Bash terminal for the first time with my updated computer. Immediately upon getting into that virtual environment and trying to check on my saved Bicep template there, I received the error:

azure cli cannot access 'main.bicep': Structure needs cleaning

I tried deleting the file so I could recreate it but got the same error when trying to do that. It seemed like I was stuck and really just needed to restart the whole thing and try again. The StackExchange answer referenced above said to unmount the corrupted file system disk and run a Linux command, but I knew that I couldn’t do that for this virtual environment, so I needed to figure something else out to get things working again.

How I reset my Azure CLI Bash workspace

Note: Please be cautious when following these steps as what you’re about to do may not be possible to undo.

Since you are not able to manipulate the file system in the Azure CLI virtual environment and unmount a disk like you could if you got this error on your own machine, you have to fix the error above in another way.

Trying a simpler fix first

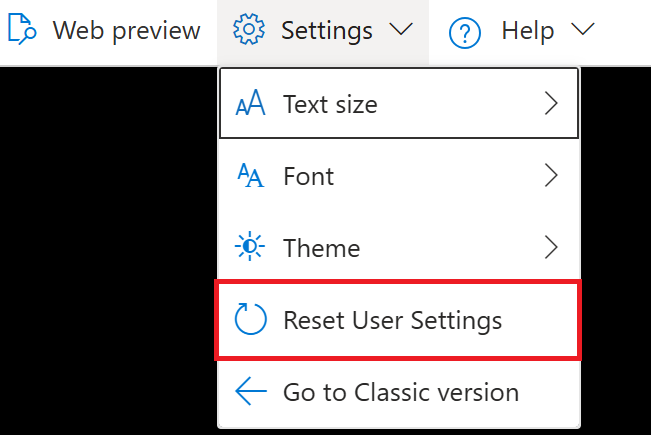
There is one way you may be able to fix your environment that is less harsh than what I had to do, which is to choose the option in the Cloud Shell in the Azure Portal to “Reset User Settings”. This action, according to the Microsoft documentation, deletes your data from the shell by terminating the current session and unmounting the linked storage account. To do this reset, select the dropdown in the Shell window in the portal for “Settings”, then click “Reset User Settings”.

Select “Reset User Settings” from the “Settings” menu in the Azure CLI in the Portal

After completing that step, you will need to start a new Cloud Shell/CLI session, which may or may not fix the error you are seeing. In my case, doing this step did not fix the issue because the actual issue was with the image being used to regenerate my virtual environment. Continue on to the next sections if you continue to have the same error after resetting your user settings.

Identify the Storage Account for your virtual environment

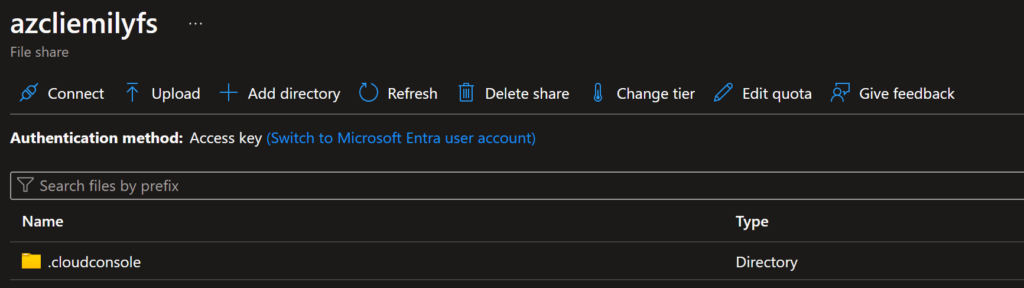
The first step in doing the full reset of your workspace after getting the above error is to identify the storage account your environment data is persisted to. In my case, it is in a storage account called “azcliemily” with a file share called “azcliemilyfs”. I’m not sure if I created this storage account a while ago and have just forgotten about that or if the system created one for me when I set up my CLI workspace for the first time. The naming for your storage account and file share is likely different.

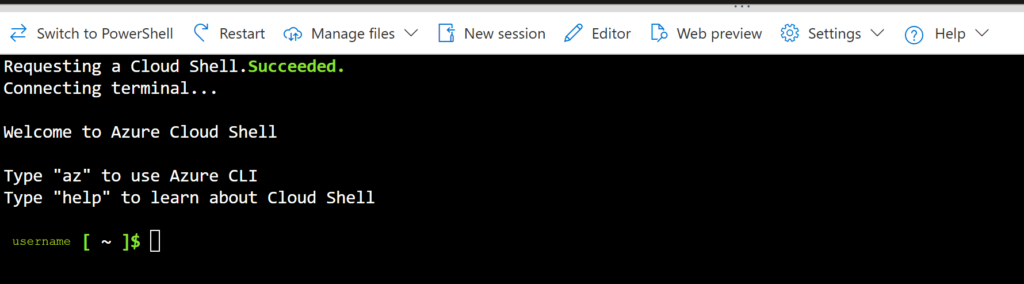
The easiest way to determine where your files are stored for your CLI sessions is to open the Azure CLI from within the Azure portal.

To get to the CLI from within the Azure Portal, click on the “terminal” looking icon in the top right menu of the screen

When that opens, if you are here because you are having the same error I was, everything in the shell/CLI should already be set up for you and you should see something like this.

When you open the CLI terminal in the Portal, you should see something like this when it first starts up

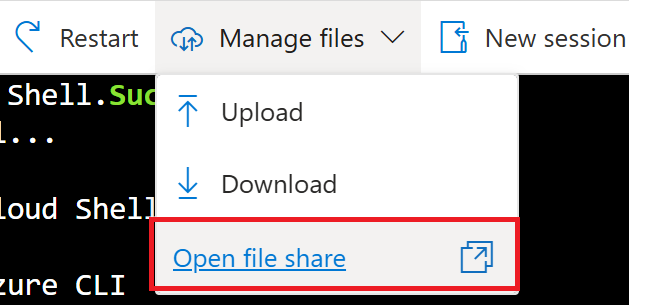
To view the file location for your workspace, click the dropdown for “Manage Files” at the top of the shell window, then select “Open file share” which will open a new tab.

You can access the file share where the files for the session are stored by opening the dropdown for “Manage Files” and then choosing “Open file share”

The file share page will look something like this:

The file share that Azure uses to persist your CLI virtual environment between sessions should look something like this.

Delete the image file used for your virtual environment

Note: Please be cautious when following these steps as what you’re about to do may not be possible to undo.

If the above “Reset User Settings” step didn’t work, like it didn’t for me, you may need to completely delete the machine image that Azure has created and is using for your virtual environment in the CLI. The error I got seems to indicate that there is corruption within the disk, so the only way for me to get rid of the corruption and access my files again is to delete the disk image being used so Azure is forced to make a new one when I start my next session.

The consequence of proceeding with this method is that you will lose anything and everything that you had stored in your CLI virtual environment. For me, this was only two test files, but it could be a lot more for you.

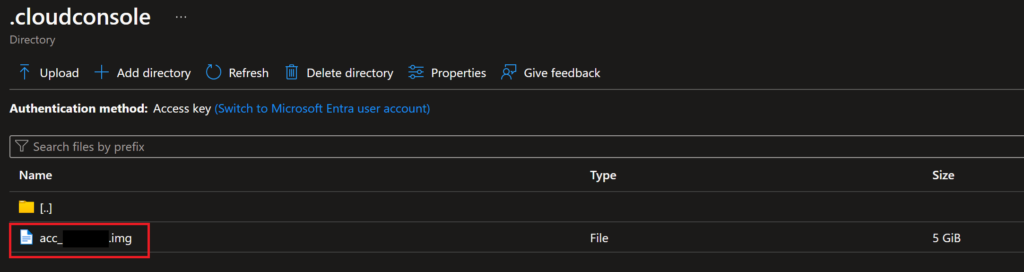
If you are going to proceed with the following steps, please save off everything from your virtual environment that you don’t want to lose.

Once you are sure you are ready to proceed at your own risk, navigate to the file share location we identified in the above section, then go into the folder “.cloudconsole”. In this folder, you will see a file with the type “.img”, which is a disk/machine image, the one that Azure uses to spin up disks on the backend for you when you open a new Cloud Shell/Terminal session. For my session, the file was named “acc_username.img”.

Opening the folder “.cloudconsole” in your file share should show you a file with the type “.img”, which is the machine image for your environment

If you haven’t done so already, please first open a Cloud Shell in the portal and choose “Reset User Settings” before moving on to the next step so that this file share/storage account is unmounted from your Cloud Shell session.

Once you have done that reset, delete the .img file from the file share. This step may be irreversible so proceed with caution!

After you have deleted that image file, you can open a new terminal session with the Azure CLI or use the Cloud Shell from the Portal and then work through the normal steps of setting up a new virtual environment. When you choose to persist your files between sessions, Azure will create a new machine image to use to store those files, which should no longer have the corruption you were seeing previously.

Summary

If you run into what appears to be disk corruption issues with the Azure CLI virtual workspace, like if you are working with Bicep deployments or anything else through the CLI and are saving files between sessions, I highly recommend starting completely fresh with your environment if you can. It doesn’t take very long to do an entire reset of the virtual environment and it easily fixes errors that indicate disk corruption which occurred for whatever reason (like if you upgrade your computer’s OS so Azure thinks you’re trying to use the same session from two different computers).

Let me know in the comments below if this solution worked for you!

Related Posts

Deploying A DACPAC to Azure SQL Server

One of the easiest ways to duplicate SQL Server database objects from one database to another–such as in a situation where you want to copy the structure of a production database down to a development database to help with testing and development–is to create a file called a DACPAC from the database you want to copy. With SQL Server, there are two ways to copy a database without creating and restoring a full database backup: 1) Create a full copy of the database structure and data by exporting to a BACPAC file, or 2) Create a copy of only the database structure by exporting to a DACPAC file.

This post will cover how you can import a previously generated DACPAC file onto an Azure SQL Database to duplicate the structure of another database with little effort on your part. It specifically covers copying an existing Azure SQL Database to another Azure SQL Database. This process may work with on-prem or managed instances of SQL Server, but I haven’t tested that yet.

What’s in this post

Prerequisites

  • Have SSMS available to use
  • Have an existing Azure SQL Database ready to copy
  • Have an Azure SQL Server or Database to load the DACPAC to

Note: The source and target databases can be on the same Azure SQL Server or on different ones.

What are DACPACs and BACPACS?

There have already been many blog posts written on the subject of the difference between DACPACs and BACPACs, so I will refrain from trying to duplicate that information. Essentially, a DACPAC is an export of the schema/structure of a database, including the database users and logins. A BACPAC is similar to the DACPAC except that it contains the data from the database as well. If you would like more detailed information about both of these types of files, I recommend reading this post from SQLShack.

Then if you’re like me and are now wondering what the difference is between a BACPAC file and a full database backup (BAK file), I found this resource on SQL Server Central that explained the difference well.

Why use a DACPAC?

As I mentioned in the introduction above, the primary use case for making and importing a DACPAC file of your database is to quickly copy all database objects–including tables, procedures, functions, and even users–to a new version of the database, such as when trying to create a new dev version of an existing production database. That was my exact use case and what triggered me to write this post. I got tired of manually copying tables, procedures, and functions from one database to another whenever we needed a new version of a database.

How to Create a DACPAC File

When you have a source database that you would like to copy over to a new database, without the data, you should create a DACPAC from SQL Server using a “Task” on the database. To do this, right-click on the database name in the Object Explorer, select “Tasks” then select “Extract Data-Tier Application”. This will open a wizard for you to create a DACPAC file of the selected database.

Screenshot of the context menu where you can select to Extract Data-tier Application for a database
Choose to “Extract Data-tier Application” from the context menu of the Database in the Object Explorer

If instead, you click on “Export Data-Tier Application”, you will be brought to a wizard for creating a BACPAC file, which is not what we intend to do during this process, so make sure you choose the option to Extract a data-tier application.

After selecting that option, you will see a screen like the following. Review the introduction page and make sure it refers to creating a DAC package (see screenshot below, underlined in red) and not a BAC package.

Screenshot of the "Extract Data-tier Application" wizard in SSMS
The introduction page of the “Extract Data-tier Application” wizard, confirm that it is going to extract to a DAC package, not a BACPAC.

Step through the wizard, provide a name for the “Application” (database name), and choose where you want the file to be downloaded to on your local machine.

Screenshot of the setup screen of the "Extract Data-Tier Application" wizard in SSMS.
The DACPAC extraction properties page of the “Extract Data-tier Application” wizard

Once you have reviewed the settings for your file, click “Next” until the creation process starts. Once that has been completed, you will have successfully created a DACPAC file which is stored in the location that you chose.

Using a DACPAC to Format an Azure SQL Database

There are two different ways that you can deploy a DACPAC to an Azure SQL Server. The first way is to deploy the DACPAC to create a database, the second is to update an existing database with the DACPAC.

Overview of the Steps

  • Choose whether you want to create a new database with the DACPAC or update/format an existing database
  • If choosing to create a new database:
    • Right-click on the “Databases” folder in the Object Explorer of SSMS, choose “Deploy Data-tier Application”
    • Specify the DACPAC you want to use and the name of the database you want to create
    • Run the wizard which will create a database with default settings
  • If choosing to use an existing database, whether blank or already in use:
    • Right-click on the database, select “Tasks” then “Upgrade Data-tier application”
    • Specify the DACPAC file you want to use
    • Review the changes the wizard identifies between the DACPAC and the target database
    • Run the wizard which will update the target database with all changes necessary from the DACPAC

Deploying a New Azure SQL Database using a DACPAC

If you want to make your new Azure SQL Database on an existing Azure SQL Server and don’t want to do that through the portal, you can create a new database on the server by “deploying” a DACPAC to create a new database.

The main downside to this method of using a DACPAC is that the database will be created with the default setup, which for me is a General Purpose standard database with 2 vCores. That level of database may be pricy for some people, or it could be underperforming for others, depending on your needs. Due to that downside, that is not the method I chose to use my DACPAC with, but I still researched it so I could understand both ways. If you want to know how I used a DACPAC, skip down to the section for “upgrading” with a DACPAC below.

Deploying a Data-Tier Application

To create a new database from a DACPAC, you first need to connect to your target server through SSMS in the Object Explorer. Once you have connected, right-click on the “Databases” folder and choose “Deploy Data-Tier Application” from the list.

Screenshot of the context menu where you can choose to "Deploy Data-tier Application" for a server
Choose to “Deploy Data-tier Application” from the context menu of the Databases folder in the Object Explorer of SSMS

This will open a wizard that is very similar to the one for “upgrading” a data-tier application (discussed below). On the overview page of the wizard, you can confirm that you are going to deploy a DACPAC and not a BACPAC.

Screenshot of the introduction screen of the "Deploy Data-Tier Application" wizard in SSMS.
The introduction page of the “Deploy Data-tier Application” wizard

The first thing you will need to do in this wizard is to choose the DACPAC file you previously created.

Screenshot of the "Deploy Data-tier Application" wizard on the page where you choose the DACPAC you want to deploy
The page of the “Deploy Data-tier Application” wizard where you choose the DACPAC file you want to deploy from

Click Next to move to the following page, where you will choose the name of the database you will deploy.

Screenshot of the "Deploy Data-tier Application" wizard on the page where you choose the the name of the new database you want to deploy
The page of the “Deploy Data-tier Application” wizard where you choose the name of the new database you want to deploy from the DACPAC

Click Next to move to the Summary page and review the process that the wizard is about to execute to ensure everything is set the way you want. Click Next again to deploy the DACPAC and create a new database from that file.

Once that process completes, you can close the wizard and then check on your database through the Object Explorer to see that you now have a new database with the same objects as the source database. At this point, you will also be able to see the newly created database in the Azure Portal under that SQL Server, where you can make any changes you would like to the default setup chosen by the deployment.

Updating or Formatting an Existing Azure SQL Database with a DACPAC

This method of “updating” an existing Azure SQL Database is helpful if you already have a database that you want to align with another, or if you have already created a blank database meeting your standards that you want to quickly deploy database objects to. In the previous section, the method of “Deploy a Data-Tier Application” creates a new database from the specified DACPAC, but that database is created with the default Azure SQL Database settings, which is “General Purpose: Standard-series (Gen5), 2 vCores”. That database setup is estimated to cost (in our setup) $373 per month.

If that default setup for a database doesn’t work for you or you don’t want to fix that after the database has been created, you can use this second method of “upgrading” your existing database with the DACPAC. Before you can complete this method, you first need to create a blank database on your Azure SQL Server, through whichever method you prefer. Or use any other existing Azure SQL Database that you are fine with overwriting with the DACPAC.

Upgrading a Data-Tier Application

Connect to your target database in SSMS through the Object Explorer. When you are ready to import the source database objects onto this new database, right-click on the empty database then select “Tasks” then “Upgrade Data-tier Application”.

Screenshot of the context menu in SSMS where you can choose to "Upgrade Data-tier Application"
Choose to “Upgrade Data-tier Application” from the context menu of the existing database you want to deploy the DACPAC to

This will open another wizard that will walk you through the process of “upgrading” your chosen database with the DAC package of another database.

Screenshot of the "Upgrade Data-tier Application" wizard on the introduction page.
The introduction page of the “Upgrade Data-tier Application” wizard

On the second page of the wizard, you will be prompted to select the DAC package you would like to use for the upgrade. Browse to the DACPAC file you created earlier, then click Next.

Screenshot of the "Upgrade Data-tier Application" wizard on the page where you choose the DACPAC you want to deploy.
The page of the “Upgrade Data-tier Application” wizard where you choose the DACPAC file you want to deploy to the database

After you click Next, the system will start detecting changes between the target database and the DACPAC you selected, which may take a few minutes.

Screenshot of the "Upgrade Data-tier Application" wizard on the page where you have the wizard detect changes between the DACPAC and the target database.
The page of the “Upgrade Data-tier Application” wizard where the wizard checks for differences between the DACPAC and the target database

If you have already imported the DACPAC before or have anything on your target database that is different from the source, you will receive a warning like this:

Screenshot of the "Upgrade Data-tier Application" wizard on the page where you must specify that you want to proceed with the upgrade despite possible data loss.
The page of the “Upgrade Data-tier Application” wizard where you confirm that you are okay with proceeding despite the risk of data loss from deploying the DACPAC

I got that warning because I had already imported the DACPAC so I no longer had a blank database. In this situation, you are required to check the box that you’re okay with overwriting the existing structure by continuing. If it’s your first time attempting to import the DACPAC onto a blank database, you should instead receive a green check box on this page.

On the next page, choose whether or not you want to roll back in the event of a failure during the “upgrade”. I chose to not have it roll back since this was going to be a new dev database that I could tweak, fix, or simply recreate if something went wrong. You may want to choose differently.

Screenshot of the "Upgrade Data-tier Application" wizard on the page where you choose rollback options.
The page of the “Upgrade Data-tier Application” wizard where you choose the rollback option you want the wizard to use when deploying the DACPAC

The final step will be for the system and you to review the “upgrade” plan. You will see a list of all changes that will be applied to the database on the “Review Upgrade Plan” page. If you’re happy with the proposed list of changes, click Next until the upgrade process starts and the DACPAC gets applied. Once that process completes, you can close the wizard and then check on your database through the Object Explorer to see that you now have database objects deployed to the database that you didn’t before.

Screenshot of the "Upgrade Data-tier Application" wizard on the page where you review the differences between the DACPAC and the target database that have been identified.
The page of the “Upgrade Data-tier Application” wizard where you review all the changes that will be applied based on the DACPAC

Can’t I just import the DACPAC from the Azure Portal?

This was the first thing I tried when trying to import my DACPAC into an Azure SQL Server. I uploaded my DACPAC file to a storage account, then clicked “Import” on the SQL Server page in the Portal. This started a new deployment where the SQL Database was created but then the deployment of the DACPAC to the database failed so I was left with an empty database on my server. The error I received when the deployment failed was related to not specifying a BACPAC file for the import process, so it expects that file type instead of a DACPAC.

If you can figure out how to import a new database to a SQL Server using the Portal, I would love to hear about it in the comments below.

Summary

If you, like me, were confused about how you could import a DACPAC file into a database on an Azure SQL Server (because the Microsoft documentation for this isn’t great), I hope these instructions help you with your import. It is as simple as creating the DACPAC file and then using a wizard to “upgrade” or “deploy” your database using the DACPAC.

Related Posts

A Fun SQL Function — QUOTENAME()

I have a short post today because I’ve gotten a little behind on my editing and want to get something out today. This week, I learned about the most useful little string function available in SQL Server that I wish I had known about previously. The function is QUOTENAME()which isn’t the most intuitive name for a function.

What’s in this post

Overview of QUOTENAME()

What the function QUOTENAME() does is put delimiters around a string, which is especially useful for certain columns in your queries. Where this comes in handy are scenarios where you are going to use the outputs of your SQL queries in other future queries, so having the strings delimited to meet SQL Server standards is essential.

For example, say you want to generate a list of the tables in your database and then you are going to use that list of table names in another query, so you would like the table names to be surrounded with square brackets–a SQL Server best practice. Instead of manually adding the brackets yourself, which I have done too many times to count, you can use the QUOTENAME() function that will do it for you. This function will also let you specify other delimiters, like parentheses, if you would like that instead. There are other delimiters you are allowed to specify, more than I was expecting, so check out the W3Schools page on the function for more details.

Demo of the function

Here is a demonstration of the function being used on the [name] column of the sys.tables table.

SELECT [name]
	,QUOTENAME([name]) AS DelimitedName
	,QUOTENAME([name], '()') AS ParenthesesName
FROM sys.tables;
Screenshot showing a SQL query using SSMS with the default settings and with specifying parentheses as the delimiter.
This screenshot shows two uses of the QUOTENAME() function: one with the default setting of square brackets and one specifying the parentheses.

In the example above, I have displayed the normal [name] column from the table and then used the same QUOTENAME() function two different ways. The first usage of the function only inputs the column that I want to be delimited, which then gets the default delimiter of square brackets. If you, however, would like to use a different delimiter, like parentheses, you can specify that as the second parameter to the function. In my testing, you can specify QUOTENAME(column, '('), QUOTENAME(column, ')'), or QUOTENAME(column, '()') and they all give you the same parentheses delimiting.

Summary

If you often find yourself manually putting bracket delimiters around values you retrieve from SQL Server with queries, please consider using the QUOTENAME() function in the future instead to save yourself time and manual effort. I know I will for sure be using this now.

Related Posts

Moving Data Between Azure SQL Databases–the Fast Way

I have done more database creation in the past couple weeks than I had done in the previous year combined, all because my team is working on making several different AI chat bots for our business users and we are being very agile about our development process. At first we had separate Azure SQL Databases for each chat bot to use for its backend, but then I decided it would be more prudent, cost effective, and easier to manage if we combined the three related bots into a single database. This meant that I needed to move data from three disparate databases into one single database, and I wanted to do it easily without any extra tools.

How I decided to move the data between the databases was to quickly export to a flat file then import that flat file onto the new database–since I only had a few hundred rows to move from each source database. As far as I am aware, this should work with all modern types of SQL Server (on-prem, IaaS, Azure SQL Database). Read on to learn how to follow the same process I did.

What’s in this post

Exporting the data from the source

On your source database in SSMS, run a SELECT query to retrieve all the data you want to copy over to your target database. Once you have your result set, select all records, right-click on them, then choose “Save Results As…” from the menu.

Screenshot showing the "Save Results As" option when right-clicking on the results of a query in SSMS
You can export your query results using “Save Results As…” from the right-click dialog

That will open the normal “Save As” dialog, and you can choose where to save your results. Save the file to your computer.

Once the file has been saved, I recommend opening the CSV using Notepad++ or similar tool to review the formatting of the data. There were a few times when I went through this process that the columns names did not get exported to the flat file, and instead the columns were generically named “Column1”, “Column2”, and so on (see final screenshot below for what this would look like when trying to import). Chances are that you won’t run into this issue, but it doesn’t hurt to check. If for some reason your file doesn’t have the correct column names that you expect, simply export the query results to a file again and it should fix the issue.

Importing the data to the target

To import the data onto your target database, connect to it in SSMS as well, right-click on the database name in the Object Explorer, then choose “Tasks” > “Import Flat File”. This will open a wizard to help you import the data.

Screenshot showing where to navigate to in the database menu to import a flat file
Import a flat file using the Task “Import Flat File”, which will open a wizard tool for you

In the dialog that opens, browse to the file that you previously exported from the other database. Once you select that file, a table name is generated that the data will be imported to. You can change the name of that table if you wish. Also, choose the schema that table will go into. This process creates a new table from the imported data, so make sure you don’t use an existing table name.

Screenshot of the Import Flat File wizard where you specify the file you want to import and the table you want to load the data to
Specify the CSV file you created during the export process and the name of the new table you want to load the data into

Click “Next” to move to the next page, where you can preview the data that will be imported. If the data looks good to you, click “Next” to move to the “Modify Columns” page where you can change some settings on the table columns if you would like. I chose to “Allow Nulls” for all columns, just to make things easier for myself in this import process. I plan on deleting this table after I copy the data from it into the final target table, so it doesn’t matter to me if every column allows nulls.

Screenshot of the Import Flat File wizard showing the screen where you can modify the columns of the new table you are going to create during import
This screenshot shows you what can happen if the export process goes a little wonky–the column names from the source may not be put into the CSV file and thus only show as generic names in the Import wizard. From this menu, though, you can modify the properties of the columns in the new table that is going to be created for the import.

Keep clicking “Next” to move through the rest of the pages, review the process before you opt to import, then import the data. Once the import wizard has completed its work, you will now have a new table in your database, essentially a staging table.

To get the data from your staging table into the final target table in your database, you can use an INSERT INTO tablename SELECT... query. This step also allows you to modify the data before moving it into the target table if you need to. In my case, I needed to add an extra column to the data that the source table didn’t have but the target requires, so I hard-coded the value for that column into my SELECT statement so it would be added to the final table.

Cleanup

After you have moved your data into its final destination, make sure to clean up the temporary new table that you created during the import wizard process, to keep things as neat as possible in your database.

Summary

Using this method to copy data between two Azure SQL Databases may be considered a bit lazy, but I truly think it’s the most efficient way to get data from point A to point B. Sure, I could have made a pipeline or used some other system to move the data around, but I only had a few hundred records to copy over so this method worked great for me. Let me know if this method saved you time as well!

Related Posts