Month: February 2025 (page 1 of 1)

Azure Storage Explorer for Moving Files

Once again I am sharing a quick tip that will potentially speed up your work process, this time by using Azure Storage Explorer for moving database backup files between servers. This process saved me so much time this past weekend while completing a server migration, which is why I wanted to cover it with a quick post.

What’s in this post

What is Azure Storage Explorer?

Azure Storage Explorer is a desktop application that helps you manage your Azure Blob Storage and Azure Data Lake storage. Before this past weekend, the only purpose that I had used it for was to propagate Access Control Lists (ACLs) for storage accounts, which is also a very helpful task it can accomplish. However, what I want to focus on for this post is how you can also use this tool to very quickly transfer files between servers, as long as those servers have access to the internet.

Moving files with Azure Storage Explorer

If you are ever in a situation where you are migrating a database from one server to another using the backup/restore method, and that backup file is very large even after being compressed, you may want to try this method of moving the file between your servers. This of course only works if you use Azure as your cloud provider.

With previous database migrations, I tried different methods of moving my file between the servers, and even have an old post discussing this. But this past weekend, I was doing the production migration for a database and the file was larger than previous ones I had moved between servers, even after creating the backup in a compressed format. My first transfer method that I tried was to drop the file onto a network drive and then copy it to the destination server from that share drive on the destination server. While that worked, it was pretty slow, taking about 30 minutes to complete. That would have been… fine… if I hadn’t run into issues with the backup which forced me to generate a new backup file that needed to be copied over as well. Since I didn’t want to force the rest of the upgrade team to wait for that again, I started trying a new method.

While that slow copy was in progress, I quickly download Azure Storage Explorer (ASE) onto the source server and uploaded my backup file to a storage account in our Azure subscription. And to my surprise, the upload of the 15 GB file took just about a minute or two if I recall correctly. No matter what specific amount of time it took, using ASE was significantly faster, and it didn’t cause a browser memory issue like when I attempted to upload the same file to the same storage account manually through the Azure portal. Because for some reason, even though I got the manual upload to a storage account to work in the past, I have now been having issues with my browser, both Chrome and Firefox, crashing out part way through the upload. So this new, faster transfer method is a huge win for me!

Then I also quickly downloaded and installed ASE onto the target server, and the download of the file from the storage account through the application was just as fast as the upload was. I had my database backup copied over to the new server in the same amount of time that the progress of the network drive copy only reached 20% done. So I gratefully cancelled that copy process. I was happy about the speed of ASE and I am sure my colleagues were happy they didn’t have to wait on the database part of the upgrade even longer.

Why is this so much faster?

Given how much faster the upload and download for my file went using Azure Storage Explorer compared to every other method, I really want to know how it manages to achieve that. Unfortunately, it seems that the information about why and how it manages to be so fast is limited. Part of the speed obviously came from our own network speed, but some of it certainly comes from something special with the tool since trying to upload manually through the portal proved to be super slow, and would then crash out in the browser.

From the few resources I’ve found online (listed in the References section below), it seems that the performance of ASE comes from how it uses the azcopy tool to speed up and also parallelize the file transfers and use multiple cores from the host machine to do so. Whatever makes it work so quickly, I am very happy that it exists and will likely be using this method of copying files between servers going forward. Downloading and installing ASE, then using it to upload and download files, is still much faster than trying to move big files any other way.

Summary

If you need to move a large file between two servers in your Azure cloud environment, I highly recommend using Azure Storage Explorer to drop that file onto a storage account, which will complete very quickly as long as your internet speed is normal, and then download that file using ASE as well, which will be equally as fast. There are other methods of copying files between servers that I’ve discussed before, but this is now going to be my preferred method.

Resources

  • https://stackoverflow.com/questions/57729003/blob-code-download-much-slower-than-ms-azure-storage-explorer
  • https://azure.microsoft.com/en-us/blog/azcopy-support-in-azure-storage-explorer-now-available-in-public-preview/
  • https://learn.microsoft.com/en-us/azure/storage/storage-explorer/vs-azure-tools-storage-manage-with-storage-explorer?tabs=windows
  • https://azure.microsoft.com/en-us/products/storage/storage-explorer
Notepad++ Backup Files

This is going to be a short and slightly random post, but this information is something I learned this week that was entirely opposite of what I thought it was so I wanted to share.

What’s in this post

“Unsaved” Notepad++ files are actually saved

When you work with Notepad++, a free and very nice notepad application for Windows, you have the ability to create a lot of new files and leave them unsaved without losing them when closing the app or even restarting your computer. I never really knew how the app managed that and hadn’t thought much about it, but I figured that since I had never officially saved the files to my hard drive, that the information in the files wasn’t saved onto my hard drive and were thus safer from external access than a stored file would be.

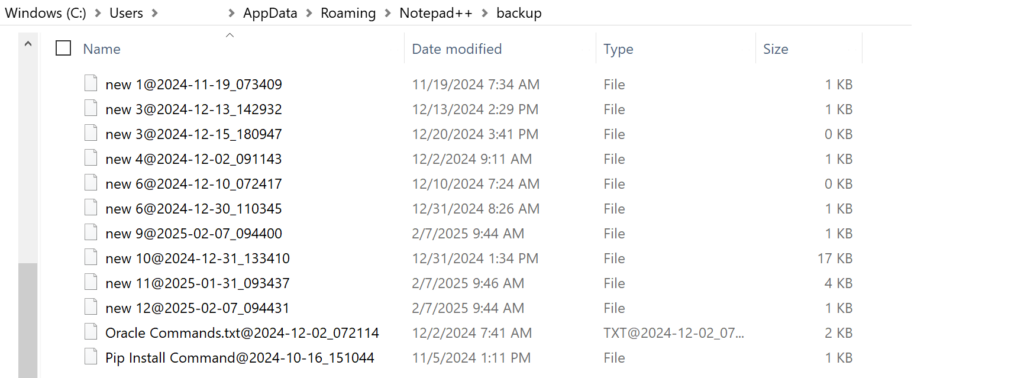
However, this week I learned that I was totally wrong and that the way Notepad++ keeps your “unsaved” files ready for you to use again after being closed is to keep a “backup” saved onto your hard drive. For me, these files were saved in this location: C:\Users\username\AppData\Roaming\Notepad++\backup

This is what I currently have backed up there, which lines up with what I see in the actual application, plus backups of files I closed today which are kept just in case I want them, I guess.

Screenshot showing the Windows File Explorer location for Notepad++ unsaved file backups and my list of backup files
Screenshot showing the tab bar of Notepad++ and my list of open and unsaved files that are being backed up by the application

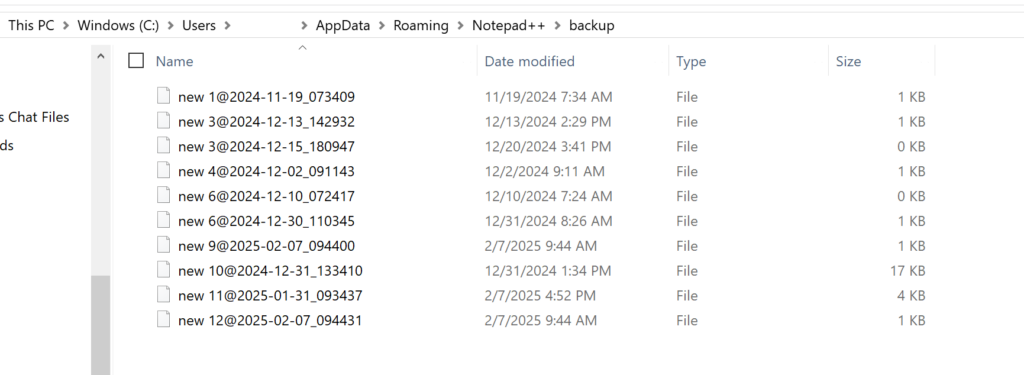
And then if you end up saving the files, like for me I had unsaved changes in the two actually-named files which I then saved, the “backup” files will disappear.

Screenshot showing the Windows File Explorer location for Notepad++ unsaved file backups and my list of backup files, with some now gone from the list after I saved them

I think this is actually a neat feature since it could save you if you accidentally close an important file that you didn’t mean to. But it isn’t some cool loophole for keeping important secret things easily at hand but secure like I kind of assumed. I’m not saying I put secrets into these temp files, but if I was, I definitely wouldn’t be doing it anymore. 😀 Always keep your secrets locked up in key vaults or password tools! The one I’ve started using is Bitwarden and it seems pretty nice and easy to use so far.

Summary

Notepad++ doesn’t use magic to keep your unsaved files available for you to use after closing the app or restarting your computer; it is saving those files in a backup location on your computer. And if you close a file you didn’t intend to before you saved it, you can get that file back from this backup location before you restart your computer.

Adding Entra Authentication to IaaS Server

The other day I needed to verify that some IaaS (infrastructure as a service) SQL Servers (“SQL Server on Azure VMs” as Microsoft puts it) I created for a project a couple months ago were setup exactly as we want them to be before we move them to production in their upcoming upgrade. There were several things I needed to check to ensure the servers match our team’s standards, and one of them was double-checking to ensure that Entra ID authentication is enabled for the servers. I knew that we had worked through all the required steps on the Azure portal to enable that type of authentication, but wanted to validate to make sure I could login to the server with that authentication type. However, what I discovered is that I could not login with my Entra ID account despite Entra being enabled for the server. This was really confusing to me so I set out to figure out why it wasn’t behaving the way I thought it should be and why I could log in with Windows Authentication but not Entra MFA.

What’s in this post

Enabling Entra Authentication for the Server

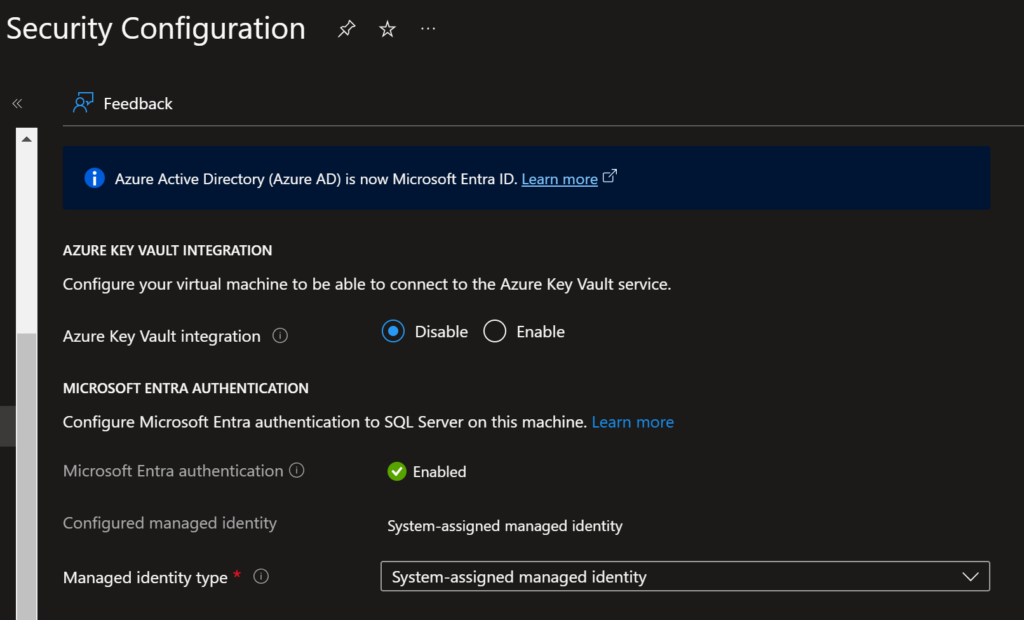
When I originally set up my servers a couple months ago at this point, I know that I fully went through the process in this Microsoft document to add Entra authentication to the SQL Server. But since it had been a couple months, I reviewed everything in the settings for the server and confirmed that it all should be set up to allow me to authenticate with my Entra user when connecting to the server through SSMS. This is what the security configuration page looked like for each of my servers, and it shows that Microsoft Entra Authentication is Enabled.

Screenshot showing the Azure Security Configuration page of an IaaS server with Entra Authentication enabled

Based on that information, I thought that I should be able to login with Entra, yet I still couldn’t. The only way I could connect to the server was to use Windows Authentication. So what was the problem then?

What my problem was and how I solved it

The next step of my troubleshooting process was to login to the server and look at the groups I added for my team so that we can be the admins on the server. For some reason, we have two different groups so I needed to review both of them. What I found when reviewing the logins for our groups is that both were created using the FROM WINDOWS statement, since I had directly copied the logins from the old versions of our servers which were created before Entra authentication was possible for IaaS servers.

Screenshot showing a redacted CREATE LOGIN script using the phrase FROM WINDOWS to create a Windows Authentication type login

That was the problem! The logins for our groups, which are now in Entra ID and we want to use Entra auth to login with, were created as Windows logins which is why I could only login with Windows authentication. Makes a lot of sense.

To resolve this problem and make it so that I can login to the server with Entra instead, I had to drop and recreate the logins using the parameter FROM EXTERNAL PROVIDER, like this.

Screenshot showing a redacted CREATE LOGIN script using the phrase FROM EXTERNAL PROVIDER to create a Entra Authentication type login

Once I made that change, I was then able to login to the server with Entra MFA authentication like I originally wanted. And since I had made multiple servers with this same issue, I had to go and make the same changes on those as well. Super easy to overlook when migrating logins from an older server to a new, but also super easy to fix.

How to tell at a glance if a login is Windows or Entra

There is a super quick way to tell at a glance on your server if a group login is an Entra based group or a Windows authentication based group, and that is to see what kind of icon is given to the login in the Object Explorer list. The icon for the Entra group looks the same as a single user icon, whereas the icon for the Windows group looks like multiple people in front of a server.

Screenshot of a list of logins from the SSMS Object Explorer demonstrating what the Entra ID icon for a group looks like and what a Windows icon for a group looks like

Summary

If you run into a situation where you enabled Entra ID authentication on your IaaS SQL Server instance in Azure yet you still can’t login to the server with Entra authentication, you may want to check to see what type of authentication your login was created with. If you want to be able to login through a user or group with Entra ID, you need to make sure that the login was created with the phrase FROM EXTERNAL PROVIDER instead of FROM WINDOWS.

Quick side note

This form of Entra authentication with IaaS servers in Azure is only available for SQL Server 2022. If you have older versions of SQL Server installed on Azure VMs, you will still need to use Windows authentication for your logins.