Month: January 2024 (page 1 of 1)

How to Set Up and Use Liquibase, Part 2

In last week’s post, I covered the initial setup steps you must follow when starting to work with Liquibase. In this week’s post, I will be finishing up my tutorial of getting started with Liquibase. If you haven’t yet downloaded and set up Liquibase on your computer, please review that post before reading this one.

What’s in this post:

Create the baseline changelog file for your database

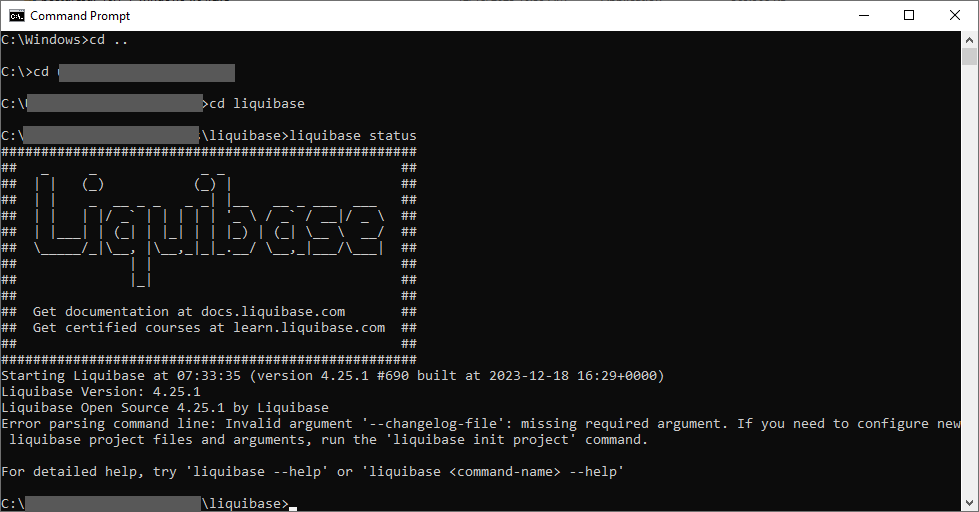
Using the command “generate-changelog” with the CLI for Liquibase, we can create a SQL file containing queries that will regenerate all objects in your database. What database objects get scripted into this files depends on which license you have for Liquibase. If you have the open-source version of the tool, it will script out all non-programmable objects like tables, keys, etc. If you want or need to script out all of your programmable objects such as procedures and functions (plus other items), you will need to have the Pro version of the tool.

Either way, the command for creating the script is exactly the same.
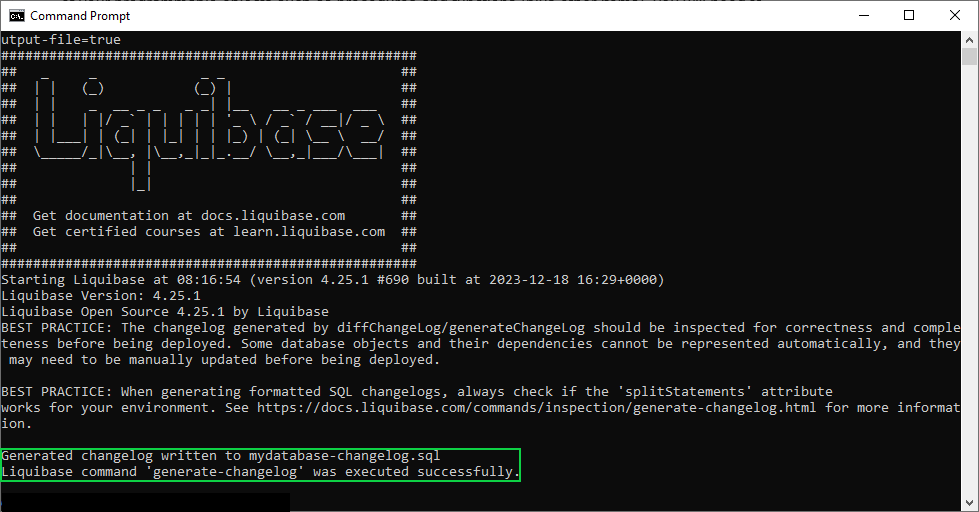
liquibase generate-changelog --changelog-file=mydatabase-changelog.sql --overwrite-output-file=true

Let’s break this command down. The first two words are simple, you’re calling Liquibase and specifying you want it to run the generate-changelog command. The next part is the “changelog-file” argument that allows you to specify the file you want to write the new changelog to. The next argument, “overwrite-output-file” tells the tool if you want to overwrite that specified file if it already exists. In this case, I specified true for that argument because I want the tool to overwrite the example changesets in the file it created upon project creation with the actual queries for my database. After running this command, you should get a success message like the following.

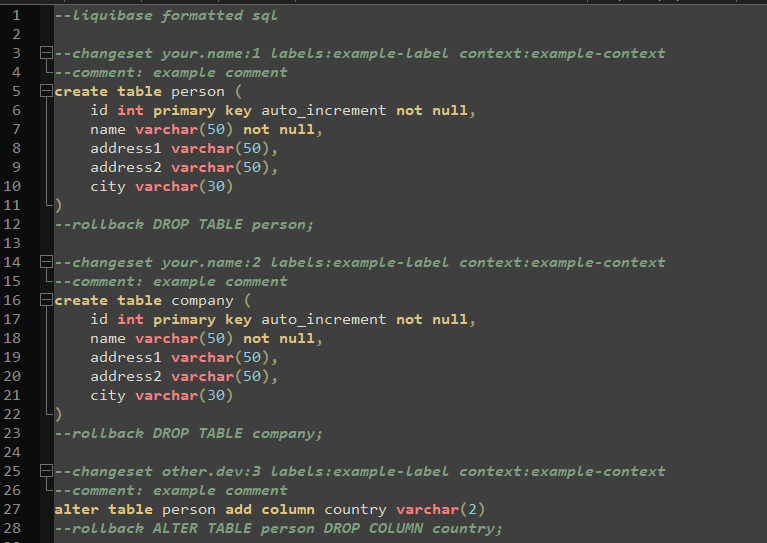
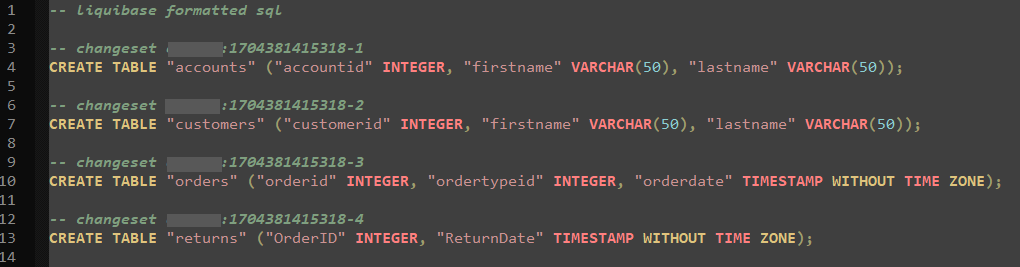
And if you open that specified file now, it should contain the actual scripts to generate all of the objects in your database, each change separated into its own changeset. Each generated changeset will be defined with the username of the person who generated the file, as well as the tracking/version number for the set.

Now you are ready to start doing normal development and changes to your database because you have baselined your project.

Adding and tracking ongoing database changes

There are two methods for adding/tracking database changes with this tool: 1) add your scripts to the changelog file as changesets, then “update” the database with those changes, or 2) make your changes within the IDE for your database (ex: PGAdmin) then use the “generate-changelog” command to identify and script those changes.

Method 1: Adding Scripts to Changelog File

Open your changelog file and add a new line. On that line, you are going to add the required comment that lets Liquibase know you are starting a new changeset. This line looks like “– changeset author:versionNumber”. Example: “– changeset elahren:1.1”. Then, add a line below your changeset comment and add the DDL script you would like to run on your database. Once you have added all the changes you would like to your changelog file, save and close the file, then open the Liquibase command prompt to execute those changes on your database.

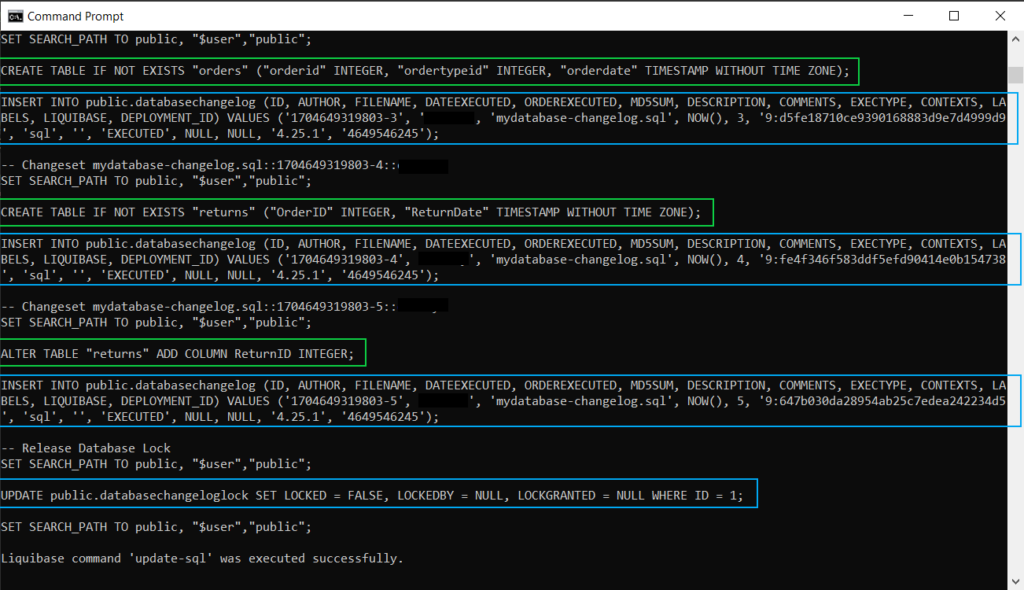
If you would like to preview the changes Liquibase will run on your database, you can run the command “liquibase update-sql” which will show you all the SQL that will be executed, which will include your queries as well as queries Liquibase will run to track what you’re applying. In the below screenshot, the commands with a green square are the ones I included in my changesets, and the commands with a blue square are the ones that Liquibase will run to track the changes.

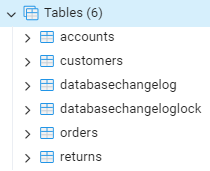
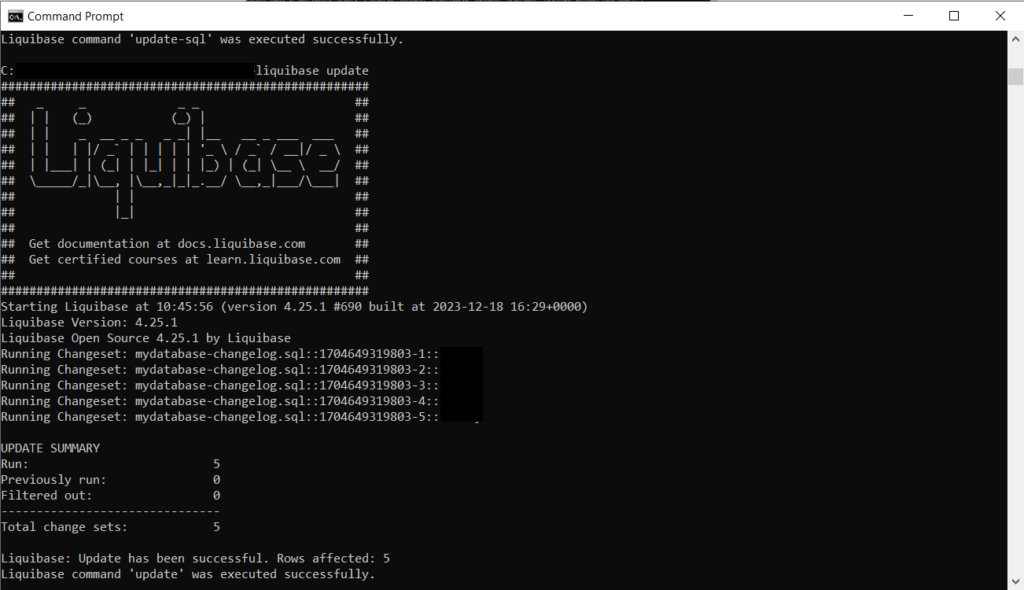
If the preview looks correct, you can then run the command “liquibase update” which will apply all the previously viewed SQL queries to your database. You can verify the changes have been successfully applied by opening your database in your normal IDE (e.g. PGAdmin) and confirm the changes.

Method 2: Make Changes in your IDE

The process for making the changes in your IDE and then tracking those changes in Liquibase is almost exactly the same as the process we used to create the initial changelog file when setting up the project. It is as easy as making whatever database changes you want in your IDE and then opening the Liquibase CLI and running the “generate-changelog” command with either a new file name if you want to put it in a new changelog file, or use the same file name with the “--overwrite-output-file=true” argument.

If you are going to use the first option, writing to a new changelog file, it seems like you will then need to edit the file after creating it to remove any of the queries you didn’t create in your latest changes (since the command will try to recreate all objects in your database).

I’m not sure if this is the recommended workflow for tracking database changes, but it was a feature my team was hoping to get from the database change tracking tools we’ve been investigating, so I found a way to make it happen with Liquibase. If you want or need to have a “database-first” approach to change tracking (making changes directly to the database and then generating files to track that), instead of a “migration-first” type approach (making migration/change scripts and then applying that to your database), it appears that is technically possible with this tool.

Structuring your changelogs according to best practices

You can set up and structure your changelogs in any way that you would like, it’s your project, but Liquibase does have some ideas to help you stay organized. There are two different organization methods they recommend: object-oriented and release-oriented.

Object-oriented means you will create a different changelog file for each object or type of object being tracked in your database (e.g. one file for stored procedure changes, one file for table changes, etc.). I personally don’t like the idea of this organization method since it would mean you could be updating many files each time you make database changes, like if you’re updating procedures, tables, indexes, and views all for one release. However, having all the object types separated could also be a benefit, depending on how you normally complete your work.

Release-oriented means you make a new file for each release you make for your software/database. This method seems more familiar to me personally since it’s similar to the concept of migration scripts in Red-Gate’s SQL Change Automation or Flyway tools, where you can combine multiple database changes you’re making at once into a single file and deploy it all at once. This process could also work for organizations that use a more structured delivery system and not continuous delivery/agile development. That way you could put all of your changes for the week, month, or whatever development length into one file to associate with one particular release.

Whichever method you choose should work well if you set it up properly, the decision of which option to choose only depends on how you work and how you prefer to track that work.

Outstanding Questions

The first outstanding question I have about this tool right now is can you put DML scripts in your changelogs? That is something supported by Red-Gate’s SQL Change Automation and Flyway tools, which is what I’m used to. So far, I haven’t been able to figure out if that’s possible with Liquibase. Being able to deploy DML changes alongside a regular deployment really simplifies the process of some DMLs that you may need to run in your production environment, because it makes sure they go out with the deployment they are related to. An example of this is if you are adding a lookup type table (i.e. AccountTypes) and need to add the few records into that table after it’s created. Normally, you would need to run such a DML script manually after your deployment has completed. But SCA and Flyway allow you to put the DML in a deployable script that will automatically insert that data after the table is created. That of course can come with its own challenges, but it’s something I’ve really enjoyed with Red-Gate SQL Change Automation so I want it to be possible with Liquibase.

The second outstanding question I have about Liquibase is whether or not it can work with a secrets manager for database user passwords. How I set up my test project locally required me to put the password for the database user for Liquibase to be saved in cleartext in the properties file, which is not safe. For my purposes, it was fine since it’s a dummy database that doesn’t have any real data in it. But for production purposes, there is no way we would ever save a database user password in cleartext in a file. I haven’t had the chance to research this question more yet, so I’m not sure if the tool would work with a secrets manager or not.

Summary

When I first started working with Liquibase I was pretty frustrated with it since it was a totally new-to-me tool with documentation I didn’t find intuitive. But I kept working with it because I wanted to make it work for my organization and then just found it interesting to learn more about. I now feel fairly confident working with the tool in the ways my organization would need.

For being a tool with a completely free-to-use version, it seems like it has a good amount of features that many developers might need and could use for tracking and deploying changes to their databases. I can’t honestly say that I would prefer using this tool to Red-Gate’s SQL Change Automation or Flyway tools, which I currently work with, since they have a better use interface and seem to have more intuitive script creation processes. But Liquibase does seem like a useful tool that I could get used to working with given enough time. It’s worth a try to work with if your organization is working with a limited tool budget.

How To Set Up and Use Liquibase, Part 1

In a recent post, I gave an overview of what Liquibase is and what features it offers as a bare minimum. This week and next, I am going to give the step-by-step instructions I followed myself to learn how to properly set up a Liquibase project after playing with it for several hours. I personally found the documentation offered by Liquibase a little confusing, so this post is essentially the notes I took while figuring out what I really needed to do to set up a demo project with the tool. The aim of this post is not to be an exhaustive tutorial of the software, since I am far from an expert of Liquibase. Let me know in the comments if you found any of this useful or interesting!

What’s in this post:

Download Liquibase and install it on your computer

I won’t provide a link to it here (because that would be sketchy), but you can find the tar or Windows installer download for the free (open-source) version of Liquibase on the Liquibase website under Editions & Pricing > Open Source. I used the Windows installer version since I am working on a Windows machine. After you download the installer, you can run it to install the tool. I did not change any of the setup options (there were very few). The installation and setup were both extremely fast.

After the installer runs, you should be able to see where it was downloaded, which for me, was under Program Files. Now you can start working from that downloaded folder for the program, or you can copy the entire folder to another directory so you can play around with it without the fear of breaking something and then having to reinstall everything to fix issues. I made a copy in another location and worked from that copy (which was suggested by one of the Liquibase tutorials).

Verify that Liquibase is properly installed on your computer

The next important step is to verify the status of the tool to make sure it installed correctly. To do this, you want to open a command prompt window and navigate to the directory of the liquibase folder that you want to work with, then run the command “liquibase status“.

As you can see in the above screenshot, although I had an error returned by the “status” command (since I haven’t setup a Liquibase project yet), the tool did run and work (as evidenced by the giant Liquibase printout). Download and installation of the tool was successful.

Create your first Liquibase project

Creating your first project is simpler than I originally thought it was. I knew that at a bare minimum, a file called “liquibase.properties” needed to be created, but I thought that I had to do that manually (mostly because I did skip a page or two in the documentation that I thought weren’t needed). Although it is possible to create that file manually and then manually enter the necessary values to create a project, the easiest way to setup a new project and all of its necessary files is to use the “init” command, “liquibase init project“.

That command will run you through the process of setting up a new project, including setting the necessary values for the liquibase.properties file. If you are fine with using all default settings for your project, specify “Y” when prompted, otherwise specify “C” which will allow you to customize the values used by the project so you can work with your own database.

What I specified for each of the setup prompts:

  • Use default project settings or custom? Custom, “C
  • Relative path for the new project directory? In the main Liquibase folder, not in a subfolder, “./” (I would likely change this for an actual development project if I was creating one for work)
  • Name for the base changelog file?mydatabase-changelog“, but you can set it to whatever makes the most sense to you. I definitely wouldn’t use that format for an actual work project if we move forward with this.
  • Changelog format?sql” since I am working with a normal SQL database
  • Name of default properties file?liquibase.properties“, the recommended name, but you could change it to something else
  • JDBC URL to the project database?jdbc:postgresql://localhost:5432/postgres“. This points to the database called “postgres” on my local machine, which is a PostgreSQL database so it uses that type of connection string that I specified. Other database engines will have their own connection string format.
  • Username to connect to database? “Postgres”, the default user for a new PostgreSQL database, which is what the project should use to interact with the database. You should change this to a better-defined user just for the Liquibase tool.
  • Password? The password associated with the specified user. For real-world purposes, I hope we’ll be able to use a secrets manager tool to update that file for deployment purposes so that we don’t have to specify that in clear text in the file.

New Project Files

After you go through all of the above steps, Liquibase will have created several new files for you. I am not sure what most of them are for at this point, but I think some of the other files besides the properties file that were created are used for CI/CD integration (flow files). The properties file I created for my project now looks like this after my project setup:

If you have a license key for the enterprise/Pro version of the software, you can scroll to the bottom of this file and uncomment the line “liquibase.licenseKey:” then add your license key after the colon on that line.

You can also review the default changelog file created by Liquibase if you specified that during project initialization. For me, the file contains some sample changesets that don’t relate to my actual database:

These are the tables in my database for the Liquibase project:

To set up this file to represent your database, we’ll need to use the “generate-changelog” command on the project, and I’ll walk through that in the next post.

Database changes made with project initialization

As you can see from the last screenshot above showing what tables I have in my database, there are two tables called databasechangelog and databasechangeloglock. Those two tables will be created in your project database when you connect Liquibase to the DB because that is how the tool keeps track of what changelogs and changesets have been applied to the database already. You can also prevent some changes from being executed when the changelog is applied, and those changes will be tracked with the “lock” table.

You are now ready to start making changes to your database and tracking those changes with Liquibase!

A quick note about changelogs and changesets

The changelog is the main file (or files) that contain the queries you use to interact with your project database. You can have just one or you can have a series of changelogs, each used for a different part of your database.

Each changelog file contains what Liquibase calls the changeset, which is a single unit of change for your database, like an ALTER TABLE statement or any other DDL statement you can run against a database. A changeset is identified in the changelog file with a comment line which will contain the change’s author and then a change number which can essentially be any number you would like to track the changes. If you use the above steps to have Liquibase create your first changelog file for you, it will create a randomly generated version number for each of the queries listed in the file. This number will determine in what order the changes will be applied.

Summary

In this post, I covered how you go about setting up your first Liquibase project and what each of commands and files related to that means. This tool is surprisingly simple to work with, as can be seen with the initial setup process. Next week, I will be covering what you do now that you have the tool successfully installed and set up on your computer.

What’s in the next post:

  • Create the baseline changelog file for your database
  • Adding and tracking ongoing database changes
    • Method 1: Adding scripts to changelog file
    • Method 2: Making changes in your IDE
  • Structuring your changelogs according to best practices
  • Outstanding questions
  • Summary

More Postgres vs. SQL Server

Welcome to a coffee break post where I quickly write up something on my mind that can be written and read in less time than a coffee break takes.

As I’m getting further into my PostgreSQL adoption project at work, I am continuing to learn about so many more small differences between Postgres and SQL Server that I never would have expected. None of the differences I’ve found so far are profound, but they will pose challenges for all the developers we have (including myself) that have only worked with SQL Server.

Postgres does not have default constraints

That’s right, there is no way to make a default constraint on a Postgres table, instead you make a default value, which cannot have a name assigned to it. In SQL Server, you can define a default constraint in essentially the same way as you would define a unique or key constraint and you can give that constraint a name. In Postgres, you simply specify that a column has a default value when adding that column to a table. In theory (I haven’t tested it yet), the generation of default values works exactly the same between the two engines, one just isn’t saved as it’s own script or file with a name.

The index differences are amazing (and confusing)

I’m not going to lie, the prospect of figuring out when to use what kind of index with Postgres is daunting to me. Deciding which type of index to use with SQL Server is very straightforward, since you only need to know if you already have a primary key/clustered index on the table already and then go from there. You pretty much only have clustered or non-clustered indexes in SQL Server. But Postgres has a handful of different possible options and you need to better know how the data will be queried in order to pick the best one. The default/usual best option seems to be a B-Tree index, which is comforting and familiar, but one day I know I’ll likely have to figure out the other options as well.

The default length of object names is really short

Of these three new items I learned recently, I think this one is going to be the most annoying. The name length for objects in Postgres is surprisingly low, only 31 characters. The max length for objects in SQL Server is much longer. I’m mostly concerned that we’re going to need to figure out how to rename many long object names as we migrate off SQL Server, and that could be tedious. But we’ll see how that goes. I read somewhere in my research that you may be able to change this default length, so that will need to be something else for me to research.

What is Liquibase?

Liquibase is a tool used to track and deploy changes to databases. It can connect with Git and other software, including CI/CD software, allowing your team to collaborate and track changes to your databases. There are several different software options similar to (and even better than) Liquibase, but what makes this tool unique is that it has both an open source version, which could benefit smaller organizations that don’t have as much cash to spend on database software, and a “Pro” version, which gives more features for those who need it and can pay the additional cost.

I’m currently reviewing this software and playing with it for a project at work, and I’ve found it a bit challenging to figure things out from the Liquibase websites and documentation. I’m summarizing my findings here not only for others who may read this in the future but also to help myself get everything organized and clarified in my mind. This will be a two-part series of posts, with the second providing a deep dive into how to use Liquibase with your database.

What’s in this post:

  • Why would you want to use this tool?
  • Features of open-source edition
  • Features of Pro edition
  • How to get 30-day free trial of Pro edition
  • Other options for similar tools

Why would you want to use this tool?

You want to be able to track and manage changes happening in your database

In the modern development process, all code, including database code, should be tracked using source control. Using source control enables you to have a complete history of what changed when, and who made that change. Having this level of tracking can be great for overall documentation of what you have in your systems, but it can also help immensely in troubleshooting bugs and other issues in your code to find when an issue started happening. It also enables you to quickly revert any bad or unintended changes without having to update all the code again manually. This is a well-known and well-used system in the software development realm but doesn’t seem to be quite as popular in the database realm, at least from my own experience. Liquibase can help organizations start on this journey.

You want to automatically deploy database changes to multiple environments

When you first start using Liquibase, you can generate a changelog file that acts as a baseline for recreating the database, with the file containing all of the SQL queries necessary to recreate all objects within the database. Then, as you make more changes, those will be added to one or more files that can be tracked with Git or other source control to help with deployments and change tracking of your system. If you are looking for a way to automatically deploy your database changes through pipelines, Liquibase should be able to help with that, although I haven’t gotten that far in my project so I can’t say for sure. But based on how the tool is set up, you should be able to use the software on a build and deployment server and have it execute the changelog scripts you create on databases in other environments. You can read more about the integration with CI/CD systems on the Liquibase website.

You need a database change-tracking tool that works with multiple database engines

On the Liquibase website, they claim they can work with over 50 database engines, which is a huge claim to make and an accomplishment to have. There are very few other options for this type of tool that can claim to support more than just SQL Server, let alone 49 other database options. I am looking at this tool exactly for this reason because I need to be able to manage database changes on at least SQL Server and PostgreSQL going forward, and perhaps others if needed since it supports so many different options. At this point in my current tool exploration project, I have only played around with the tool and how it works with Postgres since that’s the future my department is looking at, but I’m sure it would be just as simple to set it up to work with a SQL Server database as it has been with Postgres.

Features of the Open-Source Option

I’m not going to go through and list every single one of the features of the open-source version of Liquibase because you can see that on their website. Instead, I will discuss the features I am interested in and why I think it’s interesting that those features are available completely for free.

Run Preconditions Before Executing SQL Changes

The concept of the preconditions interests me because it almost combines a custom system my department uses to validate data with the change tracking and deployment of changes. Although I haven’t had a chance to use the preconditions in my testing yet, it looks like a cool feature because it allows you to validate data using a SQL statement before the next change query is executed. For example, if you are adding an ALTER TABLE statement to your changelog file to drop or change a column, you can first add a precondition that will check to see what the data looks like in the column to ensure it doesn’t run if data exists in the column. With the precondition for SQL files, you specify an expectedResult value and then the query you want it to run, and if the results of the query don’t match the expectedResult value, it will fail the execution of the file and the changes won’t get deployed. This would be very useful for ensuring you’re only running code in the scenarios you want it to be run in.

Preview SQL Changes Before Running Them

I’ve already used this feature in my testing to see what exactly Liquibase is doing under the hood when I run certain commands and apply changes, and it seems useful to me. I, like a lot of database developers, am paranoid about knowing what exactly I am about to execute on a database, so Liquibase provides that capability with the command “update-sql” which will print out in the CLI all of the SQL queries that will be executed when you apply the existing changelog and changesets to your database, including the ones that the tool runs in the background to track the changes in the two log tables it uses.

Automatically Detect & Script Change for Non-programmable Objects

When I was first working with Liquibase for my proof of concept project, I thought that the command to automatically generate changelogs based on the current state of the database was only available in the Pro version. But I finally figured out that my assumption was incorrect, you can use the “generate-changelog” command even on the open-source version, but it will only generate queries for what I call non-programmable objects, everything but functions, procedures, etc. If you are working with the open-source version of Liquibase and use the “generate-changelog” command, it will generate a new changelog (or overwrite an existing one if you specify an argument) containing SQL queries to recreate every object in your database that isn’t one of the programmable type objects.

I was happy to find this command in the Liquibase arsenal because it’s a working method that my department uses regularly with our current database change management and source control tool. The normal workflow for a developer making a database change is to go into the database, make the change using SSMS, and then use our existing software to automatically detect the change and generate a migration script to track and implement that change upon deployment. This was a workflow that I was hoping to not lose as we change tools, and it looks like we won’t lose that if we switch to Liquibase. In my next post, I’ll cover both of the two different methods of creating and tracking changes with Liquibase, which each have a different angle of attack for where to make the change.

Features of the Pro Edition

I have been working with a 30-day free trial of the Pro edition of Liquibase to see what features it offers in that edition that we might need. If you would like to see a full list of the upgrades you can get with Liquibase Pro, visit their website to compare it against the open-source version.

What I found while working with the tool is that you do not need the Pro edition to use the command “generate-changelog” like I originally thought. If you would like to be able to automatically script out programmable objects like stored procedures and functions, you will need the Pro version for that. However, if you only want this tool to track changes to tables, foreign keys, primary keys, and other constraints (see the documentation for the entire list), then you would be fine to use the open-source edition of Liquibase.

Another big feature of the Pro edition that most people are probably interested in is that it is the only version of the software that you can integrate with CI/CD tools to do automatic deployments of the code you’re tracking with the tool. This feature would be a big one for my company since I doubt we are okay with going back to manual deployments of database code across dozens of databases in multiple environments.

The final reason you might choose the Pro edition over the open-source edition is that you can get a much greater level of support from the company with the Pro version (which makes sense). Pro comes with what they define as “standard” support which is through email. If you would like more advanced and involved support, such as 24-hour emergency help, you can add that to your subscription for an additional cost.

How to get a 30-Day Free Trial of Pro

If you would like to try out the Pro version of Liquibase to see if it meets your needs, they do offer a 30-day free trial through the website. You will need to go through the process of giving your email and other contact information, as well as setting up an appointment with one of their representatives to get the license key. In my experience, since my company is seriously considering this tool as an option and I can’t do the contact or negotiation for licenses (someone else handles that), I went through the meeting setup process but then contacted the representative and told them I would be unable to make the appointment, and still received the trial license through an autogenerated email. As of writing this, I still haven’t been bombarded by sales emails or calls from the company which I appreciate. It’s nice to be able to try out the full version of the tool without being harassed for it.

Other options for similar tools

While there are other very expensive options for database change management and tracking software available, Liquibase seems to be unique in that it offers a lot of useful features without requiring you to pay for them. They outcompete the other free options by a long shot since they can work with different database engines. It’s hard for them to compete with options like Red-Gate SQL Change Automation or Flyway since those tool suites are robust and expensive, but they are a viable option for people who don’t want to be stuck paying thousands of dollars per year for this type of software.

To see a more complete list of alternatives for this type of software, you can review the list that originally helped me in my search at DBMSTools.com.

Want to learn more details about how to work with Liquibase?

Next week, I will be posting about how specifically to set up and work with Liquibase since the startup documentation on their website was scattered and hard to move through as a beginner with the software. I thought I would make it easier for others to learn how to work with this tool by posting the notes I made while working with it.